Tuesday, April 23, 2013

Addicted to CAS: A Big Dahlia Bday

The current challenge at Addicted to CAS is the code word: Flower.  I added a personal challenge - that I absolutely could not use some of my much-loved flowers - I had to find one that hadn't seen ink!

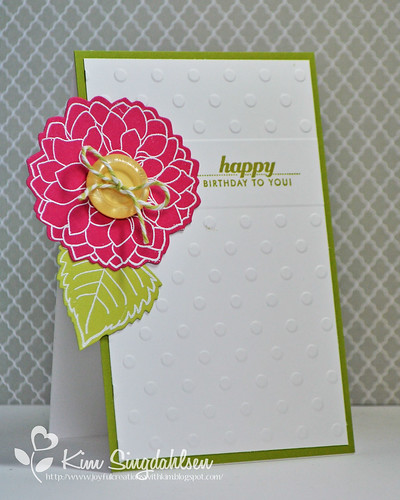
Happy Bday with a Big Dahlia


Now I'm not sure why this stamp had never seen ink!  I love its open and airy look.  I can also imagine it stamped on plain paper and some subtle watercoloring for a elegant look.  However, it is big and I had a really difficult time getting it to look right on a standard card.  I decided to really showcase it by cutting the card down about an inch and then letting the flower hang over the edge.  The whole thing is still just 4 1/4" wide so it will fit into a standard envelope.

  • Stamps: Papertrey Ink Delightful Dahlia, sentiment from Pretty Peonies
  • Paper: Papertrey Ink Simply Chartreuse, Limeade Ice, Raspberry Fizz
  • Ink: Papertrey Ink Simply Chartreuse, Versamark
  • Accessories: Papertrey Ink Delightful Dahlia dies, Lemon Tart Button, The Twinery Honeydew twine, Cuttlebug embossing folder

Monday, April 22, 2013

celebration ice cream cake


We recently returned from a ten day trip to California. Before we left, we had a little birthday celebration for Ella with some of her giggly, silly, darling schoolmates. I hadn't planned on a "friends" party, but Ella must have caught me on a good day and I agreed, even though it was quite late in the game.


This "cake" could not have been more simple to make. My sweet daughter-in-law Tayler, came over to help me with the party preparations and we seriously put this ice cream cake together in about 15 minutes. We were so pleased with how it turned out and it was a huge hit with both the girls and adults.


My Ella isn't a big cake eater, but she'll never pass up ice cream. And adding sprinkles to anything makes it an instant party, especially for a bunch of six and seven year olds. :)

We used 11 Fat Boy ice cream sandwiches. Make sure whichever brand you purchase has the ice cream go all the way to the edges of the cookie part--some don't. 

Step 1.
Cover all four sides of the ice cream sandwiches with rainbow sprinkles. (We poured a layer of sprinkles in a jelly roll pan and set each side of the sandwiches in them until covered.)

Step 2.
Layer ice cream sandwiches in four layers on a cake plate like this:
Layer 1. Arrange sandwiches about 1" apart for the base.


Layer 2. Arrange sandwiches close together at an angle.
Layer 3. Add two more centered side by side.
Layer 4. Place the last sandwich at an angle centered on the last two.

Store in the freezer until ready to serve. Another thing I love about this ice cream cake, is that the portions are already made, so you just lift and serve.

Simple and delish--my favorite kind of treat. Enjoy!

Post also shared at:
the 36th Avenue
Chic on a Shoestring 

who inspires you?

Are you playing along with the Heidi Swapp Memory Album free 8 week class?
It was my turn this week to present my 4 pages of the album. I was given the topic of who inspires you! It was easy for me to pick those who are my greatest inspiration!
Starting with my husband..


The scrappers who past and present have influenced me...

 The girls on the Heidi Swapp and Greatest View DT's, my good friend Lydia and my first scrappy crush Laura Vegas.


The tag swings up behind the photo when the previous page is in view.


My eldest son who is very artistic!
Love this Greatest View flair!

 
 I have a tutorial on the Heidi Swapp blog sharing how I created these splotches!


My youngest son who inspires me to play!


I created the subway art using the iphone app  Subway Art Maker!


My best friend who inspires me to be a better mum!


I do hope you have been inspired and I would love to see your version don't forget to link up on instagram and hashtag hsmemoryfileadventure.
Photobucket

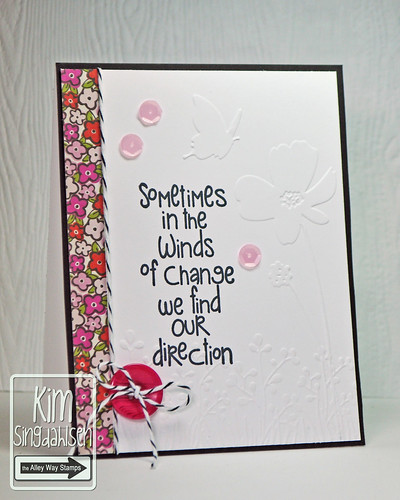
Sometimes in the Winds...

Only six more days and I am done with my Marketing class that is taking up so much of my time!  Yeah!!

I've also been taking an accounting class which has a fairly fun final project.  Yes, I do think playing with numbers is fun, but in this case I also have to describe a simple "manufacturing process" (the prof's example was making chocolate chip cookies to sell at a bake sale) and then follow the accounting through the process.  (FYI: what I've discovered so far in this class is that the "manufacturing process" may be simple, but accountants have managed to make the numbers part really, really complicated!)  Well...I don't bake...but I do make cards!!  So I get to describe my favorite hobby - this will be easy!!  But I am also a little nervous about gathering together the "costs" of the hobby!!

Today is my day to post over at The Alley Way Stamps (TAWS).  It's my last official April post before the countdown begins for new May stamps (countdown starts Saturday at the TAWS blog; I don't post until Monday, then a full blog hop on Tuesday).  I have really liked playing with the sentiments in Life is Short.  This one is my favorite (although I do wish that the wind would settle down a bit at my house.)

Sometimes in the Wind
  • Stamps: The Alley Way Stamps Life Is Short
  • Paper: American Crafts Soho Garden 6x6 pad
  • Ink: black
  • Accessories: Papertrey Ink Raspberry Fizz button, Divine Twine Black Licorice, Darice Butterfly on Flower embossing folder, sequins are from a mixed bag from the Etsy shop Endless Inkabilities

Sunday, April 21, 2013

A bloglovin'/Google Reader update

I've written a number of educational posts on these issues.
Click here to see each of them.

First - in answering an email question, it became apparent to me that not everybody knows what Google Reader is.  Let me tell you what it is NOT - if you are reading your blogs in blogger/blogspot - you are not using Google Reader.  Google Reader is a separate program.  So if I were you - I'd stay where you are until the dust settles.


Second, if bloggers are moving to bloglovin', you do not have to go there to continue to follow them.  Choose the blog reader that you like and that works for you - read in blogger/blogspot, go to feedly, go to bloglovin' - that's your preference - you can read any blog in the reader you choose.


Third, an important update on a bloglovin' problem:

There are blogs that can't be found in bloglovin' even though these blogs use blogger like so many of us and the blogs are found by Google Reader and feedly.  

(Some people are believing that you have to sign up for bloglovin' so that others can read you in bloglovin' - not true - so that is not the problem here.)

A blog friend reported that her blog was one that got "lost" and I got this wild idea to see how big this problem was.  I imported all of my Google Reader info into bloglovin'.  It turns out eight of all the blogs I read didn't import into bloglovin'!!.  Six of those actually let me add them manually - after I went to the work to figure out which were missing - YUCK.  But two of them are seriously broken.  For your information - because you most likely read them too - the two blogs that don't work are:

Always Playing with Paper - the talented Lesley Croghan and the home of Merry Monday
GIBMISS - the wonderful Sylvie who takes all of her pictures using her Gibraltar ocean view in the background!

FYI - if I comment on your blog with any regularity, 
you are in my list of blogs 
so I have double-checked you and you work!!

I'm not trying to insult bloglovin' because the simple fact is that all of these Google Reader replacements are frantically programming to accommodate everybody who is moving over and they are all having issues, but I am really upset for these ladies because:

1.
Bloglovin' didn't give any warnings that they were lost if you did an import from Google Reader.  Their followers do NOT know that they lost them.  Bloglovin' really needed to say "oops...some of your blog feeds can't be read by bloglovin'".

2.
They can't currently be added manually - you just plain and simple can't get them in bloglovin'

3.
Bloglovin's customer service only speaks techie.  We don't speak techie.  They say the rss feed isn't working correctly and you should contact your blog portal (which they say isn't blogger???) then they say try feedburner which is another place that only speaks techie!!  (My son's high school web design teacher is trying to translate for us!)


I will let you know when there is an answer - so you can re-add these wonderful blogs and any others that might be lost.

----------------------------------------------------------------

If you have moved to bloglovin' and imported your blogs from Google Reader - I would STRONGLY recommend that you check that all of your favorites came over!!!

If you have the same experience that I did, you can add a bunch of them back to bloglovin' manually - you just have to find them first.

If you are going to check - let me give you a few tips, because I learned a lot of hard lessons when I checked my blogs this morning - it took me forever.  Bloglovin' made some strange decisions when they designed their Google Reader import:

The short version - bloglovin' does not bring all the blogs over in the same folders or under the same names that you had them in in Google Reader!!!

The details -

1. Bloglovin's first priority is "blogger-following".  Those are the people that you clicked the "follow" button on.  When you click that follow button, those blogs show up in your blogger/blogspot dashboard and you could read from there.  The problem with putting this first priority is that bloglovin' then does not import the folder that you used in Google Reader.   If you think blogs are missing from a one of your Google Reader assigned folders, check bloglovin's "blogger-following" category they may be there!!  (You can clean this up by clicking on each blog and changing its category.)

2. Bloglovin' seems to be pulling "original" information in a couple of ways.

          a. Original blog names - if a blog has a newer name, it came over with its old name.

          b. Original folders - if you put a blog into a folder in Google Reader, and them moved it to a different folder, it comes over under the first folder.

So it's a bit of a hide-and-seek game - hopefully these hints will help!!
Rainbow Chard and Saffron Omelets

My husband and I just returned home from a very tasty trip to Mexico.  We enjoyed many delicious meals, but the thing we looked forward to most was breakfast.  Our resort had a phenomenal breakfast service.  All of the food was authentic, homemade, fresh, colorful, brimming with flavor, and very exciting.  My husband was a fan of their omelets.  Each morning he would have an omelet stuffed with beautiful bright red chorizo, sliced jalapenos, pico de gallo, and a very melty and delicious chihuahua cheese.  My personal favorite was the Red Chilaquiles topped with sliced red onion, crema, and queso asadero.  On the side I always had a serving a refried beans, the perfect combination with chilaquiles.  To wash it all down I drank the most amazing cantaloupe agua fresca.  Total heaven!
 
On the plane ride home we had a lengthy discussion about how much we were going to miss breakfast in Mexico.  We decided it was time to spice up our breakfast routine and add a little color and excitement to our mornings. These rainbow chard and saffron omelets are a real labor of love but they definitely fit the bill when it comes to shaking things up.
 
Herb-infused omelets are stuffed with colorful ribbons of rainbow chard, tiny saffron-kissed potato cubes, and a layer of cream cheese. The delicate omelet is filled with flavor from all the herbs, the filling is earthy and hearty, the cream cheese brings it all together, and the hint of saffron definitely adds a complexity that otherwise wouldn't be there.  I thought the filling would be the dominant flavor in this recipe but the paper thin omelet packs a lot of flavor with all those herbs. All in all, this dish has a very good balance and is very unique and delicious.


Rainbow Chard and Saffron Omelets
 Adapted from Plenty
by Yotam Ottolenghi
Serves 4

1 medium waxy potato, peeled and cut into 3/8-inch dice*
1 cup water
pinch of saffron threads
3/4 lb Swiss or Rainbow Chard (stalks and leaves), shredded
salt and pepper
2 tablespoons lemon juice
1 garlic clove,minced
5 eggs
1/4 cup milk
2/3 cup chopped herbs (tarragon, dill, parsley)*
about 4 teaspoons vegetable oil
1/2 cup cream cheese, room temperature OR creme fraiche, cold

*Note: I used a yukon gold potato
*Note: Use whatever combination of herbs you like.  I used parsley, baby dill, and chives


Put the potatoes, water and saffron in a large pan and bring to the boil.  Simmer for 4 minutes, then add the chard, minced garlic, and some salt and pepper.  Continue cooking, covered for 10 to 15 minutes, or until the potato is soft.  Drain out any excess liquid that is left in the pan.  Off the heat, add the lemon juice and garlic.  Leave to cool.  

Whisk together well the eggs, milk, herbs and some salt and pepper.  Pour 1 teaspoon of oil into a hot, 9-inch nonstick frying pan, then use one-quarter of the egg mix (about 1/4 cup each) to make a thin round omelete.  Transfer to paper towels.  Make three more omelets in the same way.   Leave to cool down.  Note:  I found it was easiest to use about 1 teaspoon of oil for each omelet.  I have an electric stove and set mine to about 3 or 4.  The omelets cooked very fast.

Divide the cold creme fraiche, or cream cheese, among the omelets, spreading it over one half of each.  Taste the chard mix and adjust the seasoning, then spread generously over the creme fraiche.  Fold each omelette over in half, then fold again to get a fan shape.  Allow the chard mix to show at the open side.  Arrange the omelets in a lightly oiled ovenproof dish or on a baking sheet.  (Keep in fridge if making ahead.)  When ready to serve, preheat the oven to 325F.  Place the omelets in the oven for 5 to 8 minutes, or until hot.  Serve at once. 

Saturday, April 20, 2013

Get Well Quilts

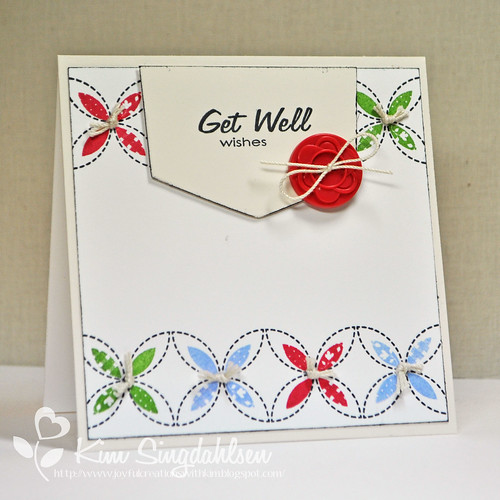
When I was young, I had a "sick quilt".  It only came out when I didn't feel well.  One side was silky smooth and the other was rougher with hand-tied tufts.  I remember my mom saying that she could tell just how sick I was by which side I was cuddling with.  As an adult, I've tried to find a new "sick" quilt for my family - but it just never has measured up to my childhood blankie.

WPlus9 recently came out with a quilt-building set that I just had to have for get well cards.  This first card is a tribute to my blankie.  I am not sure that I love it as a card - but I do love it as a memory!  (Check out the little "tufts"!)

Get Well Quilt

I was inspired by the WPlus9 Mood Board.


And I used the sketch from Freshly Made Sketches.


  • Stamps: WPlus9 Quilt Prints, A Pocketful (sentiment)
  • Paper: white and Papertrey Vintage Cream
  • Ink: Stampin' Up Real Red, Gumball Green, Bashful Blue
  • Accessories: WPlus9 Pocketful die, October Afternoon button, cream crochet thread