Showing posts with label recipes. Show all posts

Monday, April 22, 2013

celebration ice cream cake


We recently returned from a ten day trip to California. Before we left, we had a little birthday celebration for Ella with some of her giggly, silly, darling schoolmates. I hadn't planned on a "friends" party, but Ella must have caught me on a good day and I agreed, even though it was quite late in the game.


This "cake" could not have been more simple to make. My sweet daughter-in-law Tayler, came over to help me with the party preparations and we seriously put this ice cream cake together in about 15 minutes. We were so pleased with how it turned out and it was a huge hit with both the girls and adults.


My Ella isn't a big cake eater, but she'll never pass up ice cream. And adding sprinkles to anything makes it an instant party, especially for a bunch of six and seven year olds. :)

We used 11 Fat Boy ice cream sandwiches. Make sure whichever brand you purchase has the ice cream go all the way to the edges of the cookie part--some don't. 

Step 1.
Cover all four sides of the ice cream sandwiches with rainbow sprinkles. (We poured a layer of sprinkles in a jelly roll pan and set each side of the sandwiches in them until covered.)

Step 2.
Layer ice cream sandwiches in four layers on a cake plate like this:
Layer 1. Arrange sandwiches about 1" apart for the base.


Layer 2. Arrange sandwiches close together at an angle.
Layer 3. Add two more centered side by side.
Layer 4. Place the last sandwich at an angle centered on the last two.

Store in the freezer until ready to serve. Another thing I love about this ice cream cake, is that the portions are already made, so you just lift and serve.

Simple and delish--my favorite kind of treat. Enjoy!

Post also shared at:
the 36th Avenue
Chic on a Shoestring 

Wednesday, April 10, 2013

a simple treat: rice krispie pops


My Ella Bella turned SEVEN years old this week. I'm amazed at how quickly she's growing up. She's certainly grown-up enough to make the big decisions in life, like what she wants for a classroom treat on her birthday.


Ella loves Rice Krispies treats. We found a huge box at Costco for like $7.99 with the instant rebate. I wanted to make them a little extra special, so with the help of my daughters-in-law, Ashlee and Tayler we made them into pops--with sprinkles. Because around here, sprinkles make everything an instant party. :)

INGREDIENTS:
Store bought Rice Krispies Treats
4 1/2" sucker sticks
Rainbow sprinkles
Parchment paper or wax paper
4 x 6 1/2" treat bags
Ribbon

DIRECTIONS:
  1. Insert the sticks in the end of the Rice Krispies Treats about 1 1/2". 
  2. Spread a thin layer of sprinkles on parchment paper, and lightly press one side of the RK Treat into it. (If you want to add more sprinkles, just find a different spot on the paper with more sprinkles and press again.)
  3. Add to a treat bag and tie with ribbon.
Seriously, so simple and so darling. I was afraid some of the boys might think the pink ribbon was too girly, but Ella assured me they would still eat the treat. Apparently, she was right, because she said the kids all thought these pops were tops. :)

Also shared at:
Oh My Creative!
Chic on a Shoestring 

Wednesday, March 13, 2013

RS birthday celebration 2013


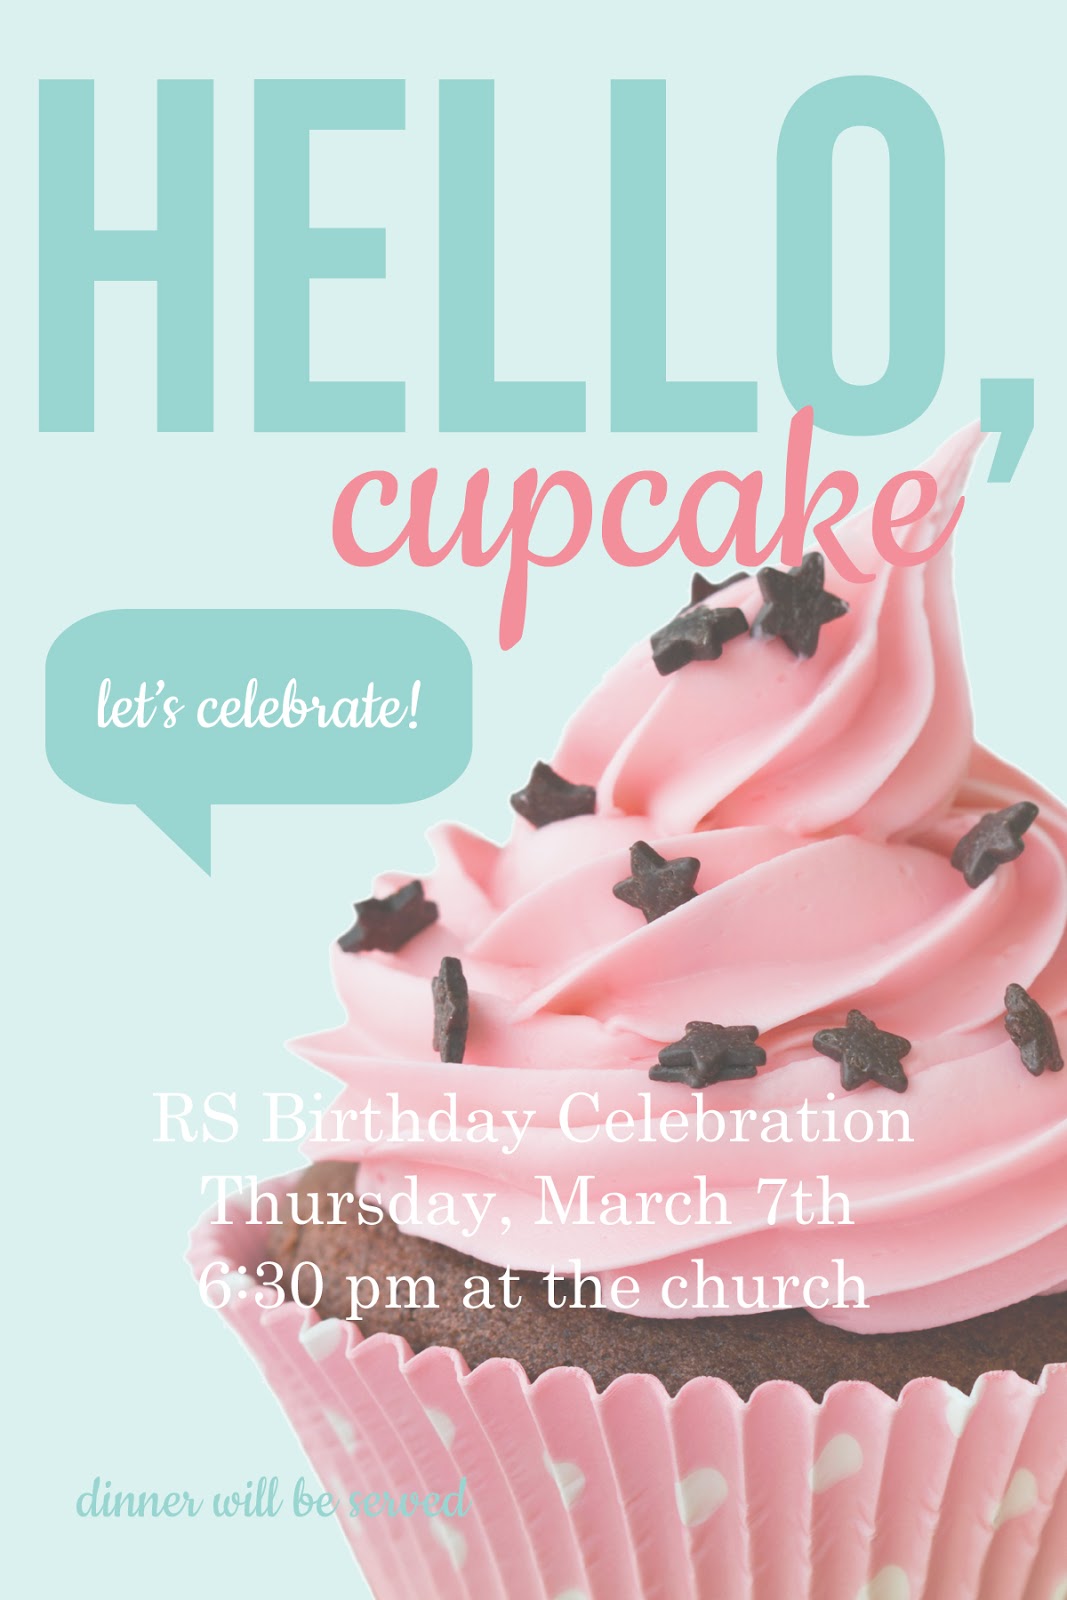
Our annual Relief Society birthday celebration was last week and I would chock it up as a great success. Our theme was "Small and Simple Things."

I have to admit, this are my favorite invitation I've created to date. I feel like I'm coming into my own style and loving it. :)

I've always been one to take a great idea and tweak it to fit my needs or make it my own. I've realized that's not the case with everyone. So many of you contact me wanting to recreate what we've done for our Relief Society meetings, and I think that's great! I'm flattered, actually. So from now on, I'll share as much as I can. :)


Our decor was super simple. We've had a very, very long winter here in Utah, so we wanted something that shouted spring. These balloon flowers are bright, cheery and large enough to not get lost in a gigantic cultural hall. They're also easy to make. I love the colors Tracy chose--pink, orange, and teal. We strung them across the cultural hall on fishing line. (Note: Tracy used 9" balloons since they were the only ones available. If we had to do it over, we would have blown up the flower centers a little larger to hide the tied together mess better.)

We ended up getting triple duty from the balloons. My friend Crystal, told me her daughter Abby was having a birthday party two days after the social, and that the balloons were the same colors as the invite and decorations. I told her to take them when we were done. She was thrilled. Crystal then took them to Tracy's home, who used them for her daughter's party the next day. Love it!

The streamers were cool too. Tracy made them from plastic table cloths she cut it strips, then pulled on the edges to "ruffle" them. The cost of decor for the night ended up being minimal.

I had these lanterns from Patrick and Ashlee's wedding last year. They lined the walkway to the reception center. I just added a simple pink sheer ribbon bow and set them in the center of the tables.


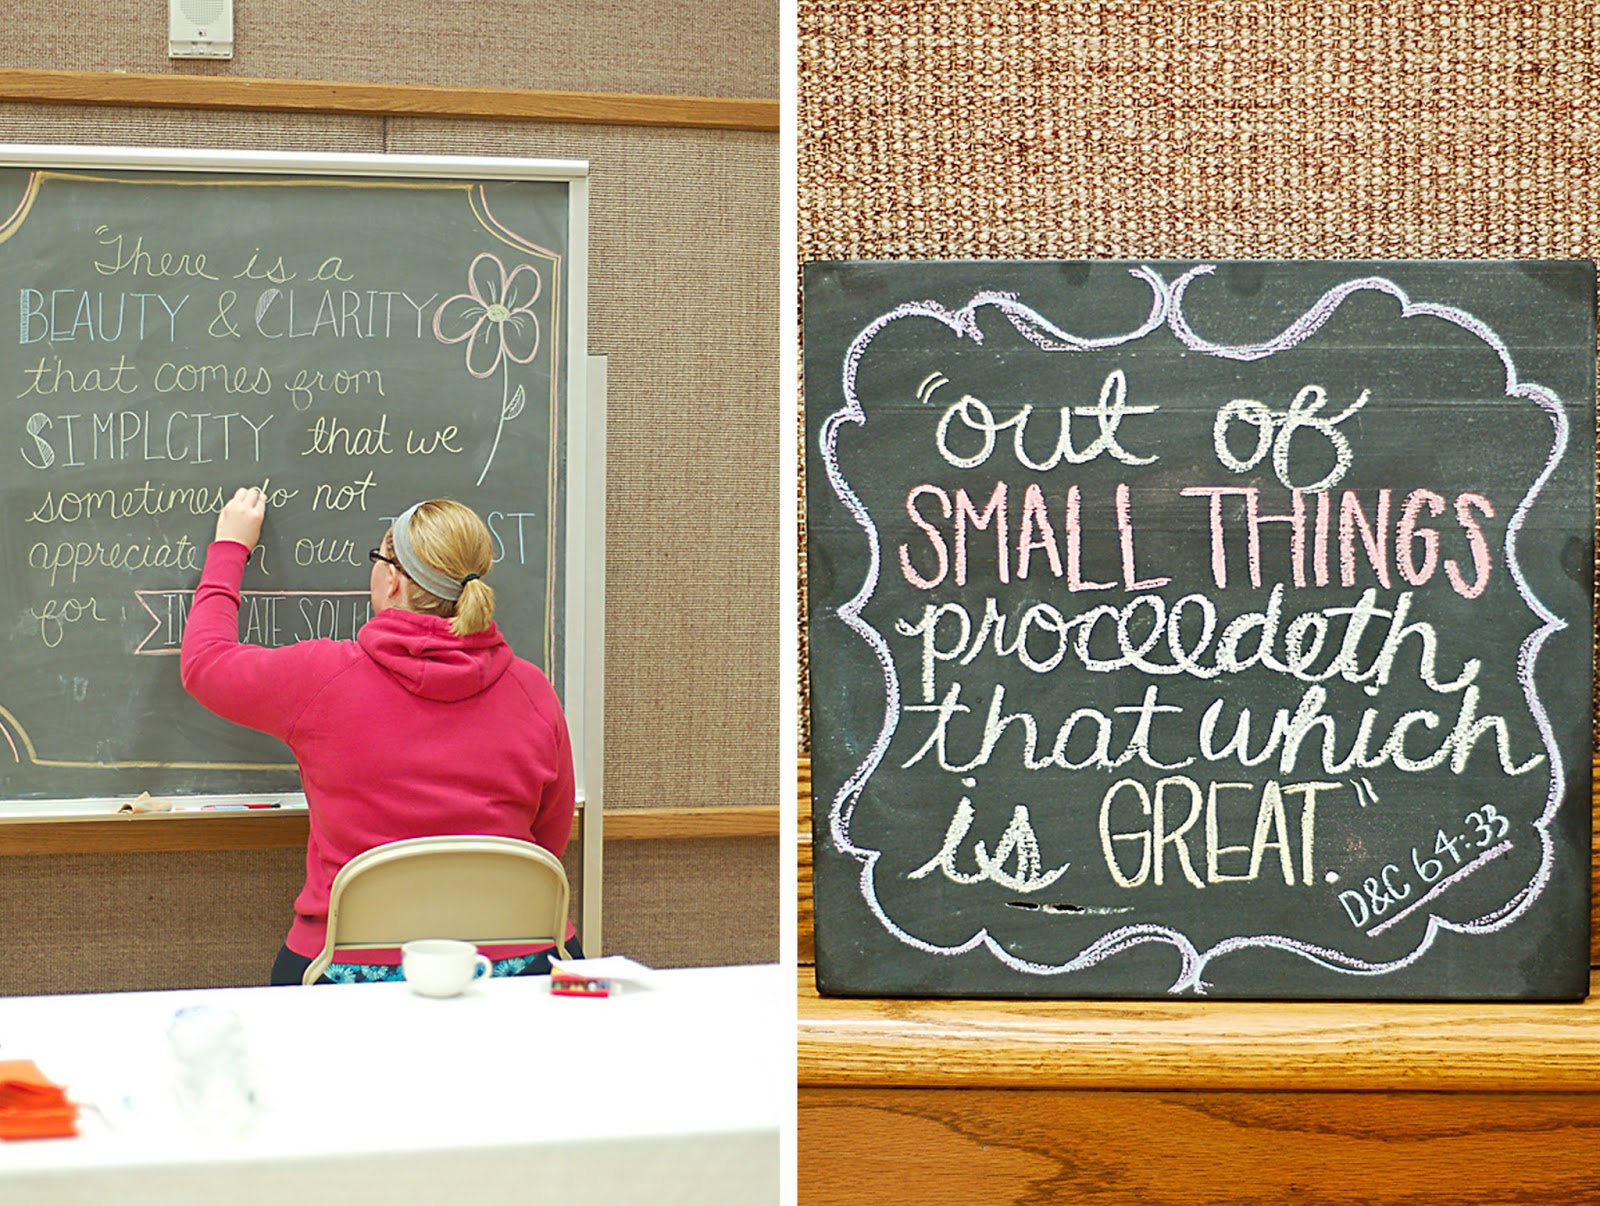
I asked Erin Winters to create some chalk art for us. It was the perfect finishing touch to our decor. She chose the perfect quote and scripture for our theme. 

Here's the quote she used:
"There is a beauty and clarity that comes from simplicity that we sometimes do not appreciate in our thirst for intricate solutions." -Dieter F. Uchtdorf
I love it.

And I love President Uchtdorf. Seriously, who doesn't? My daughter-in-law Ashlee, is a fantastic hair stylist. (I'm not just saying that because we're related. ;)) She told me the first time she met President Uchtdorf, she kept thinking, "He has the greatest hair!" So the first time Lynn went to Ashlee to get his hair done cut (sorry, hon), he told her, "I want President Uchtdorf hair."


For our dinner, the presidency made these scrumptious ham and cheese poppy seed sliders. They were a hit. Marci bought rolls from a local bakery (Shirley's). Just a personal note, I'm not a fan of mayo, so if I were to make these for my family, I think they would be just as good if I left it off. What do you think?


For the rest of the meal, they had the sisters sign up to bring a favorite salad or dessert.


As we finished up dinner, Gail Tilley, our Stake RS President, gave a great message and led a discussion centering on our theme. She's hilarious and we all love her so much.


I chose this quote--one of my absolute favorites--to go along with our theme. I gave a 4x6 print to each of the sisters who attended the celebration as a little swag. Once again I have to give credit to Bobbi for this quote layout. I used her same quote for last year's RS celebration, after seeing it on Pinterest and tweaked it just a little to fit our theme. Now I'm using the layout again. Thanks again, Bobbi! (*Remember to have the auto enhance turned OFF when you print these or you will get a very funky color.)


We also included service in our celebration. Marci (our RS President), suggested care packages for the missionaries serving from our ward. We loved the idea. Because Patti has a missionary son out right now, I delegated that task to her to organize. 

Patti announced our project and sent out a list to all the sisters of suggestions for items we could include in the packages. We brought them the night of the celebration. Here's the list of suggestions:
  • ties
  • treats and/or snacks
  • mints
  • socks
  • photos of Christ or the temple to give away
  • CTR rings to give to kids
  • stamps
  • hair clips or ties
  • written story of your conversion
  • your written testimony

Anything else you'd add? We also added a copy of the David A. Bednar quote from the meeting. Patti also had note cards so we could jot a quick note of encouragement and love to those serving. 


And of course there was lots and lots for socializing, something we're all very good at. :)

We accomplished our goals--socialize, service, and bringing the spirit to our meeting. I'd love to have you share any details of your favorite RS meetings.

Resources:
Hello, cupcake invite psd. (find someone in your ward with Photoshop Elements and have them add your information.
Hello, cupcake invite jpg. (Use a different program to add your information.)
balloon flower tutorial
ruffled tablecloth streamers tutorial
ham and cheese poppy seed sliders recipe
David A. Bednar quote

Also shared at these fabulous blogs:
Whipperberry
Chic on a Shoestring 

Friday, March 8, 2013

simple recipe: brushetta with roasted garlic and a gift idea.


I'm pretty sure, when we arrive in heaven, Brushetta will be served as the appetizer at our "welcome home" dinner. The combination of ripe tomatoes, garlic, and basil, must truly be a gift from God. :)


My birthday was a couple of weeks ago. I wasn't home when my friend Delayne, dropped off this simple, yet thoughtful gift.


It was a basil plant, with a handwritten recipe for Brushetta. I was thrilled. I love Brushetta, but I don't ever remember making it myself. Every time I walked past the plant, I would breath in, and the cravings began.

The next day I purchased the ingredients I needed, including fresh garlic to roast and spread on the baguette slices. Is your mouth watering yet?


Roasting garlic is so, so simple. Just cut the top portion from the garlic (opposite the "root" end), and place on some foil on a baking sheet. Drizzle some olive oil over the top, letting it seep into the little holes and crevices. Let some drip on the outside too.


Wrap up the foil around the garlic bulb, nice and tight, and roast at 425 degrees for about and hour and 15 minutes. (I like mine nice and spreadable.) 

Side note here: This mini-mini baking sheet (it's a 1/4 size sheet) was another gift from my friend, Jen. I had to ask her where she got it--the Bosch store. I love it and it was perfect for this little job. (Thanks, Jen!)

While the garlic is roasting, mix up the rest of the ingredients, and let the flavors meld together. Resist devouring the entire bowl, by taking just a few bites and getting a taste of what's to come.

Cut the baguette or french bread at an angle in thin slices, and spread with a bit of butter. When the garlic is done roasting, scoop it out of the bulb and spread over the butter. (I like a lot!)


Toast the bread slices until slightly crispy, and top with tomato/basil mixture. Oh my.

This was our entire dinner. Both Lynn and I loved it and will be having it a lot this summer as a fresh, simple dinner. (Thanks, Delayney!)

If you're looking for a lovely and simple gift idea this time of year, I'd recommend a basil plant and this recipe. Good stuff.

BRUSHETTA
by Delayne Dayton

5-8 tomatoes
1-2 garlic cloves, minced
Fresh basil, chopped (to taste)
Salt and pepper to taste
Crushed red pepper to taste (not cayenne!) *I thought I had some but didn't, so I left it out.
Olive oil (be generous, it's a good fat)
Splash of balsamic vinegar

Mix ingredients together. Store in refrigerator.

Baguette or french bread (I used 1/2 baguette)
1/2 stick butter (I used less)
1 garlic clove, minced or use roasted garlic (above)

Mix butter and garlic together. Spread on bread and toast in 350 degree oven until crisp and golden brown.

Top with tomato mixture and savor.

P.S. I'd love to find a whole grain french bread for this recipe. If anyone knows where to find one, give a holler. :)

Post also shared on these fabulous blogs:
Whipperberry
Six Sister's Stuff 

Monday, February 25, 2013

one simple recipe: heavenly hot chocolate


Here in beautiful Utah, we've had a far more extreme winter than usual. There have been record breaking low temps and snow accumulation totals. Brrr! That's led to far too little socializing among neighbors and friends.We decided to warm things up a bit with a good old-fashioned Relief Society social.


It was a rousing success. Keeping it simple, allowed everyone to socialize and reconnect. And if there's chocolate involved, you're pretty much guaranteed success. Not just any chocolate, really good chocolate. :)

Our resident foodie, Breanna Smithson of Breanna's Recipe Box, showed us how to make homemade hot cocoa. Seriously, I will never use powder again. It was so, so simple and amazingly delicious. 


Here's Breanna's recipe:

Hot Chocolate
1 1/2 cups whole milk
1/3 heaping cup dark chocolate chips (if you like a sweeter cocoa, use semi sweet)
1/8 tsp. kosher salt

In a small saucepan, heat milk over medium heat. Place chocolate chips and salt in a glass measuring cup and add steaming milk. Stir mixture until it looks chocolately, then pour into blender. Blend on high for 10-15 seconds. Pour hot chocolate back into the saucepan and heat until steaming. Pour in cups and add shaved dark chocolate. Enjoy!

Servings: 2

Using dark chocolate definitely made this a more "grown-up" version of hot cocoa. It had a bit of a bittersweet taste which I love. Breanna also made a quick video to demo the process. It's super fun to watch, so go check it out.


Along with the cocoa, we had a large variety of homemade scones--cranberry, blueberry, lemon poppyseed, chocolate chip and lemon ginger. (Thank you RS Presidency--Marci, Tirage, Marina, and Tamsen!) We all pretty much broke out the knives so we could taste each one. They were all wonderful. 


If I had to choose a favorite though, I think it would be Marina Jensen's lemon ginger scones. Yum!

Notes from Marina: I only baked my scones 18 minutes. I also drizzled the scones with a glaze made from powdered sugar and lemon juice.

Both sweet and simple makes for a great meeting. Here's to staying warm and cozy. 

Tuesday, September 25, 2012

simple recipe: chicken fajitas

We had a bittersweet weekend.


The bitter was that my nephew, Jordan ( a.k.a "Joe" to the family), was involved in a very serious car accident that sent him to the hospital in critical condition. I was scared. I prayed a lot. I immediately called and had his name put on the temple prayer rolls. I'll share more details later (when the legal stuff is done), but so you're not left hanging, his surgery for a broken femur went well, and he's no longer in critical condition. :) We love you, Joe.


The sweet was that our little granddaughter, Madilyn, turned four years old and came from Idaho to share her birthday celebration with us. (I'll share more on that in another post.)

The entire weekend was filled with noise and messes--oh, big messes--and craziness and laughter. It was perfect. We loved that we had so much family time together. 


Patrick and Ashlee came back over on Sunday for lunch. Lynn wanted fajitas. I realized we'd had them three Sundays in a row--twice when the kids came over and another when we went to their house. Guess I don't even need the say how much we love them. And I love how simple they are to make.


Here's my favorite recipe.

CHICKEN FAJITAS

Ingredients
2 chicken breast, cut into strips
1 red onion, cut into strips
1 red pepper, cut into strips
Mission brand multi-grain tortillas (or your own favorite)
cheese, shredded
tomatoes, sliced
sour cream
lots of avocado

Marinade
1/4 c. lime juice (2 fresh or use bottled)
1/4 c. olive oil
1 tsp. honey
2 cloves garlic, chopped (I used minced garlic in a jar)
1 tsp. chili powder
1/4 tsp. oregano
1/2 tsp. salt
fresh ground pepper

Marinade chicken breasts in a ziploc bag about 30 minutes. Add a little olive oil to a large pan and saute onions and red peppers on high heat until browned. Remove from pan and set aside. Add chicken and marinade and saute on high heat until cooked through. Add cooked onions and red peppers.

Heat tortillas by wrapping and wet paper towel and put in microwave for 30 seconds. Layer chicken mix, cheese, tomatoes, sour cream and avocados in tortillas.

*Notes:
Keep the chicken cooking at high heat. It takes a little while to cook the marinade down. Towards the end, the marinade will begin to turn clear. Leave a little in the pan so the chicken doesn't dry out and you can coat the peppers and onions.

I usually use one chicken breast per person and have leftovers for lunch the next day.

Enjoy!

I linked up this recipe here:

Lil\'Luna

Wednesday, July 18, 2012

my pinterest scores {chicken recipes}


My recipe for Monterey Chicken is by far the most popular on All Things Simple. It's been viewed over 23,000 times. Wow! I tried to figure out how many times it's been pinned on Pinterest, but no luck. I know there's a way though. All the comments from those who have made the recipe have been positive. It's still one of our absolute favorite chicken dishes.

I get asked all the time if I actually use the stuff I pin on Pinterest. I sure do! I've tried quite a few recipes-- some misses--and a lot of hits. Here are a few other chicken recipes that are definite keepers in our house.

white chicken enchiladas with sour cream sauce

We've added these White Chicken Enchiladas with Sour Cream Sauce into our meal rotation. It's from Let's Dish Recipes. It's the best recipe I've found on Pinterest. I used nonfat yogurt instead of sour cream in the sauce last night and my family actually liked it better! Woo hoo! When does that ever happen? I also use whole grain tortillas. Yep, this dish is a keeper.

 baked chicken parmesan--dinner on Sunday.

My husband Lynn, is a huge fan of Chicken Parmesan. This recipe from Skinny Taste is simple, delish and lighter than others because it's baked. I serve it with whole wheat spaghetti noodles and a nice salad. Y.U.M

Cheesy Chicken, Bacon, & Avocado Quesadillas

Cheesy Chicken, Bacon and Avocado Quesadillas from the Kevin{&}Amanda recipe blog. Need I say more? Haven't made these in awhile, this week for sure. If you have a George Foreman grill, use it. It makes these nice and crispy.

Is your mouth watering yet? Mine sure is. Enjoy!

Kim

Monday, April 16, 2012

taco salad


When spring weather hits, I start craving salads as a stand alone for dinner. This is my absolute favorite taco salad recipe and a family favorite. I love it because it's healthy, not heavy like some others I've tried, and best of all, it's simple to make.

TACO SALAD

Layer the following ingredients:
romaine lettuce, chopped
cilantro, chopped
black beans, drained and rinsed
corn ( I use canned)
cherub or grape tomatoes, chopped in half
avocado, sliced
jack and cheddar cheese blend, finely grated
Tostitos chips (or your favorite brand), crushed

Serve on a rectangular platter* with a bowl of chips and the dressing on the side.

Dressing:
Make a package of ranch dressing mix; add Bull's Eye bar-b-que sauce to taste.

That's it! You can also add chicken or bar-b-que pork to this salad if you want something more substantial, but it's great without meat too.

*Obviously the rectangular platter isn't critical, but I serve most of my salads on a platter. Not only is it a beautiful presentation, but it's easier to get a little (or a lot) of each of the ingredients. 

Enjoy!

Wednesday, February 8, 2012

cooking club: Oreo cake bites


I had a bunch of friends ask where they could order the cake bites we served at Patrick and Ashlee's reception. Apparently they were amazingly delicious. I wouldn't know, I never got the time to taste one. Even more surprising, neither did Ashlee. And she helped make all 350 of them! She confessed she was on the LGN (look good naked) diet at the time. :) She cracks me up.

So, I convinced my new daughter-in-law (love saying that :)) to do a demo for our RS Cooking Club. At first she laughed because she said they were so simple to make they didn't need a demonstration. But that's what we love--simple and yummy. And chocolate. And samples to try. And just getting together to have a good time.

We had a "filled to capacity" crowd in my kitchen. Ashlee did a wonderful job. And yes, they were simple to make.


I don't know that I'd actually consider these "cake-y." The filling ingredients are Oreos and cream cheese, so they're more moist than a cake filling would be.


We placed a duo in mini red and white polka dot liners and packaged them in small cellophane bags. Then we tied them up with pink grosgrain ribbon. (I will forever love pink and red together.) They're the perfect little Valentine's goodie for the sisters we visit teach. Hope they make it that long (*wink*). The liners are from Wilton.

I get asked all the time how to tie a pretty knot. I just use a simple square knot--right over left, left over right. Give yourself plenty of ribbon to work with and then trim the excess off at an angle when you're done. Packaging always looks nicer when you don't scrimp on the ribbon.


Adding a sucker stick makes the perfect "cake pop" for the little (or big) ones. How darling would these be for a baby shower or any special occasion?

Here's the recipe Ashlee used:

OREO CAKE BITES
from the kitchen of: Ashlee McCrary
Yield: 30-35 bites

30 Oreo cookies (about 1 package)
8 oz. cream cheese, softened
1 pkg. melting chocolate (I like Wilton brand)
2 squares vanilla almond bark

Using a food processor or placing cookies in a Ziploc bag, crush Oreos into a fine crumb. In mixer, combine softened cream cheese and Oreos. Mix until a soft dough forms. Chill in freezer 20-30 minutes or in fridge for an hour. Measure one tablespoon scoops and form into round balls. Place on wax paper on cookie sheet that will fit in freezer. Chill for 30-45 minutes until firm.

Melt chocolate, following directions on package.

Insert toothpick into frozen Oreo ball and dip in chocolate to cover. Let excess drip off, then place on cookie sheet covered with wax paper. When chocolate is no longer shiny, remove toothpick by twisting to leave only a very small hole. Fill hole with melted chocolate.

Melt almond bark, following package directions. Transfer to Ziploc bag. Make a very small cut in the corner of the bag. Drizzle back and forth over cake bites.

Store in airtight container in fridge.

Ashlee's Tips and Tricks:
  • Use only regular Oreos.
  • I prefer Wilton brand melting chocolates because they're made with real cocoa, instead of chocolate-flavored like other brands. (I've found them at Walmart in the craft department and at Joanne's.)
  • Don't be tempted to use regular chocolate chips to melt. They have a tendency to seize up and become lumpy. Melting chocolate is formulated for melting and dipping.
  • Make sure you measure when forming balls to make uniform cake bites. 
  • As dipping chocolate starts to cool, it will get thick and start to clump. Simply put back in microwave for 30 seconds at 50% power to thin again.
  • White almond bark can be found in the baking section of your grocery store.
Thanks, Ashlee!

Sunday, January 29, 2012

cooking club: homemade yogurt + granola

We held our second Cooking Club for Relief Society this week.


It was at the home of my friend, Breanna Smithson. She's known as "the foodie" in the ward/neighborhood. :)


She taught us to make homemade yogurt. (It was kind of a personal request from me.)

Oh. my. goodness.

If I had known it was so simple to make I would have been making it forever! I don't know if I can ever eat store-bought again. It's the perfect consistency, so much healthier, and just plain yummy. And it's so pretty in a canning jar.

Breanna brought over a jar later that night after it was done. I had Lynn try it the next morning (the real test), and he's asked me three times, "Are you going to make some yogurt?" He wants to take it to work with him for breakfast.


Breanna also mixed up a batch of her granola to sprinkle on top of the yogurt. The best granola I've ever tasted--really. And I love that it uses honey as the sweetener. No more looking, I found "the one."

BREANNA'S HOMEMADE GRANOLA

3 c. old-fashioned rolled oats
1 c. shredded coconut
1/2 c. chopped almonds
1/2 c. chopped walnuts
1/2 c. chopped pecans
1/2 tsp. cinnamon
1/2 tsp. salt
4 T. butter
1/3 c. honey
1 tsp. vanilla

Preheat oven to 325 degrees.

In a large bowl, stir together oats, coconut, nuts, cinnamon, and salt. In a small saucepan melt butter with honey on low, stirring. Add vanilla and pour butter mixture over oat mixture. Mix until thoroughly combined.

On a large baking sheet, spread the granola evenly in a thin layer. Bake, stirring every 5 minutes to keep from sticking or burning, until golden brown and crisp (about 20 minutes). Do not overcook, the granola will become more crisp as it cools. Cool granola on baking sheet.

May be kept in an airtight container for up to one week.

Breanna's notes:
  • I always double the recipe and keep it in the freezer because I love really cold granola. (Oh, I need to try that!)
  • If you like dried fruit in your granola (I don't), stir in when you take the granola out of the oven to cool.
Thanks, Breanna!
Check out Breanna's blog for more great recipes.