Wednesday, June 30, 2010

Guest DT

Being the first of the month I have some challenges to share with you today. Firstly these is a new sketch over at StuckSketches you can see I flipped the sketch to better suit my photo.


Secondly I was asked to be GD this month at Artastic Challenge Blog we were given a painting to use as inspiration, we also had to use feathers, playing cards and the colours brown in our layout. I hope you can join in the fun over there with me this month , there are some awesome prizes up for grabs


Luckily I had that cute little card, button and vintage disc in my stash from lilredrocketbuttons

Till next time...


Hippie Rice Salad


I saw this recipe in Mark Bittman's How To Cook Everything Vegetarian and it tickled me. Hippie Rice Salad. It caught my eye for a few reasons. The first being that it was a healthy recipe, the second being that it reminded me of my parents. When my parents were first married, they lived in a renovated school bus which they parked on a farm on Maryland's Eastern Shore. The picture below was taken on my parent's wedding day. My Dad was carrying my Mom over the threshold of the school bus, which was home to them.

As a young couple, their alternative lifestyle was lots of fun for them. They parked their school bus on a farm with an old farmhouse, where several other couples lived. From what I hear, they had the time of their lives. They all lived on the farm for a couple years. Once the babies came, people starting going their own ways. My parents sold the school bus, left Maryland, moved to Ohio, and had me!

My parents gave up a lot of their old lifestyle in order to start a family, BUT healthy food was still a big part of their life. We never ate processed food and we rarely ate out. Although my parents continued to eat meat, vegetables were king. We snacked on them all the time. One of our favorite all-time snacks were green onions. We used to go through bunches of green onions, dipping them in a little salt and eating them on their own. It sounds funny to me now, but they really tasted great that way and I still love them today.

This healthy eating made me rather naive about the world around me. When I started school, I discovered Spaghettio's, Ho-Ho's, Cheese Crackers, juice boxes and all kinds of other processed junk. I had no idea what any of it was, but I learned quickly. Naturally, I wanted what all the other children had and relentlessly begged my Mom for all sorts of treats. Every once in awhile she would cave in and buy it for me, but for the most part, she stood her ground.

Here's to my parents for sticking with it over the years, teaching me how to eat real, wholesome food. This Hippie Rice Salad is something that I know they would like (and it even has green onions)!!

Hippie Rice Salad
Adapted from How To Cook Everything Vegetarian by Mark Bittman
3-4 cups cooked brown rice, cooled
1/4 cup chopped scallion (green onion)
1 small or 1/2 large red or yellow bell pepper, cored, seeded and chopped
1 cup cooked and shocked broccoli florets
1/4 cup toasted sunflower seeds
salt and freshly ground black pepper
1/4 to 1/2 cup Vinaigrette (recipe directly below)
Red Wine Vinaigrette:
1/2 cup extra virgin olive oil
3 tablespoons good wine vinegar, or more to taste
salt and freshly ground black pepper
1 large shallot, cut into chunks (optional)
Combine all the ingredients except the shallot in a blender and turn the machine on; a creamy emulsion will form within 30 seconds. Taste and add more vinegar a teaspoon or two at a time until the balance tastes right to you. Add the shallot and turn the machine on and off a few times until the shallot is minced within the dressing. Taste, adjust the seasoning; and serve.

To make the Hippie Rice Salad:
Put the rice and all the vegetables in a large bowl. Drizzle with vinaigrette and use 2 big forks to combine, fluffing the rice and tossing gently to separate the grains. Add salt and pepper, taste, adjust if necessary. You may want to add in more vinaigrette if necessary. Right before serving, sprinkle the sunflower seeds over the top and serve at room temperature.

Notes/Results:
This is a terrific recipe and holds very well at room temperature, making it perfect for picnic baskets, this week's theme at IHCC! I found some gorgeous orange bell peppers at the market and decided to serve my rice salad in the bell pepper cups. It was delicious. Everyone enjoyed the slight nutty crunch from the sunflower seeds. Hippie Rice Salad was a total hit! I would definitely make it again.


I am submitting this Hippie Rice Salad to my friend Deb at Kahakai Kitchen for her weekly Souper Sundays roundup. I am also submitting this recipe to I Heart Cooking Clubs in honor of this week's Picnic Basket theme.

My family and I will be leaving for Ohio tomorrow morning to visit with my Dad and some of my old friends. I'll be back in about a week!! I hope everyone who is celebrating the 4th of July weekend has a safe and happy time!!

Monday, June 28, 2010

Popsicle of the Week: Sour Plum


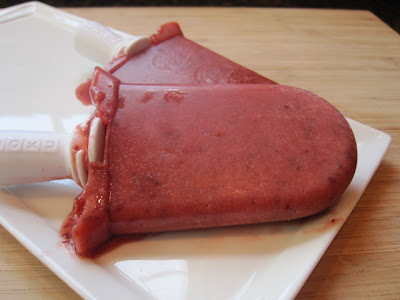
Introducing my favorite popsicle yet: Sour Plum! Who knew? I'll be the first to say that I am not a self-confessed plum lover. I like them, but I don't love them. However, I do love anything sour and these popsicles fit the bill perfectly. I was lucky enough to find some little, underripe red plums at the Farmer's Market this past weekend. The little plums were just a tad bit bigger than a cherry, very cute.

I bought a container of the sour plums, just under 1-1/2 pounds for $6. These popsicles were going to be some of the more expensive ones, but I knew that I had to snatch up those plums. I knew that I wasn't likely to find them again. I'm so glad that I did as these are my favorite new popsicles. If you happen across some little baby plums, definitely gather them up and make these popsicles.

Sour Plum Popsicles
Adapted from Ice Pops by Shelly Kaldunski
Makes about 9 popsicles in the Zoku Quick Pop Maker
1-1/2 pounds underripe red plums (do not peel, skin is the tartest part)
1/3 cup superfine sugar
1/3 cup freshly squeezed lemon juice
pinch of salt
Cut the plums in half and remove the pits. Place the plums in a blender or food processor. Add the sugar, lemon juice, and salt. Process until the mixture is completely smooth.

If using conventional molds, divide the mixture among the molds. Cover and freeze at least 4 hours. If using sticks, insert them into the molds when the pops are partially frozen, after about an hour, then continue to freeze until solid, at least 3 more hours.

If using an instant pop maker (such as the Zoku) follow manufacturer's instructions.

Notes/Results: Wow! These popsicles are sour, sour, sour...almost like those little sour candies that you buy in the store. They had a very soft almost creamy texture and I loved them. If you love sour things, this is the popsicle for you! I did alter the recipe from what was in my book. The recipe calls for 2 tablespoons of lemon juice but I found that it wasn't enough and ended up using 1/3 cup lemon juice, which suited my taste. The recipe also calls for you to add in 1/3 cup water and I left it out. I didn't want to water the popsicles down.


I am submitting this to Two for Tuesdays!

Also, one of my very favorite local joints, Wallace Station in Versailles, KY, will be featured on Diners, Drive-In's and Dives tonight at 10pmEST on Food Network. I featured a post on them which you can find HERE. It is a very charming place, with lots of character and terrific food featuring local ingredients. Can't wait to see it on TV tonight!!

Sunday, June 27, 2010

Finally the next challenge....

Finally my wonderful friend taryn and I can share our next challenge layout, this time we have used some photos from a couple of weeks ago when her son Curty came over for a play. Addison put a plastic duck down a golf bag, I decided to try a little problem solving with them and showed them how to fill the bag with water to raise the duck, then I remembered a book I had about the same concept so read that to them too....I guess the teacher in me never rests LOL !!

Of course that fire truck is from 3tails ...mmm how did I do for a girly layout ?


Still trying to come down from cloud nine about my DT spot at hambly, thank you all so much for your lovely comments, it really makes me feel loved!


Till next time...

Saturday, June 26, 2010

Green Bean Salad with Charred Onions


Every summer, my Mom plants green beans and we eat them like crazy all through the month of June. Last week was the third picking and we were looking for a new way to serve them up. I decided to get out Mario Batali's new book, Molto Gusto, and quickly found a great recipe for a green bean salad that can be served either warm or at room temperature.

Mario's green bean salad begins with blanching the green beans and then adding them to a dry skillet with charred onions. Once the beans and the charred onions are mixed, they are dressed with a dressing made from balsamic vinegar, orange juice, and extra virgin olive oil. Mario says the salad is best served if the beans are allowed to stand in the dressing for at least 10 minutes and I definitely agree. This green beans grew even more flavorful as they were allowed to soak up some of the tangy, orange-flavored dressing.

Green Beans with Charred Onions
Adapted from Mario Batali's Molto Gusto
Serves 6
Kosher salt
1 pound young green beans or haricots verts
2 medium sweet onions, such as Vidalia or Walla Walla
1-1/2 tablespoons balsamic vinegar
1-1/2 tablespoons orange juice
2 tablespoons extra virgin olive oil
Maldon or other flaky sea salt
Bring 4 quarts of water to a boil in a large pot and add 2 tablespoons kosher salt. Add the beans and blanch until crisp-tender, 3 to 5 minutes. Drain in a colander and cool under running water; drain well.

Halve the onions lengthwise and trim off the ends. Cut lengthwise into 1/2 inch wide slices. Heat a dry 12-inch saute pan over medium-high heat until very hot. Add the onions and saute until charred in spots but still crunchy, 4-6 minutes. During the last minute or so, add the beans, stirring and tossing to warm them through. Transfer the beans and onions to a large bowl.

Whisk the balsamic vinegar, orange juice, and oil together in a small bowl. Pour over the beans and onions, tossing to coat. Let stand for at least 10 minutes, or up to 1 hour, before serving.

Sprinkle the beans with Maldon salt and serve.


This is my submission to Souper Sundays. A weekly roundup of soups, salads and sandwiches. Click HERE to view today's roundup!

This is also my submission to Reeni's monthly Side Dish Showdown.

I have the most amazing news ever!!!

Well the secret is out!!!! I have made the DT at Hambly screen prints!!!!!

We are so excited to announce our new 2010-2011 Design Team!


US Team:

Amy Tangerine (Culver City, California)

Laurie Cinotto (Tacoma, Washington)

Ann-Marie Norris (Simi Valley, California)

Tiffany Johnson (Fort Rucker, Alabama)

Becky Olsen (Cottonwood Heights, Utah)

International Team:

Jennifer Johner (Sexsmith AB, Canada)

Larissa Albernaz (Sao Jose dos Campos SP, Brazil)

Yukari Takanashi (Kanagawa, Japan)

Kim Jeffress (Australia)

Leena Loh (Singapore)

Stepanie Baxter (Surrey, United Kingdom)


Design Team Coordinators:

Kerry Lynn Yeary

Dina Wakley

See the reveal here did you see who else is on the team.... I mean I have admired Jen Johner's and Larissa Albernaz' work for forever and now to be on the same team..I am gobsmacked and soooooo delighted! I have been in a daze all day , I even dreamt about it last night after I got the email..I am on cloud nine...can you tell I am excited!
I am actually shaking writing this post...anyway I sooo can't wait to start!!! I actually posted this layout at the beginning of the week thinking I hadn't made the team, this was one of my layouts for my application....thought I would share it again tee hee

till next time...

Friday, June 25, 2010

Angel Food Cake with Coconut Ice Cream and Mango Sauce


This week at I Heart Cooking Clubs the theme is Summer Lovin'. What better way to celebrate summer than with ice cream, right? I've been eyeballing Bittman's recipe for Coconut Ice Cream for a long time and thought this was the perfect chance to make it. When I was through making the ice cream I had 6 leftover egg whites and thought it would make a great start for an Angel Food Cake. Feeling on a roll, I went ahead and researched Bittman's sauces and decided to go ahead and make a Mango Sauce. I ended up with a very summery, tropical dessert that was light and delicious!

The coconut ice cream was made with both heavy cream and coconut milk. It was a very thick and creamy custard-based ice cream with little shreds of toasted coconut running through it. I kept wanting to dress it up and turn it into a fancy ice cream sundae, but it was best served on it's own with more toasted coconut on top. I enjoyed the ice cream, but my favorite of all three recipes was the Angel Food Cake and the Mango Sauce.
Coconut Ice Cream
Adapted from HTCE by Mark Bittman
2 cups cream, milk or half and half
1/2 cup sugar
6 egg yolks
1/2 cup dried unsweetened shredded coconut, toasted in dry skillet until lightly browned if you like
1 cup canned or fresh coconut milk
Place the cream and 1/4 cup sugar in a heavy medium saucepan. Heat, stirring occasionally, until steam arises from the cream.


Using a whisk or electric mixer, beat 1/4 cup sugar with the egg yolks until light yellow and thick, 2 to 4 minutes. Beat 1/2 cup hot cream into this, then gradually stir this mixture into the saucepan with the remaining cream. Cook over medium-low heat, stirring almost constantly, until the mixture reaches 175 to 180F, or is slightly thickened; do not boil. (There will be a thick coating on the back of a spoon, one that will hold the outline of your finger after you pass it through).

Stir in the coconut and coconut milk. Pour into a covered container. Chill to 40F (you can hasten this process by setting the bowl in a large bowl filled with a mixture of ice and water; stir occasionally), then churn in an ice cream maker according to the manufacturer's directions. Serve immediately or freeze; use within 2 days, "warming" in the refrigerator for about 30 minutes before serving.


Let's talk about Angel Food Cake for a minute. Do you love it like I do? I find it so irresistibly light, delicate, and sweet. You can eat it on it's own, which is perfectly delicious or you can pair it with almost anything. You can even serve it toasted. What a wonderfully versatile dessert!

Bittman's recipe calls for cake flour, which I can almost never find. Did you know that with a little work you can make your own cake flour? For every cup of cake flour needed: Sift one cup of all-purpose flour twice. Remove 2 tablespoons of the a/p flour and add in 2 tablespoons of cornstarch. The cornstarch has to be incorporated extremely well. The final mixture of a/p flour and cornstarch will need to be sifted at least five times. It was a little bit of a process, but I found it much easier than running all over town for cake flour.
Angel Food Cake
Adapted from HTCE by Mark Bittman
1 cup (about 4.5 ozs) cake flour, sifted
1 - 1/2 cups sugar
9 egg whites
1/4 teaspoon salt
1 teaspoon cream of tartar

1 teaspoon vanilla extract
1/2 teaspoon almond extract
Preheat oven to 325F. Sift together the flour and 1/2 cup of the sugar.

Beat the egg whites until foamy. Add the salt and cream of tartar and continue to beat until they hold soft peaks; the tops of the whites should droop a little bit when you remove the beaters. Beat in the remaining sugar and vanilla and almond extracts and continue to beat until the peaks become a little stiffer.

Gradually and gently fold in the flour mixture, using a rubber spatula or your hand. Turn the batter into an ungreased 9- or 10- inch tube pan (not one with ridged sides) and bake 45 minutes to 1 hour, until the cake is firm, resilient, and
nicely browned.

Invert the cake onto a rack and let cool for about an hour. Cut carefully around the sides of the cake and remove. Cool completely around the sides of the cake and remove. Cool completely before slicing with a serrated knife or pulling apart with two forks. Angel Food Cake is best the day it is made; it becomes stale quickly (although is wonderful toasted).


I saved the best part of this dessert for last....the Mango Sauce. The Mango Sauce is perfectly delicious. Absolutely wonderful. I super duper highly recommend it!! It was great with the Angel Food Cake.
Mango Sauce
Adapted from HTCE by Mark Bittman
1/2 cup water
1/2 cup sugar
3 tablespoons unsalted butter
2 cups mango, pitted, peeled and diced
Combine the water, sugar and butter in a medium heavy-bottomed saucepan and cook over medium-high heat, shaking and stirring, until the mixture is thick and syrupy but not browned.

Toss in the fruit and cook over low heat until the fruit begins to break up and release its juices, about 4-5 minutes, possibly longer. (You may required a little more water). Serve warm or at room temperature. This sauce keeps well, refrigerated, for up to a week.


Notes/Results: Each of these components were great on their own, but paired together they made a wonderful tropical dessert. I enjoyed the ice cream, but was really impressed with the Angel Food Cake and especially impressed with the Mango Sauce. I will definitely make the cake and the Mango Sauce again. I left my Mango Sauce chunky, but it would also be just as tasty and probably more visually appealing if pureed into a smooth sauce.

Thursday, June 24, 2010

Wednesday, June 23, 2010

STUCK in the mud

A couple of posts ago I showed you a layout of Larsen being saved by Addison from the mud.....Here is the before...tee hee, he wanted soooo desperately to play in the mud with Addison but once he got in and was stuck he cried until he was rescued by his big Brother.


I have used a scrummy button from lilredrocketbuttons and if you head over there Shell has stocked the store with some fabulous new goodies...some I will be sharing on layouts very soon.

PS check out the new blinkie for stuck sketches....to the right on my sidebar! If you head on over to stuck now there is a fabulous RAk going on if you post the new blinkie on your blog.


Till next time...

Guava and Cream Cheese on Galletas


This past weekend I was invited to a Bunco game for a Girls Night In. I love playing Bunco with the girls. It is the perfect excuse to eat good food, drink cocktails and have some girly chit chat. There was just one catch. Everybody was suppose to bring a potluck dish from another country. The hostess was having an international theme. The problem was that it was Thursday afternoon and I needed the potluck dish for Friday night, which didn't leave me a whole lot of time to plan or grocery shop, especially with two kids in tow. This is where I owe Velva of Tomatoes on the Vine a HUGE THANK YOU!!

Awhile back Velva posted guava and cream cheese served on Cuban Galletas. I mentioned to her that I really wanted to try the Guava Paste, but couldn't find it in the market. Velva was sweet enough to send me a package containing both the guava paste and the Cuban crackers, or Galletas. Velva's sweet gesture really saved me on this one! I threw these crackers together in no time at all and really appreciated not having to run to the store with two crazy kiddos. Thanks Again, Velva!

Please see Velva's post HERE for the recipe and her explanation about the guava paste.

Notes/Results
: The guava and cream cheese crackers were a huge hit! Everyone thought the guava was sweet and delicious and loved it paired with the cream cheese on the crackers. They declared it perfect party food and it was the first dish to disappear. I love this recipe because it is unique and simple and you don't have to heat up the kitchen to make it (which makes this a great summertime dish). I will definitely be on the look out for more guava paste in the store.

Thanks Again, Velva!!

Tuesday, June 22, 2010

father's day celebration

I think I have the greatest husband in the world. I also think he's a wonderful father.


I'm so grateful to be doing this parenting thing all over again with him. I couldn't do it otherwise. Ella loves and adores him. They have so much fun together. She was excited to give him his gifts in the morning. (Check out her bed head.)

I asked Ella what she wanted to give Lynn for Father's Day. Her first suggestion was a sprinkler. (She loves to run through the sprinklers.) I told her he already had one. She said, "Okay, a trampoline then." I suggested that maybe it was her who wanted a trampoline. She assured me she and Dad would share. Well, he received a gift card, a movie he wanted and a new outdoor George Foreman grill. Ella picked out a cute card for him.

One of our traditions is that we get to choose what we want for dinner and dessert on our special day. Lynn chose Monterey Chicken. (I almost forgot to take a photo again, but yelled, "Stop!" as everyone was eating so I could. Kate had the biggest piece so I used hers. Check it out here. You're going to want to make it!

For dessert Lynn asked for Homemade Oreo Cookies. One word--addictive!


Here's the recipe:


(Click to enlarge) Just kidding. It doesn't work, so here's the recipe big. I'm still leaving the photo and recipe together because I love the way it looks.

HOMEMADE OREO COOKIES

1 box deluxe devil's food cake mix (I like Betty Crocker brand)
3/4 c. Crisco butter-flavored shortening, melted
2 eggs
cream cheese frosting

Preheat oven to 350 degrees. Mix ingredients until they pull away from sides of bowl. Roll dough into 1" balls and place on ungreased cookie sheet. Bake on top rack for 4 minutes and bottom rack another 4 minutes. Allow to cool. Scoop cream cheese frosting on flat side of one cookie; top with another and press together to spread frosting.

A few tips for making these delish cookies:
Use the small Pampered Chef scoop filled right to the rim with dough to get perfectly even-sized cookies. (You'll also get exactly 42 single cookies.) Also use it for the frosting. I scoop it just a little over the top and plop it in the middle of the cookie, then work it around with the other half to get it evenly spread. Lynn bought the whipped frosting by accident and I actually like it much better.

When the boys were young, I made a jumbo-sized version of these cookies once for all the scouts and leaders when they went on a camp out. It became a tradition and I ended up making them every time. Good memories.


Happy Father's Day, Hon. I love you more than chocolate!

***Photo Club girls: These are my "food" photo submissions from last month.

Burger Club Roundup: Caesar Salad and Flank Steak Burgers on Garlic Crostini


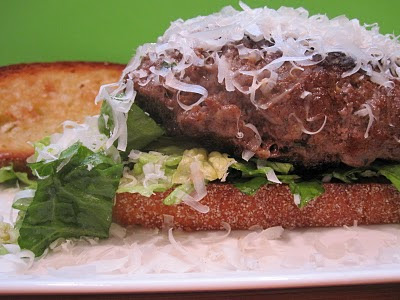
The third round of Burger Club ratings are in! This time around it was Build a Better Burger's Award-Winning Caesar Salad and Flank Steak Burger with Garlic Crostini. A ground flank steak burger with homemade caesar dressing, romaine lettuce, and lots of fluffy Parmesan cheese served between two pieces of garlic crostini.

This is the criteria used to rate the burger:

1 Star = Didn't like and wouldn't make again.
2 Stars = Liked but wouldn't make again.
3 Stars = Liked and will make again.
4 Stars = Loved! Will make often.

Reeni of Cinnamon Spice & Everything Nice
loves Caesar salad and thought the homemade Caesar dressing was one of the best she has ever tried. Reeni and her family found the burger itself to be very well-seasoned but would have preferred a softer roll, perhaps grilling only one side of the bread or even using Texas Toast as a bun for the burger. I personally love the idea of using the Texas Toast, great idea Reeni! Reeni gave the burger a 3.5 rating and said it was exceptionally delicious!

I'm so happy my friend Deb of Kahakai Kitchen had the chance to join in and make the burger this month. Deb thought the burger was juicy and flavorful and found the Caesar salad was nice and garlicky. Deb loved all the Parmesan "fluff" on top of the burger (me too!!) and gave the burger a 3.5 rating, stating that it was one of the best burgers she has made lately.

Barbara of Barbara Bakes loved the grilled sourdough which topped the burger and found it to be the best part of the recipe. Barbara also loved the homemade Caesar dressing, but found her burger to be a little on the dry side. Barbara gave the burger a 2.5 rating, saying that it was a tasty burger, but she probably wouldn't make it again. Barbara did say that she would most definitely be making grilled sourdough again and I have to agree with her. I loved the grilled sourdough too!

Kristin of Holy Cannoli Recipes loved the burger and even made her own ground steak. Way to go Kristin! Kristin and her husband are a very creative team because they came up with some wonderful ideas for this burger. Kristin's husband thought it would be great to marinate the steak in the dressing before grinding it, which sounds like a grand idea to me! Kristin loved the burger and mentioned that the next time she made it she would use ground chicken, making a Chicken Caesar Salad Burger. I say Kristin and her husband are full of all kinds of wonderful ideas. I'm thinking about moving in to her house -LOL! Kristin gave the burger a 3.5 rating.

I'm very happy to add in another Burger Club member, Brenda from Brenda's Canadian Kitchen. Brenda and her husband Joe loved the homemade dressing and thought the burger was very juicy. Brenda and Joe gave the burger it's best rating yet, 3.75! Thanks Brenda for leaving me a comment so that I could add your burger and rating to the roundup!!

Here at Stirring the Pot we really enjoyed the burger. I thought the burger was tender and flavorful and that the dressing was light and herbaceous. I loved the garlic crostini and found myself making that portion of the recipe in the days that followed. My husband and I also gave the burger a 3.5 rating.


A very big thank you to everyone who participated in this month's Burger Club! I loved all of your comments, ideas and suggestions!

Updated: I averaged out the ratings of all six participants, coming out with a 3.375 rating for the Caesar Salad and Flank Steak Burger with Garlic Crostini. This means the Caesar Salad Burger falls into the "Liked and will make again" category.

The original recipe for the burger can be found HERE.

A very big thank you to Reeni for letting me host this month's roundup! Reeni will be announcing the next Burger Club challenge shortly. Please stay tuned to Reeni's blog, Cinnamon Spice & Everything Nice to catch all the info.

If I missed you in the roundup, please leave me a comment so that I can be sure to include you. I don't want to leave anyone out!

Sunday, June 20, 2010

Here's one I prepared earlier...

TEEHEE I always wanted to say that!!!
I created this layout about 6 weeks ago and for some reason I never posted it here!
This is actually an old photo of Larsen and I that I have tried to scrap 3 times but the colours just never worked for me.
At last I am happy with the outcome.

Till next time...

Saturday, June 19, 2010

Dining with Dad


My Dad and I have always been best friends. As a little girl I followed my Dad around everywhere because I knew wherever he went, fun would follow. To me, my Dad was like magic and I never knew what fun game or activity he was going to dream up next. Dad and I would play games and laugh, from sunrise to sunset.

(Dad chasing me before I could even walk, so not fair!)

Dad and I were partners in crime. Laughter and games are always better when you "break the rules", right? There were definitely those times when the games were probably not appropriate, especially when it came to the dinner table. One of our favorite family meals was Spaghetti and Meatballs. You can imagine my Mom's delight at the game my Dad created, which was "How Much Spaghetti Can You Fit In Your Mouth At Once?" My Dad and I loved the game and would twirl huge chunks of spaghetti onto a fork and proceed to ram it into our mouths. Dad and I would laugh hysterically. My poor Mom. I don't think she cared for the game very much, but she never said anything. She just sat there silently while we acted ridiculous and laughed our heads off.

Our theme this week at I Heart Cooking Clubs is Dining with Dad. Our Father's Day celebration this year will be just me and the kids. I have plans to see my Dad in a couple weeks, but he lives in Ohio and I live in Kentucky. My husband also can't make it as he is working out of state and unable to come home. No worries, we plan on celebrating again soon! I decided that for now I would make Bittman's Bolognese and serve it over top some spaghetti, in honor of my Dad. After dieting for two weeks straight, the spaghetti with Bolognese sauce was a big splurge for me and I had no trouble seeing how much spaghetti I could fit into my mouth (LOL)!


Meat Sauce, Bolognese-Style
Adapted from How to Cook Everything by Mark Bittman
*Makes 1 quart, enough for about 3 pounds of pasta
2 tablespoons olive oil
1 small onion, minced
1 carrot, peeled and minced
1 celery stalk, minced
1/4 cup bacon or pancetta
1/2 pound lean ground pork
1/2 pound lean ground beef (I used 1lb. 95% Hereford Beef)
3/4 cup dry white wine (I prefer red wine in Bolognese)
1 (28-35 oz) can whole plum tomatoes, drained
1 cup beef or chicken stock,
salt and freshly ground black pepper
1 cup cream, half and half, or milk
freshly grated Parmesan cheese
Put the olive oil in a large, deep skillet or saucepan. Turn the heat to medium-low and a minute later, add the onion, carrot, celery, and bacon or pancetta. Cook, stirring occasionally, until the vegetables are tender, about 10 minutes.

Add the ground meat and cook, stirring and breaking up any lumps, until all traces of red are gone, about 5 minutes. Add the wine, raise the heat a bit, and cook, stirring occasionally, until most of the liquid is evaporated, about 5 minutes.

Crush the tomatoes with a fork or your hands and add them to the pot; stir then add the stock. Turn the heat to low and cook at a slow simmer, stirring occasionally and breaking up the tomatoes and any clumps of meat that remain. After an hour or so, add salt and pepper. Cook for at least another hour, until much of the liquid has evaporated and the sauce is very thick. (This sauce may be covered and refrigerated for a day or two, or put in a closed container and frozen for several weeks. Reheat before completing).

Add the cream, half and half, or milk and cook for another 15 to 30 minutes, stirring occasionally, taste and add more salt and pepper as needed. Serve immediately with any dried or fresh pasta, passing grated Parmesan, if you like at the table.

Notes/Results
: I love making bolognese sauce. There is just something about a pot of sauce bubbling away on the stove for hours that is comforting. Bittman's Bolognese sauce was really good. The only change I made was to add in garlic. For some reason his recipe didn't call for any. I also subbed red wine for white wine because I prefer red wine in Bolognese. The recipe really did make a quart of sauce, which is great because I can freeze the leftovers for a great, quick meal later on. It was a great meal and I know my Dad would have approved!


I couldn't resist leaving you with this funny picture of my Dad teaching me how to use the sit-and-spin. After all, it's not every day that you see a grown man riding on a sit-and-spin. Looks like he is really trying to show me how fun it can be AND he really looks like he is enjoying himself!

A Very Happy Father's Day to all the fathers out there!!

shop hop 2010

I've been a total blog slacker lately. I've been diligent in trying to get the home projects I mentioned in an earlier post done. I get easily side-tracked but was able to accomplish some of them. Plus I've been taking time for myself and doing a little sewing. It's been years since I've used my sewing machine to sew something other than scrapbook pages or paper crafting projects. I'll update on my progress in both areas (home and sewing) later.

I desperately needed some girlfriend time this weekend, so Lynn took Ella for the day on Friday. I went with my friends Maggie and Crystal, to a few stores on the Quilting Shop Hop 2010. These girls are so fun. As always, we had a great time.


This Model T was parked outside one of the quilt shops, so we hopped aboard.


This was my absolute favorite stop. I'd never been there. It's in South Jordan. You take the 106th exit and turn west, then turn left on Redwood Road. It's in a nice shopping area on the left by Cafe Rio. The store is delightful and filled with amazing fabric and samples galore.


There was so much inspiration and the owner and the girls who work there are so sweet and helpful. They gave us tiaras made from sparkly silver pipe cleaners--totally vintage looking. You can bet Ella snagged mine the minute she saw it.


So much stuff to love. Attached to our tiaras was a 25% off coupon for next month. We've already planned our trip back.

I didn't purchase much throughout the day--three retractable tape measures (Ella broke my last two, so I thought I'd better stock up. They were only $1.50. I paid seven our eight dollars each for my last ones.), some darling fabric to make a skirt for Ella and an embroidered pillow for a thank you gift.

We had lunch and hit the cookie store for some sweets. It was a great day off. I came home inspired and rejuvenated.