Showing posts with label tyler florence. Show all posts

Wednesday, February 9, 2011

Recipe #60 - Stirring the Pot: Slow-Roasted Pork Shoulder with Salsa Verde

I don't know about you all, but sometimes there are just posts that I don't want to write.  This post is one of them.  Theoretically, this meal should have been wonderful.....but it wasn't.  The pork shoulder, while wonderfully seasoned and slow cooked, should have been meltingly tender and mouth-watering.  It wasn't. I'm not faulting Tyler's recipe at all.  If anything, the blame is on me.  Somehow or another, I chose a bad cut of meat that was tough, fatty, and almost impossible to cut.

Does this ever happen to you all?  Do you occasionally make a recipe to find out that you're working with a bad cut/piece of meat?  It doesn't happen often, but I seem to experience this at least once or twice a year. At any rate, I really wish this recipe had not turned out so poorly because the pork roast smelled so heady with aroma as it cooked in the oven.  I think this recipe, when done correctly, would be fantastic.

Tyler's recipe for the pork consists of rubbing a herb paste made from toasted ground fennel, garlic, rosemary and sage all over the pork to create a crispy and flavorful outer coating.  Tyler pairs what should be a wonderfully tender pork shoulder with grainy mustard mashed potatoes and tangy and sweet salsa verde.  With the right pork shoulder, this would be an incredible meal. The recipe can be found on Tyler's blog, HERE.
Slow-Roasted Pork Shoulder with Salsa Verde and Grainy Mustard Mashed Potatoes
Adapted from Stirring the Pot
Serves 6-8

1 4lb. boneless pork shoulder
2 tablespoons fennel seeds
4 garlic cloves, peeled
1/4 cup chopped fresh rosemary leaves
1/4 cup chopped fresh sage leaves
4 tablespoons kosher salt (1 tablespoon for every lb. of meat)
1 tablespoon freshly ground black pepper
1/4 cup extra virgin olive oil
1 recipe Salsa Verde (see recipe, below)
1 recipe Grainy Mustard Mashed Potatoes (see recipe, below)
1 sprig fresh Italian flat-leaf parsley, for garnish

Place the pork, fat side up, in a roasting pan fitted with a rack insert.  For the rub, toast the fennel seeds in a small saute pan over medium heat until fragrant.  In a food processor combine the toasted fennel seeds, garlic, rosemary, sage, salt, and pepper.  Pulse to combine.  With the motor running, gradually pour the oil through the feed tube to form a paste.  Rub the herb paste on the pork.  Cover the pork with plastic wrap and marinate in the refrigerator for at least 3 hours or overnight.

Preheat oven to 325F  Allow the meat to stand at room temperature for 3o minutes.  Loosely cover pork with aluminum foil; roast about 3 hours, until juices run clear (160F).  Let the meat stand for about 15 minutes before slicing.  Serve with Salsa Verde and Grainy Mustard Mashed Potatoes and garnish with parsley.

Salsa Verde
Soak 1/2 cup golden raisins in warm water until softened; drain.  Rinse 1/2 cup salted button capers.  In a food processor combine raisins; caper; 1/4 cup finely chopped shallots; 1 cup fresh Italian parley; the  juice of 2 lemons; 1 tablespoon Dijon mustard; 1 teaspoon lemon zest; and 3/4 cup extra-virgin olive oil. Pulse for 30 seconds, until combined.  Season with kosher salt and freshly ground black pepper.  Refrigerate for 30 minutes.

Grainy Mustard Mashed Potatoes
Heat 1 cup whipping cream and 4 tablespoons unsalted butter in a saucepan over medium heat until the butter melts; set aside and keep warm.  Place 3 large peeled Yukon gold potatoes in a saucepan; add cold water to cover.  Place saucepan over high heat; bring to boil.  Add 1 teaspoon kosher salt; reduce heat.  Simmer for 15-20 minutes, until the potatoes are tender.  Drain.  Pass potatoes through a food mill into a bowl.  Stir in cream and butter mixture.  Season with salt and freshly ground black pepper.  Stir in a 1/4 cup olive oil and 3 tablespoons whole-grain mustard.


Notes/Results:  The herb paste created a wonderfully flavorful and crispy coating on the outside of the pork shoulder.  Unfortunately, my pork shoulder was pretty much inedible.  As a lover of all things mustard, I did enjoy the grainy mustard mashed potatoes, although it's hard to knock plain old mashed potatoes.  The Salsa Verde was a nice accompaniment, sweet and tangy.

Monday, January 24, 2011

Recipe #59 - Stirring the Pot: Veal Braised in Milk and Honey with Buttered Turnips

  
In effort to continue cooking my way through Tyler's Stirring the Pot, I will have two recipes from the book to share with you this week.  I've been trying to work my way through Tyler's book for two years now and one of the constant problems I have is finding all the specialty ingredients.  Take this recipe for instance, veal shoulder?  Have you ever seen it in your market?  I've searched high and low for about 2 years now and never found it.

I decided just to bite the bullet and use beef shoulder.  I'm sure veal shoulder is great, if you can find it.  Also, let's talk about turnips.  I've had them.  I like them.  I couldn't find them in my local market, so I subbed yukon gold potatoes.  So basically, instead of having Veal Braised in Milk and Honey with Buttered Turnips, we really had Beef Braised in Milk and Honey with Buttered Potatoes.  How's that for a stretch?

 I'd like to think the main point of this particular recipe is the unique use of milk and honey as a braising liquid, not necessarily the focus on whether or not you use beef or veal and/or turnips and potatoes.  I have to say that I was somewhat reluctant about braising anything in milk as I'd never done it before.  This was yet another dish that really surprised me, in a very pleasant way.  The milk and honey braising liquid turns into a rather creamy gravy with a savory and slightly sweet taste that enhances the richness of the meat.  I would definitely use this method again when braising.
Beef Braised in Milk and Honey with Buttered Potatoes
Adapted from Tyler Florence's Stirring the Pot
Serves 6-8

Extra virgin olive oil
4 pounds beef shoulder (or veal)
Kosher salt and freshly ground black pepper
4 garlic cloves, peeled
1/4 bunch fresh thyme sprigs (about 4 sprigs)
4-5 dried porcini mushrooms
1/2 gallon milk
3 tablespoons honey
1 recipe Buttered Potatoes (or turnips)*recipe follows

Preheat oven to 350F.  In a large heavy pot or Dutch oven heat a 3-count of olive oil (about 3 tablespoons) over medium-high heat.  Season beef (or veal) with plenty of salt and pepper.  Add beef (or veal) to pot, cook and turn  until brown all over and a crust forms.  Add garlic, thyme, and mushrooms.  Pour in the milk and stir in the honey.  Cover and braise about 3 hours, until the beef (or veal) is fork-tender.

Remove beef (or veal) from pot and set aside.  Carefully pour small batches of the braising liquid, along with garlic and mushrooms, into a blender.  Tightly hold the lid in place with a kitchen towel and puree until slightly thickened and silky smooth.  Continue with the rest of the braising liquid, mushrooms, and garlic.  Season to taste with pepper and pour over meat.  Serve with Buttered Potatoes (or Turnips).

Buttered Potatoes (Turnips): Preheat oven to 350F.  Peel and quarter 6 medium potatoes.  Place potatoes on a roasting tray; drizzle with EVOO and season with kosher salt.  Roast for 25-30 minutes until just tender.  Toss roasted potatoes in a large bowl with 2 tablespoons unsalted butter and 2 tablespoons chopped fresh Italian flat-leaf parsley so they are evenly coated and glossy.  Season with kosher salt. 

Notes/Results:  We really enjoyed this recipe.  I will probably still keep my eye out for a veal shoulder, just because I'm sure the veal is much more tender, and a little more sweet, than the beef.  Also, I like that this was a really quick and easy recipe that took little to no time to prepare.  

I do have some notes to share.  Braising liquid is suppose to cover the meat by 2/3rds.  You should be able to see the top half of the meat peeking out.  With this recipe, using a Dutch oven and 1/2 gallon of milk, the meat would be completely covered.  I made the mistake of using only 1/4 gallon of milk (so as not to cover the meat completely) and all the braising liquid evaporated out of the pan.  I caught my mistake in time and was able to pour the other half of the milk in the pan.   Next time I would just pour all the milk into the pan, even if it completely covered the meat.  I guess it pays to follow directions sometimes. 

One more recipe down!

Wednesday, November 17, 2010

Recipe# 57 & 58 -Stirring the Pot: Crab Cakes and Zucchini Crab Fritters


Working my way through Tyler's Stirring the Pot has presented different challenges along the way. Now that I'm more than halfway through the book, one of the biggest challenges has been sourcing some of the more "specialty" items. I suspect this was the reason why I never made them in the first place. It wasn't that Lobster Cakes with Lemon Aioli and Bacon Frisee Salad didn't sound good or that I feared no one would like Zucchini Crab Fritters with Grapefruit Aioli. It was simply because I never found fresh lobster and never ran across fresh crab that looked good enough to use.

When Crab Tater Tots came due for Symon Sundays I knew it was time to get serious and get my hands on some crab. I hightailed it to the city, going to 3 specialty stores, and only found two cans of pasteurized crab in all my searches. One can contained one pound of lump crab meat, $26.99 and the other can contained one pound of claw meat, $8.99. The lump crab meat is ideal, but since I was going to be frying most of my recipes, I opted for the can of claw meat. Eager to make the most of my crab, I spread it out and made three crab recipes. The first recipe was Symon's Crab Tater Tots, the second was Tyler's Zucchini Crab Fritters, and the third was Tyler's Lobster Cakes, which I had to turn into crab cakes simply because I don't think I'll ever find fresh lobster anywhere around here.

Let's talk about these tasty little morsels known as Zucchini Crab Fritters with Grapefruit Aioli. Well worth getting out the deep fryer, these are a real treat! First, zucchini is sliced thinly with a powerfully sharp mandoline. The thinly sliced zucchini is salted and set aside so that they moisture is drawn out and the slices become pliable. Crab is mixed with egg white and seasoned simply with salt and pepper. A spoonful of crab is placed on one end of each zucchini slice and rolled up, starting with the end that has the crab meat. Each zucchini fritter is rolled in flour, dipped in egg, and finished in panko. Tyler always advises to let your coated items set aside in the refrigerator for at least 10-15 minutes. He says that this added step helps the coating to set up. I use this tip constantly, applying it to all coatings, and have had lots of success with it.

After resting, the fritters are ready to be fried for 3-4 minutes and dipped in a delicious grapefruit aioli. Everyone loved these fritters, including my husband who isn't the biggest fan of crab. We ate them up in record time!

Saving the best for last are these fabulous Lobster turned Crab Cakes with Lemon Aioli and Bacon Frisee Salad. (NOTE: In all my travels I didn't find frisee either, so I used a mix of field greens) The crab cakes were very simple and delicately flavored with sliced white bread, egg white and mayo. Panfried until crisp, they were served with the most delicious and bacony salad and an equally delicious and complimentary lemon aioli. I found this recipe to be my favorite of all three crab recipes.

Although I would've enjoyed having fresh crab, the pasteurized canned claw meat worked well in all three applications. I would buy it again if I couldn't find fresh.

Both recipes can be found on Tyler's blog, or by clicking on the links below:
Zucchini Crab Fritters with Grapefruit Aioli
Lobster/Crab Cakes with Lemon Aioli and Bacon Frisee Salad

I'm submitting my Crab Cakes with Lemon Aioli and Bacon Frisee Salad to Beth at The Seventh Level of Boredom for The Bacon Games, a very tasty and promising new foodie adventure.

Wednesday, October 27, 2010

Recipe #56 - Stirring the Pot: Tempura Green Beans with Chile, Garlic & Sesame Aioli


I can't even tell you how many times I bought the green beans for this recipe and then ended up using them for something else. I lost track. I wanted to make them while I could still find fresh green beans, yet I was afraid I'd love them too much to stop eating them. I was right! Tyler's Tempura Green Beans with Sesame Aoili are absolutely fantastic. I told myself that I would only eat 5 of them. Yeah, right! One bite of that green bean in a light, crispy, crunchy coating sent me over the edge. Scattered with crispy bits of garlic, ginger, and chile these green beans are beyond fantastic dipped in the sesame aioli. This appetizer is sure to be a hit!

Tempura Green Beans with Chile, Garlic, and Sesame Aioli
Adapted from Stirring the Pot
Serves 2-4
Time: 35 minutes
Aioli
1/4 cup toasted sesame oil
2 teaspoons minced ginger
1 teaspoon minced red chile (I used one cayenne pepper)
1/2 cup store-bought mayo
1/2 cup sour cream
1 teaspoon lemon juice
Kosher salt and freshly ground pepper
Tempura Green Beans
1 bunch green beans (about 1lb), root-end trimmed (1 pound usually equals 2 handfuls)
3/4 cup all-purpose flour
1/4 cup cornstarch
2 tablespoons baking powder
1 teaspoon kosher salt
1 egg yolk
3/4 cup club soda, chilled
vegetable oil, for deep-frying
Kosher salt
1 lime, cut into wedges, for garnish
1/4 bunch fresh cilantro (about 4 sprigs), for garnish

For the aioli, heat sesame oil in a small pan over low heat. Add ginger, garlic, and chile and saute until fragrant and crispy. Drain ginger, garlic and chile and set aside, reserving the oil.

In a blender combine mayo, sour cream, and the reserved sesame oil. Add lemon juice and season with salt and pepper. Puree until smooth. Set aioli aside.

For the Tempura Green Beans, in a large bowl combine flour, cornstarch, baking powder, and the 1 teaspoon salt. Make a well in the center and add yolk. Gradually whisk in club soda, slowly working your way out from the center to form a smooth batter.

Pour 2-3 inches oil into a large heavy pot and heat to 375F. Dip green beans into batter, shake off excess, and fry a few at a time for 4-5 minutes, until golden and puffy. Drain on paper towels; sprinkle with crispy fried ginger, garlic, and chile. Garnish with lime wedges and cilantro and serve with Aioli.

Notes/Results: These were a huge hit and everyone loved them. The green beans remained somewhat firm, yet tender, and the tempura batter was extremely light and crispy. At times sesame oil can be a bit strong and I was concerned that the aioli would be overpowering, but that was not that case at all. It was a wonderful accompaniment to the beans. The crispy bits of chile, garlic, and ginger really added to the flavor of the dish. We kept trying to sprinkle those bits over our beans and finally decided to add the crispy bits to the aioli so that we wouldn't miss out on the flavor. A total hit all around. I would make these again when I wanted to splurge.

Thursday, August 12, 2010

Recipe #55 - Stirring the Pot: Fried Chicken with Buttermilk Cherry Tomatoes


About a year and a half ago I decided that I was going to cook my way through Tyler's book, Stirring the Pot. I liked the way Tyler's book was broken down into rather unique chapters, each chapter celebrating a specific cooking technique: Roast; Saute; Braise; Fry; Grill; Bake; Steam; Fresh and Raw. At that time I was pretty good at roasting,sauteing, braising and baking. Fresh and raw...no problem! However, when it came to frying, grilling, and steaming I had no experience......and I still don't! Somehow I have managed to put off the recipes in those chapters (I'm definitely one to procrastinate).

Well, I'm procrastinating no longer. Awhile back my husband bought a deep fryer because we thought it would be easier to regulate the temperature of the oil that way. The deep fryer makes things easier for me and I like the fact that it frees up the stove top. I practiced my deep-frying by making french fries in the fryer and learned that it ran on the hot side. If a recipe calls to fry at 375F, I've learned to turn my fryer down to around 325F. After some practice I thought I had a pretty good handle on frying......but that was not the case.

My first batch of fried chicken cooked all the way through but the coating was very dark. I turned the oil down and decided to cook the chicken a little longer on the second batch. When the second batch came out the coating was perfect, but the chicken was still pink inside..........really not good! I turned the temperature back up a tad and fried the third batch. You know what they say about the third time being a charm? Well, thank God the third time was a charm! Each batch fried for about 20 minutes, meaning that I stood in the kitchen lording over the fryer for an hour and I was in no mood for raw or burnt chicken.

Tyler's fried chicken is marinated in buttermilk and hot sauce which makes the chicken very tender. The coating is made from all purpose flour, garlic powder, onion powder, sweet paprika, and cayenne pepper and has quite a bit of flavor. He serves his fried chicken with ancho cress or any other peppery lettuce, as well as sliced cherry tomatoes and a homemade buttermilk blue cheese dressing. In the book Tyler pours the buttermilk blue cheese dressing over the fried chicken. We decided to serve ours on the side. Overall I would say that this is a solid recipe for fried chicken. The chicken was tender and the coating was flavorful with all the spices. I don't know if I would make it again, but then that might not be a fair statement since I'm not much on frying. You can find the recipes online HERE and HERE.

Next up from Stirring the Pot is Tempura Green Beans with Chile, Garlic, and Sesame Aioli! I think I nabbed the last of the fresh green beans and I'm really looking forward to this one.

Tuesday, August 3, 2010

Recipe #54 - Stirring the Pot: Salmon "Slashed and Stuffed" with Basil Butter


I took a big break cooking from Tyler's Stirring the Pot, but now I'm back in the kitchen with Tyler and I'm loving it! My goal is to crank out several of Tyler's summer-inspired recipes that highlight fresh and seasonal produce while it is still available. This Salmon "Slashed and Stuffed" with Basil Butter is the perfect recipe to utilize seasonal produce: lots of garden fresh basil, cherry tomatoes, zucchini, onion, fennel and red bell pepper. I was lucky enough to find all these ingredients at the Farmer's Market. This recipe is gorgeous when plated and really flavorful and delicious. It really exceeded my expectations!

Salmon "Slashed and Stuffed With Basil Butter (recipe also found HERE on Food Network)
Ratatouille:
Extra-virgin olive oil
3 garlic cloves, peeled and minced
pinch crushed red pepper
4 sprigs fresh thyme
1 red sweet bell pepper, thinly sliced
1 large fennel bulb, thinly sliced
1 zucchini, thinly sliced into rounds
1 medium onion, sliced
2 cups cherry tomatoes
Kosher salt and freshly ground black pepper
Herbed Bread Crumbs:
2 cups panko
1 bunch fresh basil sprigs (about 16 sprigs), leaves only
1/2 bunch fresh Italian flat-leat parsley (8 sprigs), leaves only
Salmon:
1 bunch fresh basil sprigs (16 sprigs), leaves only
2 sticks unsalted butter, room temperature
1 whole side of salmon, cleaned and scaled (about 2 pounds total)

For the Ratatouille, place a large pan over medium heat and add a 3-count of oil (about 3 tablespoons). Add garlic, crushed red pepper, thyme, and the vegetables, gently squeezing the tomatoes as you add them. Season with salt and pepper. Saute for 5-7 minutes until vegetables wilt. Pour vegetables onto a sheet tray and set aside.

For the Herbed Bread Crumbs, in a food processor combine panko, basil, and parsley. Pulse until the crumbs are green. Set aside.

To make the Basil Butter, roughly chop the basil. In a food processor combine basil and butter. Pulse until fully combined and creamy. (Note: Tyler's basil butter appears green but does in fact turn green until the salmon is removed from the oven and served).

Preheat oven to 400F. Using a chef's knife, make slits on the skin side of the fish. Paint the skin side of the fish with the Basil Butter. Carefully place the fish, skin side up, on top of the sheet tray covered with Ratatouille. Bake about 15 minutes, until top is golden and bubbly. Top the fish with Herbed Bread Crumbs and switch on the broiler. Broil for 5 minutes, until golden and crispy.

Notes/Results: A whole side of salmon was not available so I opted to use 4 salmon fillets. I made the whole batch of Ratatouille, which was phenomenal. I quartered the recipe for the Herbed Bread Crumbs and halved the recipe for the Basil Butter. These adaptions worked out well and everyone REALLY enjoyed this dish. I was expecting it to be good, but it was sensational. The salmon was tender, buttery and delicious and the Ratatouille was out of this world delicious. The farm fresh flavor of the vegetables and fresh really stood out. This would be a wonderful meal to entertain with and serve to company this summer.

I am submitting this to my friend girlichef who is a co-host of the wonderful new foodie event, Two for Tuesdays.

Thursday, April 8, 2010

Recipe #53 - Stirring the Pot: Baked Lime Pudding Cakes


My Mom's Birthday is today and she is not excited. Some women have no problem getting another year older, my Mom is not one of them. For example, I remember the year she turned 30. I was only five years old and I remember it well. My Dad and Grandpa tried telling her that 30 wasn't old, she wouldn't buy into it. Today Mom is turning 57 and even though my parents have been divorced for years, they still love each other deeply. A couple days before Mom's birthday, I always receive an endearing phone call from my Dad. First, he reminds me it is Mom's Birthday. Next, he asks me a million questions about what gift I'm buying. He always follows that up with another million questions about what special things we are going to do for her birthday. He asks me if I have enough money to do everything I want to do. He always wants to make sure there is enough. Bless his heart, my Dad is the sweetest man alive. When my Dad finally feels satisfied with my plans, he'll end the call.

Dear Dad:
We celebrated Mom's birthday all week. Tuesday morning I took her and the kids to breakfast and then we went to the zoo. It was pretty fun, but the weather was unseasonably hot and we all got a little sunburnt, but only on the left side of our body. Don't worry, we laughed about it. We bought her a new blue shirt. Yes, I remember that blue is her favorite color. We also bought her a pair of new blue pants. Mainly because you said just buying a shirt wasn't enough. I know you wanted me to buy bubble bath, but I opted for lotion and some soap she's been wanting. Since you were worried that all of that wasn't going to be enough, I made her these little lime pudding cakes. Yes, I remember that she doesn't like chocolate. Yes, I remember that she likes pies. Instead I opted for these little lime pudding cakes because lately Mom loves limes and she's always a fan of a light dessert. Don't worry because I think these pudding cakes are worthy of her. I wish you could be here to have one. You would probably like them too. Oh, yes, I will make sure to tell her you said "Happy Birthday". I know it will make her happy.


Baked Lime Pudding Cakes
Adapted from Tyler Florence's Stirring the Pot
1 tablespoon unsalted butter
superfine sugar
2 eggs, separated
2/3 cup reduced-fat buttermilk
1 tablespoon lime zest
2 tablespoons lime juice
1/4 cup all-purpose flour
2/3 cup superfine sugar
1/4 teaspoon kosher salt
Lime halves and leaves, for garnish

Preheat oven to 325F. Butter and lightly sugar four 6-ounce ramekins. Using the paddle attachment on a kitchen stand mixer, beat yolks, buttermilk, lime zest, and lime juice on medium speed until well combined. Reduce the speed to low and slowly add flour, the 2/3 cup sugar, and the salt, until just combined. Transfer to another large bowl. Thoroughly wash mixing bowl with soap and hot water; return to stand mixer. Using the whisk attachment, beat egg whites in the clean bowl until stiff peaks form. Gently fold the beaten egg whites into the yolk mixture, a little at a time.
Divide mixture evenly among ramekins. Place ramekins in a roasting pan and fill the pan with hot water halfway up the sides of the ramekins. Bake about 1 hour, until the top springs back when gently pressed and the cakes have a light golden color. Remove ramekins from water; allow to cool slightly. Carefully invert each onto a plate.

Notes/Results: Definitely a dessert worth serving Mom on her birthday. These cakes are light, soft and delicate. They have a wonderful light lime flavor and I really enjoyed the one I ate this morning (quality control, right) I had to try one before I fed it to my Mom. I would definitely make these again. I think my Mom is going to love them.

Sunday, April 4, 2010

Recipe #52 - Stirring the Pot: Baked Fresh Ham with Apple-Cranberry Chutney


It has been an absolutely gorgeous Easter Sunday in the Bluegrass. The weather is a sunny 70 degrees and I'm writing this post from a lounge chair in my driveway. The country music is blaring, the kids and my husband are playing basketball and the sun is going down. The sound of the kids laughter is infectious. What more could you ask for?


Well, a delicious dinner would've topped the day perfectly, but it didn't happen. Cooking my way through Tyler's Stirring the Pot is a lot of fun, but some of the recipes like this fresh ham are somewhat seasonal and need to be prepared for a special day, such as Christmas or Easter. This recipe for Baked Fresh Ham has somewhat haunted me. I had tried to prepare the ham for Christmas but was told that I wouldn't be able to get any fresh ham until Easter. I started looking for fresh ham at the beginning of March and never found it. Desperate, I called the butcher in Lexington. He explained to me that I couldn't just buy a 5-6 pound fresh ham but that I would have to buy an entire leg of pork. Twenty pounds of pork! He was kind enough to tell me that he would cut the ham and butcher the rest, free of charge. Thirty dollars later, I left his shop with a 6 pound fresh ham, 11 pounds of ground pork and two ham hocks. This is how Project Pork began.


After much planning I was hopeful that Tyler's recipe for Baked Fresh Ham with Apple-Cranberry Chutney would be a winner. High hopes. Need I say more? High hopes get me almost every time.

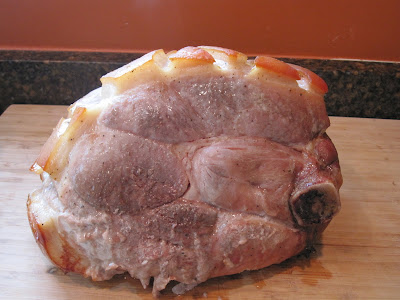
Notes/Results: Tyler's recipe is about as simple as it gets. You simply oil, salt and pepper the fresh ham and baked it covered for 2 hours. After 2 hours, the ham is uncovered and baked for another hour. Simple enough, right? Well, the ham was flavorless, bland and chewy. My ham never achieved the pinkish hue that Tyler's ham has in the cookbook. Also, the outside of the ham was overcooked and dry while the inside of the ham was still undercooked. It was just plain gross. My father in law and my husband were the only ones who choked it down. I took one bite and pushed it to the corner of my plate. Luckily, we had enough side dishes that it all worked out okay. I have a ton of the ham leftover and I think it is rather inedible. When a recipe fails, I always try to think of what I could have done wrong, but I don't see where I could have gone wrong with this. I bought the ham from a very reputable butcher, it was extremely fresh, I followed all the directions, but it just wasn't very good at all. I have quite a bit of the ham left and I don't foresee us eating the leftovers. While I enjoyed the chutney, which tasted like a spicy applesauce, I did not enjoy it with this ham. I have chose not to post the recipe based on the fact that none of us cared for it very much.


Even though we did not enjoy the fresh ham, I am excited about the 11 pounds of ground pork and the two ham hocks. Project Pork is still happily underway. I have been having fun thinking of ideas for all the ground pork and will have a Throwdown featuring breakfast sausage coming up this week.

I hope you all had a wonderful Easter Sunday. Even though the fresh ham didn't work out we had an absolutely wonderful day!

Tuesday, March 16, 2010

Recipe #51 - Stirring the Pot: Slow-Roasted Beef Ribs with Mushroom Stroganoff


Tyler won us over with this version of beef stroganoff. It was rich, meaty, indulgent and comforting.

The recipe calls for 3 pounds of beef short ribs, cut into 2 ribs apiece. I halved the recipe, buying one and a half pounds of beef ribs and opted not to cut them, leaving them whole. The ribs are simply placed in a roasting pan, drizzled with olive oil, salt and pepper and roasted for 3 hours in a 300F oven. You can hardly get more simple than that.


When the 3 hours time frame is closing in, start preparing your sauce. You'll need mushrooms, garlic, shallots, to start. Once the mushrooms have browned, add the garlic and shallots. When the garlic and shallots are fragrant, remove from heat and add the cognac, scraping to deglaze the pan.

Return the pan to heat and add whipping cream. Reduce and simmer, until reduced by half. Turn off heat and stir in mustard and sour cream. Season with salt and pepper and keep warm until serving. This is one thick and luxurious sauce.

Meanwhile, cook one pound of egg noodles (I chose egg pappardelle noodles from Trader Joe's) in a pot of salted water. Drain well, toss with butter and chopped parsley. Pile buttered parsley noodles high on a plate, top with ribs, and finish with stroganoff sauce. Garnish with parsley. (I really wish I had parsley on hand for this dish. As it was, I was out of parsley and all other green herbs).


You can find the recipe HERE on Recipe.com

Notes/Results: This recipe is actually one of the easier Tyler recipes I've tried. I had concerns about not searing the short ribs first and I also worried that they would dry out, but they didn't. The end result was richly colored short ribs with almost crispy, crackly edges that pair wonderfully with the rich and luxurious stroganoff sauce. The stroganoff sauce was like liquid gold! I really wish I had the fresh parsley on hand because I think the dish definitely needed that fresh pick me up, which only fresh herbs can deliver. I think this is a tasty, comforting, quick and easy Tyler recipe that would be great for family dinners or entertaining. No hard to follow instructions, no long list of ingredients, and best of all: NO BIG MESS to clean up! All in all, this is a great recipe.

I still have two rather heavy recipes to post this month:
Baked Fresh Ham with Apple-Cranberry Chutney, which I will probably prepare for Easter and Slow-Roasted Pork Shoulder with Salsa Verde and Grainy Mustard Mashed Potatoes. After that, I will be posting some seafood and salads. There are still 39 recipes left for me to cook in Stirring the Pot.

On another note: I was hoping to cook up some Irish fare for St. Patrick's Day in celebration of my Irish roots, but turns out the kids and I are feeling a bit under the weather this week. Happy St. Patrick's Day to you all!

Friday, March 12, 2010

Recipe # 50 - Stirring the Pot: Country Spare Ribs and Mustard Greens Braised in Apple Cider


I took a very long break in my quest to cook through Tyler Florence's Stirring the Pot. In fact, the last recipe I made from the book was back in mid-November. Feeling guilty, I dug out my rather beaten up copy of Stirring the Pot and resolved to get started again. With the onset of spring, I wanted to try and bang out some of the wintery dishes before the weather convinced me otherwise. Within the next week or so I will be bringing you some of Tyler's more heartier dishes, both this recipe for Country Spare Ribs and Mustard Greens Braised in Apple Cider AND Slow-Roasted Beef Ribs with Mushroom Stroganoff. Spring has already come to Kentucky, but I know it won't hurt my husband's feelings to eat such hearty and meaty meals.

Getting back into the kitchen with Tyler means a few things. First of all, it means searching for hard to find ingredients. Some of you are lucky to live in large cities with wonderful and bountiful grocery stores. I'm not so lucky. For me, this means a trip to Lexington and running around to different stores. For example, there are no beef short ribs or 4-pound pork rib roasts here in Georgetown. So, I hightailed it to the butcher in Lexington and was able to get both cuts of meat. The pork rib roast is really 4 thick pork chops attached to the bone in a roast-style. I've never cooked the pork rib roast before, so I was excited to get started.

The other part about getting back into the kitchen with Tyler is dirty dishes, lots of dirty dishes. I really love Tyler and his recipes, but I'm not excited about the prospect of doing tons and tons of dishes. There is really nothing more daunting in the kitchen than a sink overflowing with dirty dishes.

The pork rib roast was really easy to prepare and really only required a small amount of looking after. The pork is braised for a total of three hours, largely unattended, save for the every half hour when you baste. The pork, which Tyler refers to as country spare ribs is braised in apple juice, apple cider vinegar, mustard greens, garlic and thyme for 2 and a half hours covered, basting every half hour. After two and a half hours, the cover is removed and the meat is cooked until the surface caramelizes and the liquid reduces. A gravy is made by squeezing the garlic pulp into a blender along with the juices from the braising liquid. The pork is served on top of the greens and mashed potatoes. The recipe can be found HERE on Tyler's blog.


Notes/Results: I'm really glad this recipe pushed me to buy and cook with the pork rib roast. I really liked this cut of meat. I have to say that I wasn't too crazy about Tyler's recipe though. Even though the meat was braised and the directions were followed to the letter, the pork ended up overcooked and dry. Also, in Tyler's book, the pork has a glossy sheen to it, almost like it is covered in a barbecue sauce. My pork never got that caramelized, nor did the sauce look like a barbecue sauce. Not sure what happened there. I will buy this cut of meat again, but will probably braise it in a different liquid or coat the pork in some more savory seasonings. Neither me or my husband cared much for the sweetness that the apple juice lent to the pork. The pictures didn't turn out too well. The pork was rather pale looking and so were the mashed potatoes. The braising liquid, which was pureed, was also on the clear side, which didn't really add any color to the dish.


Overall, it was a learning experience. I was pretty sure I would love this cut of meat and I was right. I never like it when a recipe doesn't work out, but I do like learning about what would work. I'll chalk it up to a learning experience.

Thursday, November 19, 2009

Frisee with Pears, Goat Cheese, and Salted Pecans -Recipe #49 - Stirring the Pot


My friend and I had a long conversation yesterday about what we were serving for Thanksgiving. The two major dilemmas are not having enough oven space and too many things needing your attention at once. After at least one hour on the phone, we both decided that a great Thanksgiving salad was going to be part of our Thanksgiving table this year. Why not?

Maybe a green salad isn't a traditional side dish, but it is an easy and beautiful addition to any Thanksgiving table. A salad can be made the night before and doesn't require any oven or stovetop space the next day. Better yet, a salad requires no attention while you're busy cooking other things. Salads are beautiful and light and are a welcome dish at any party I've thrown. For all of these reasons, my friend and I both decided that we were definitely making a salad for Thanksgiving!!

Can you see where I'm going with this? This recipe from Stirring the Pot would be a perfect salad for any Holiday table. It is beautiful, easy, colorful, healthy and absolutely delicious!!

Frisee with Pears, Goat Cheese, and Salted Pecans -adapted from Stirring the Pot by T Flo
Dressing:
1 cup creme fraiche ** I used Greek yogurt
2 tablespoons Dijon mustard
1/2 lemon, juice only
1 tablespoon sugar
1 shallot, minced
Kosher salt and freshly ground black pepper

Salad:
2 medium ripe Bosc pears **I used red Bartlet pears for the red color
8 cups frisee lettuce **I couldn't find any at Whole Foods so I used mixed baby greens
3/4 cup salted pecan halves, toasted
3/4 cup crumbled goat cheese

In a small bowl combine creme fraiche (or greek yogurt), mustard, lemon juice, and sugar. Fold in shallot and season with salt and pepper. Cover and set aside in the refrigerator to let the flavors come together. Note: I let my dressing set for 24 hours.

Meanwhile, for the salad, halve, core, and cut the pears into thin slices. Toss pear slices together with frisee leaves and toasted pecans in a large salad bowl. Drizzle with dressing and fold in the crumbled goat cheese. Serve immediately.

Notes/Results: I have been wanting to make this salad since I received the book. It is creamy, sweet, salty, and crunchy. I absolutely loved it and think it would be great for any Holiday table, especially with the red bartlet pears. The pears do need to be somewhat firm or they will fall apart in the salad. I couldn't find salted pecan halves, so I coated them in a little butter, sprinkled them with a little salt and roasted them in the oven at 350F for about 8 minutes. I think dried cranberries would be a great addition to this salad and they would add a wonderful dimension with their tart and chewy flavor. This salad was extremely healthy, especially with the creme fraiche subbed out with the Greek yogurt. I looked at the nutritional information for the goat cheese and saw that the package was 4 ozs. Each 1 oz. serving of goat cheese is only 70 calories. This would be a great main dish or side dish to any table. Add a whole grain roll or slice of bread and all food groups are represented!! A definite make again recipe!

What are you serving for Thanksgiving? How do you get around the issue of limited oven space and too many things requiring your attention? I'd love to hear your secrets!!

Wednesday, November 11, 2009

Potato Gnocchi with Braised Swiss Chard and Pomegranate Brown Butter - Recipe #47 - Stirring the Pot


This recipe has a lot going on. In fact, you could almost say that this recipe is evil! Making the gnocchi was the easy part. The hardest part was making the pomegranate reduction, braising the swiss chard, making the brown butter, and sauteing the gnocchi in brown butter ALL AT THE SAME TIME! It's been forever since I've actively had every burner on my stovetop going all at once. And, every burner needed my attention. In addition to all these pots and pans, I was trying to open up a pomegranate and those little pesky seeds were flying all over my kitchen. I hardly ever cry, but I wanted to!! The dishes were piled up over the sink, there was flour and potato on the counter and on the floor, and there were little red-rubied pomegranate seeds everywhere. My kitchen looked like a war zone.

I quickly snapped some pictures and sat down to eat. I was still reeling with anger as I looked around my kitchen and surveyed the giant mess.

Do you think Tyler Florence does the dishes?


Potato Gnocchi with Braised Swiss Chard and Pomegranate Brown Butter-adapted from Stirring the Pot by Tyler Florence
Gnocchi:
2 pounds russet potatoes
1/2 cup grated Parmigiano-Reggiano
12 ounces fresh ricotta, drained
1/4 teaspoon freshly grated nutmeg
2-1/2 cups all-purpose flour
kosher salt and freshly ground black pepper
1 stick unsalted butter
Pomegranate Brown Butter Sauce
2 sticks unsalted butter
4 cups pomegranate juice, rendered
kosher salt and freshly ground black pepper
Braised Swiss Chard
extra-virgin olive oil
4 garlic cloves, peeled and minced
2 small onions, diced
2 bunches swiss chard, roughly chopped
2 quarts vegetable broth
kosher salt and freshly ground black pepper
1/4 cup apple cider vinegar
2 tablespoons unsalted butter
For garnish:
1/4 cup fresh pomegranate seeds
1/4 cup Parmigiano-Reggiano shavings

For the gnocchi, preheat oven to 350F. Arrange potatoes on a roasting tray and prick all over with a fork to make holes. Roast potatoes for 45 to 50 minutes, until the flesh is tender enough to scoop out with a spoon. When cool enough to handle, scoop the warm flesh into a food processor and puree with the grated Parmigiano-Regianno. Refrigerate until completely cool.

In a large bowl fold together the potato puree, drained ricotta, and nutmeg. Fold in the flour, 1 cup at a time. Season with salt and pepper and mix until a soft dough forms. (Do not overwork dough or it will be tough). Flour a surface and roll dough into a rope 1 inch in diameter. Cut into small pillow shapes.

Bring a large pot of salted water to a boil. Add gnocchi and cook until they float. Drain well and transfer gnocchi to a sheet tray. Refrigerate until cool. When gnocchi are cool, melt the 1 stick butter in a large nonstick saute pan over high heat. Add gnocchi and saute until brown, set aside.

For the pomegranate brown butter sauce, brown the 2 sticks butter in a large saucepan over medium-low heat until it turns a hazelnut color (the butter solids should be brown and aromatic). Meanwhile, in a large saucepan reduce pomegranate juice over medium-high heat until syrupy. Add pomegranate reduction to brown butter. Swirl pan to combine ingredients; season lightly with salt and pepper.

For the braised swiss chard, in a small stockpot heat a 2-count of olive oil (about 2 tablespoons) over medium heat. Add garlic and onions; saute for 2 to 3 minutes or until fragrant. Add swiss chard and toss a few times. Add vegetable broth. Season with salt and pepper; simmer for 5-6 minutes, until Swiss chard is wilted and tender. Stir in vinegar and the 2 tablespoons butter. Toss well to combine.

Serve braised swiss chard with gnocchi and top with pomegranate brown butter sauce. If you like, garnish with pomegranate seeds and sprinkle with Parmigiano-Reggiano shavings.

Notes/Results: Absolutely delicious!! Amazing combination of textures and flavors. A must make, especially if you are a vegetarian or happen to be hungry for a wonderful meat-free meal. The little gnocchi are so fluffy, the swiss chard is almost meaty and has a wonderful bite, the brown butter sauce is nutty and sweet, the shaved Parmigiano adds a salty bite, and those little pomegranate seeds are like big bursts of tart flavor. This is one lip-smacking dish!

I think you could do several things to make this recipe easier. First and foremost, just buy the gnocchi. Believe me, there is so much flavor going on in this dish that you won't miss the homemade gnocchi. I've made this recipe twice now and I bought a great whole wheat gnocchi for the second time around. Secondly, deal with your pomegranate ahead of time. And, maybe you can make either the swiss chard or the pomegranate brown butter sauce ahead of time. This is definitely a dish worth making and is beautiful with all the pomegranate seeds sprinkled on top! If you don't want to try the whole dish, at least try the preparation for the swiss chard and top it with the pomegranate brown butter sauce and pomegranate seeds. I'm thinking of serving the swiss chard as a side dish for Christmas because it is so pretty and reminds me of the holidays with those red rubied pomegranate seeds.

Wednesday, October 28, 2009

A Farewell to Tyler Florence Fridays: Baked Breakfast Apples with French Toast Crust - Recipe #46 Stirring the Pot


This is the last week for Tyler Florence Fridays, a cooking group that I will surely miss. Tyler Florence Fridays was the first cooking group that I joined and I enjoyed every minute of it. Along the way, I have met the kindest bloggers who I would consider great friends. I want to say a special thank you to Deb at Kahakai Kitchen, Natashya of Living in the Kitchen with Puppies, and Megan of My Baking Adventures. You all are to thank for starting and heading up such a wonderful group! Fridays will never be the same.

In the spirit of Tyler Florence Fridays, I am going to continue to post my weekly Tyler recipe on Fridays. I have at least forty-two recipes left in Stirring the Pot, so I have quite a few more Tyler recipes to share!

For the last week of TFF, I chose to make Baked Breakfast Apples with French Toast Crust. I have seen this made several times by other group members and it always gets great reviews. Armed with apples from a recent trip to the orchard I set out to try this recipe. It was very, very easy to put together.

Baked Breakfast Apples with French Toast Crust -adapted from Stirring the Pot by Tyler Florence
French Toast
3 large eggs
1 cup whole milk
1 tsp. pure vanilla extract
1/2 teaspoon ground cinnamon
pinch kosher salt
1/2 of a 12-14 oz loaf challah, cut into 1-inch thick slices

Filling
1/2 stick cold unsalted butter, cut into small cubes
1/2 cup packed light brown sugar
2 tablespoons dried cranberries
2 tablespoons roughly chopped pecans
1/2 teaspoon ground cinnamon
6 large Granny Smith apples, peeled, halved, and cored

To prepare the french toast, combine eggs, milk, vanilla, cinnamon, and salt in a shallow bowl, whisk until well combined. Lay challah slices in egg mixture to coat, turning slices occasionally to allow bread to absorb all of the liquid.

For the filling, place a 10-inch oven-safe skillet over medium heat. Add butter and brown sugar and cook for 2-3 minutes, until lightly golden and caramelized. Remove from heat. Sprinkle in the cranberries, pecans, and cinnamon. Gently press apple halves into the caramel so they are "standing" and line up one behind another so there is a flat surface on top (you may need to cut some of the halves to fill in the gaps).

Preheat oven to 350F. Place the soaked slices of challah over apples so they are completely covered. Bake in the middle of the oven for 55 50 60 minutes, until the top is golden and puffy and the apples are knife-tender. Cool slightly. Place a large platter over the top of the skillet. Being very careful, turn the skillet and the platter together, so the skillet is on top and the whole french toast dish comes out on the platter. Remove the skillet. Serve warm.

Notes/Results: This recipe is easy to throw together and is a great way to serve breakfast/brunch without a lot of fuss. It smells wonderful baking in the oven! Six medium-sized apples filled my 10" cast iron skillet perfectly. I can never find challah or brioche locally, so I subbed a thick sliced whole wheat bread (I'm trying to lighten things up anyway). It is only fair to say that I don't LOVE cooked apples. That being said, I liked this dish, but probably would not make it again. I think if baked apples are your thing, then this is definitely a recipe worth trying out. I liked the crispiness of the crusty toast when it was first out of the oven. The pecans and cranberries are a great addition. This is great served on it's own, as dessert with a scoop of vanilla, or with a whipped or poured cream over the top.

Head on over to Tyler Florence Fridays to check out our last roundup and don't forget to check out I Heart Cooking Clubs, the sister club to Tyler Florence Fridays. Right now we are cooking Nigella Lawson's recipes and having lots of fun each week.

Tuesday, October 20, 2009

Slow-Braised Meatballs with Cranberry Sauce and Egg Noodles - Recipe #45 Stirring the Pot

When I heard that Joanne of Eats Well With Others was hosting Regional Recipes this month, I knew I wanted to participate. Joanne is not only a great blogging friend, but a very dedicated and inspiring young lady. In fact, she just ran a marathon! I figured that if Joanne could run a marathon, then I could get my act together to make this recipe for Regional Recipes.

This month, Regional Recipes is focusing on Scandinavian cuisine. This Scandinavian theme was perfect for me because I had been wanting to make this recipe, Tyler's version of Swedish meatballs. This is how Tyler describes these meatballs:

"These aren't your typical goodfella's meatballs. You can look to Sweden for the inspiration here with the sweet cranberry sauce serving as a substitute for the traditional lingonberries."

Tyler's recipe is in Stirring the Pot, but you can also find it here on the food network.

Notes/Results: This was a pretty cumbersome dish to make and involved many dirty pots and pans! Over at Tyler Florence Fridays, Tyler is famous for yielding many dirty dishes :D We still love him though. Tyler directs you to brown the meatballs on the stove top first in a large roasting pan. Well, I didn't have a roasting pan large enough for 3 pounds of meatballs and oodles of braising liquid. I had to cook everything in batches. Then I had to transfer to another roasting pan in order to put it into the oven. Maybe I wasn't with the program yesterday, but there has to be an easier way. Overall, we liked this dish. It was an extremely savory dish and fairly mild in flavor, even with the addition of the cranberry sauce. The meatballs had a soft and delicate texture due to being braised in the cooking liquid. My husband doesn't care much for a "soft" meatball, but he did like these. The soft texture of these meatballs didn't bother me at all. I quite liked them. I enjoyed dunking my meatballs into the cranberry sauce. The cranberry sauce was a beautiful red color and really helped bring the meatballs up another notch. This was a stunning dish when it was plated with the saucy meatballs, red cranberry sauce, and pretty green dill sprinkled around the plate. It would be great at the holidays!! A very tasty dish indeed, especially if you can get around all those dirty dishes :D

I will also be submitting this to Tyler Florence Fridays this week! Don't forget to head on over to TFF this weekend to see what everyone else is cooked up throughout the week. There are still two weeks left to participate with TFF!!

Wednesday, October 14, 2009

Shrimp Scampi with Linguine - Recipe #44 Stirring the Pot

I'm excited to say that I am now halfway through Stirring the Pot! There are 88 main recipes in the book and this Shrimp Scampi is recipe number forty-four. I started this adventure back in January of this year. I had just received Tyler's new cookbooks, Stirring the Pot and Dinner at My Place in the mail. I really liked both books, but Stirring the Pot featured recipes I hadn't tried before. On a whim, I decided to cook my way through it.

I am so happy I decided to start this blog. It is so refreshing to meet people who share the same deep passion for food and cooking. And, along the way I have met some great friends. Blogging is something that I will continue to do well after I'm through cooking through Tyler's book. A big thanks to everyone who has been following me along on my adventure! I appreciate all the feedback and kind words.

Cooking my way through Tyler's Stirring the Pot has been a learning experience. For example, I had never successfully baked any yeast bread prior to this book. I had to face my fears with yeast and was successful with Tyler's parker house rolls. Now I love baking with yeast and I'm no longer scared of it. Along the way, I've tried some dishes that I thought I wouldn't like and found out that I loved them. All in all, I have learned a lot and I am only halfway through. The next half is going to be even more of a learning experience as I move on to some of the dishes that are a little more unique to me.

In no certain order, here is a list of my top ten favorite recipes so far. These are the recipes I feel were outstanding and also that I have made over and over again in my kitchen. You can click on each recipe to view the post and my review, if interested.
Perfect Roast Chicken
Chicken with Mushrooms and Marsala
Chicken with Orange, Olives, and New Potatoes
Ultimate Onion Rings
Rosemary-Garlic Mozzarella Balls with Roasted Cherry Tomato Dipping Sauce
Lamb T-Bones with Smashed Potatoes and Peas
Grilled Flatbread with Caramelized Onions, Gorgonzola, Mascarpone, and Crunchy Red Grapes Grilled Brie and Tomato on Crusty Bread
Strawberry-Rhubarb Pie
Parker House Rolls

*With Honorable Mention to:
Berry-Brioche Bread Pudding with Lemon Fondant
Crispy Asian Chicken Salad
Arugula, Fennel and Grape Salad
Shrimp with Sugar Snap Peas and Cashew Butter

Overall, I have enjoyed forty-two of the forty-four recipes I've tried. The only exceptions have been Tyler's California Bacon and Eggs and also his Lamb Shank Stew with Russet Potato Top.

I have also noticed that Tyler's recipes for baked goods are excellent. In fact, his Big Fat Chocolate Chip Cookie may just be my all time favorite recipe of his. Although they are not in Stirring the Pot, they are online at the Food Network. They are one serious chocolate chip cookie and I think I've made them a dozen times this year.

Notes on the Shrimp Scampi: I needed a quick recipe this week and decided to use up some rock shrimp I had bought at the grocery. My husband doesn't eat shrimp, so I made this for me and my mom today. It was another good recipe and my mom enjoyed it a lot. I am not a lover of shrimp, but I do like it. For me, the best part was the sauce. It was sweet, zesty, and a little spicy. I would make the recipe for sauce again. My mom, shrimp lover that she is, said that I could make it again anytime. She really liked it!! This recipe has received a five star review on the food network, so it is worth checking out! You can find the recipe here. I wish my pictures of this recipe had turned out better. I made this right before I headed out to work and was running out of time. I snapped some pictures real quick and ran out the door. After all, Kentuckians needs their bath bombs, bubble bars, and special potions :D

This is my submission for this week's Tyler Florence Fridays. Tyler Florence Fridays is so much fun. All the Tyler recipes are posted on Fridays and everyone always makes something different. Head on over there this Friday to see all the recipes and reviews.

Friday, October 9, 2009

Fish and Chips with Homemade Tartar - Recipe #43 Stirring the Pot

There are 88 recipes in Stirring the Pot and I am almost halfway through! Next week will mark the halfway point for me and I will be sharing my top ten Stirring the Pot favorites. Will Tyler's Fish and Chips with Homemade Tartar make this list? Not this time around, but maybe with some tweaking.

Fish and Chips with Homemade Tartar - adapted from Stirring the Pot by Tyler Florence
4 large russet potatoes, scrubbed and rinsed
Vegetable oil, for deep- frying
kosher salt and freshly ground black pepper
2 cups all-purpose flour, plus about 1 cup for dredging
1/2 cup cornstarch
2 tablespoons baking powder
1-1/2 teaspoons kosher salt
2 egg yolks
1-1/2 cups club soda
1 pound halibut fillets, cut into strips or pieces
Fresh Italian flat-leaf parsley leaves, for garnish
2 lemons, halved for serving
1 recipe Homemade Tartar Sauce (listed below)

Preheat oven to 350F. Prick potatoes all over with a fork. Place potatoes on a baking tray and bake for 30-45 minutes, until knife-tender. If you like, this can be done the night before and potatoes can be refrigerated until ready to fry. Cut each potato into 6 or 8 wedges, depending on the size. Pour about 4 inches oil into a large heavy pot and heat to 375F. Fry half of the potato wedges at a time for 4-5 minutes, until crispy and brown. Drain on paper towels and season with salt. Set aside and keep warm.

In a large bowl, combine the 2 cups flour, cornstarch, baking powder, and 1-1/2 teaspoons salt. Make a well in the center and add egg yolk. Gradually whisk in club soda, working your way from the center to form a smooth batter.

Season about 1 cup floru with salt and pepper. Dredge the fish fillets in seasoned flour, coating both sides, then dip in batter. Fry a few pieces at a time in 375F oil for 4-5 minutes, until crispy and golden brown. Drain on paper towels and season with salt.

When fish is done, place parsley leaves in hot oil. Fry leaves for 15 seconds, until just crispy and slightly translucent. Remove from oil with slotted spoon, drain on paper towels. Serve fish with lemon halves, crispy fried parsley leaves, and Homemade Tartar Sauce.

Homemade Tartar Sauce
In a small-medium sized bowl combine 1/2 cup store-bought mayo; 1/2 cup sour cream; 2 tablespoons caper, chopped; 1/4 cup chopped cornichons; 2 tablespoons chopped fresh Italian flat-leaf parsley; 1 tablespoon finely chopped fresh tarragon; and 1/2 lemon, juice only. Set in refrigerator for 10-15 minutes b efore serving to let the flavors come together.
Notes/Results: Tyler hits it out of the park with this recipe for batter. You will want to coat everything in this batter, I promise! In fact, you will probably start looking around for all kinds of things to fry so that you can use up this batter. It really is that good. The homemade tartar sauce is also delicious and worth making.

The problem was with the potatoes. Tyler's recipe says to scrub and rinse them, prick them with a fork, and then place them on a baking sheet and bake. Well, this resulted in a very hard shell on the outside of my potatoes. Normally, I would prick my potatoes, give them an olive oil or butter coating, sprinkle with some kosher salt, and wrap them in foil to be baked. This method always yields good results for me. In hindsight, I wished I would have went along with my method of baking these potatoes, but I figured that I would follow Tyler's directions. Mistake!! My chips, or fries, were hard no matter how thin I cut them or how long I fried them. With the potatoes being so hard, they didn't really have a chance. Next time, I will use my method for baking potatoes.

I also wanted to note that you will probably find yourself using more than 1 and 1/2 cups club soda to make a smooth batter. Club soda has so much carbonation in it, it is hard to get an exact measurement. Make sure you have extra if you want to try this recipe.

Also, when you add the parsley to the frying oil.....stand back!! In fact, stand way back. It will pop all over the place!

All in all, this is a great recipe and has great potential to be very delicious! I will make it again, using my method for baking potatoes!

I am submitting this recipe to Tyler Florence Fridays. Stop on by there this weekend to see what everyone else cooked up!!