Showing posts with label italian. Show all posts

Wednesday, February 20, 2013

Restaurant Review: Bellini's Italian Restaurant


Bellini's Italian Restaurant
115 West Main Street
Lexington, Ky 40509
Phone: 859-388-9583

(Today I'm bringing you a guest post, written by my dear friend and fellow foodie, Amy Stone.  Bellini's Italian Restaurant is located in downtown Lexington in a historic building dating back to 1869.  The building housing Bellini's is truly one of a kind, the only Italianette style architecture in the area.  Bellini's celebrates local and and seasonal offerings and is committed to supporting the region's farmers and farms.)

 
It’s been a long time since I’ve eaten a meal in Lexington that actually surprised me, but my belated Valentine meal at Bellini’s Saturday night did just that. 

This was far from our first trip to Bellini’s - my husband has been enjoying their fine bolognaise sauce for many years. The truth is, Bellini’s is the only restaurant in Lexington where I will willingly pay for Italian food. Having grown up in northeastern Ohio, as a child I was taught to make meatballs and red sauce from my neighbor and her mother in law. I confess since then I’ve found precious little to tempt me outside of what I was taught to make in that cramped little kitchen with Grandma Lavorini. I can still see her in her black shift making bread and showing me how to shape the rolls with gestures and head nods. (She never learned to speak English and in all the years I knew her I never heard her utter a single word.)

When we were seated in the Bellini’s dining room Saturday night our excellent server Quinn informed us that the appetizer special that evening was a Gnocchi Caprese. A well made gnocchi is a gift from the gods and the truth is, I’ve had precious few truly great ones. Good gnocchi should be light fluffy pillows of goodness, but if handled poorly, can end up as sticky wet globs of starch which quite simply, make me sad. Quinn was quick to recommend the gnocchi and I am so glad that we trusted him. What we were served was something I have never encountered in my life – a stuffed gnocchi! I know, I know - I’d never heard of stuffing gnocchi either. Turns out it can be done and the  Lexington Pasta Company has one of only three machines in the entire United States that can stuff gnocchi. Our little town is thus blessed and I had no idea! 
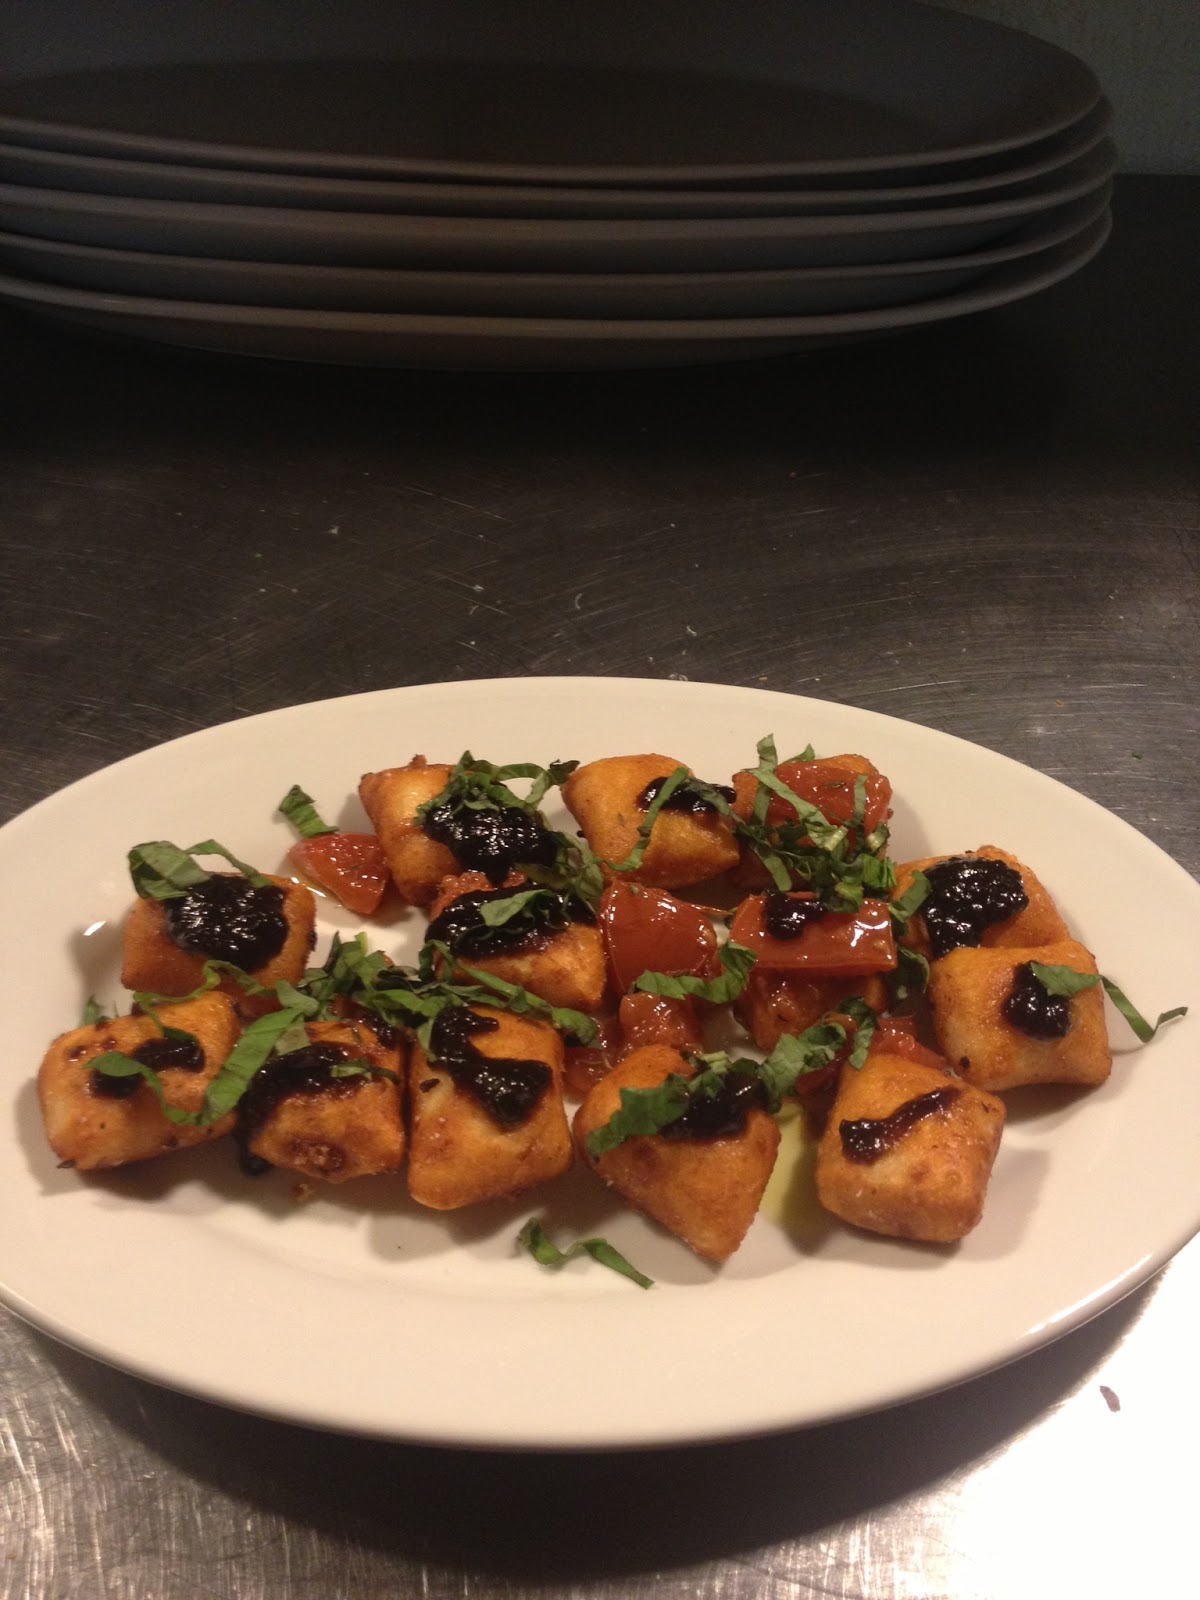
Gnocchi Caprese


Chef Craig Devillers flavors the potatoes with tomato which gives the gnocchi a lovely orange color and light tomato flavor. Lexington Pasta Company then forms the gnocchi and stuffs them with a mozzarella filling. The gnocchi are then lightly fried. Yes you read that right - surprise number two, fried gnocchi! Sounds like blasphemy I realize, but they were not the least bit greasy and the light crunch of the crust was in perfect contrast to the soft dumpling center. They were then served with a richly flavorful tomato confit, fresh basil and an onion balsamic reduction that was, quite frankly, ridiculously good. If they ever bottle it I will be the first one in line to buy it!

The rest of our meal was equally outstanding. Mr. Stone once again enjoyed the delicious Penne Bolognaise. I was treated to a succulent Lobster Ravioli in a red pepper cream sauce. What made these ravioli so outstanding was not just the quality of the pasta – thank you again Lexington Pasta Company – but the fact that there was a crazy amount of lobster in the filling. This wasn’t just a few flakes and some ricotta my friends, there were full on chunks of lobster in that ravioli and the flavor was delicate and light for what was in fact, a very rich dish. 

Here’s the thing about good Italian food, it’s not ‘chef-y’. Its’ beauty lies in the simplicity of good quality ingredients, skillfully combined to produce richly layered flavors. That was what struck me so much about the Gnocchi Caprese, it was innovative but not overdone and was truly a pleasure. So much so that it has instigated the writing of this, my very first dining review. Bellini’s is a local Lexington treasure. We had outstanding service (thank you young Quinn!) and Chef Craig took the time to come out personally to talk with us and discuss his amazing food. If you haven’t been to Bellini’s recently it’s time for a trip back in to sample the amazing quality of the dishes coming out of their kitchen. Chef Craig – Bravo Sir! Thanks for a surprising and delicious meal. And a big thank you to Kim Tracy who has allowed me to hijack her blog for this review. I appreciate your indulgence my friend!

A big thanks to my friend Amy for writing this review.  I know my readers will enjoy learning about the innovative stuffed gnocchi, the delicious food, and what sounds to be a wonderful restaurant with exemplary customer service. I hope to dine there as soon as possible!

Tuesday, August 14, 2012

Antipasto Skewers

Once a month the ladies in my neighborhood get together to play bunco, a totally brainless dice game.  Upon reading this, you might be picturing nice little housewives all dressed up playing a proper game of dice.  I can assure you that it's nothing like that.  There's nothing proper about bunco night. 

Bunco night is our night.  We look forward to it all month.  The messy houses, hyper kids, broken vehicles, and numerous other problems and errands get left at the door.  For that night we let our hair down, we dress in costume, we turn the radio up loud, and we get our drink on!

Last Friday night I hosted bunco at my house and I made a few munchies.  These antipasto skewers were probably the all-around favorite.  Salty little bites of salami and pepperoni, smooth and silky balls of mozzarella, pungent briney bites of kalamata olives, marinated cheese tortellini, and gorgeous garden fresh cherry tomatoes all skewered together and coated in Italian or Balsamic dressing.  Serve these up on a bed of baby arugula and you have a really pretty and tasty appetizer for a party.  I also think these skewers would be great to pack in a lunchbox.

You can use so many different ingredients here (marinated artichokes, strips of roasted red pepper, green olives, black olives, salami, pepperoni, cubes of mozzarella, balls of mozzarella, basically anything you'd see on an antipasto plate).  Additionally, you can use any kind of dressing.  I used balsamic dressing on half and plain old Italian dressing on the other half.  Surprisingly, the skewers  with balsamic dressing seemed to go faster. 

These are great make ahead appetizers because the flavors do improve if they have a few hours to marinate together.

Antipasto Skewers
Adapted from Hungry Housewife


1  (9 oz) package of Three Cheese Tortellini, cooked to package directions
1 Large Jar of Large pitted Black Olives (I used Kalamata)
1 container grape or cherry tomatoes
2 (12 oz) containers of marinated mozzarella balls
30 slices of Salami, cut in half
60 pieces of pepperoni
1 cup Balsamic Vinaigrette Salad Dressing or Italian Dressing (store bought or homemade)
60 Skewers  (or however many you want to make)


Place the cooked tortellini in a bowl or large gallon freeze bag. Pour the salad dressing over the top and marinade in the fridge for a few hours. Drain the pasta. Place one of each item onto the skewer using the pointy side (I did kalamata olive first, then a tortellini, followed by a tomato, then a ball of mozzarella, slice of pepperoni, another tortellini, another olive, and then a rolled up piece of salami). The skewers look especially pretty if you serve them on a bed of arugula (or any other type of green).

Can be made a few hours in advance. Just cover tightly and place in the refrigerator.

Wednesday, May 23, 2012

Cookbook Review: Weeknights with Giada

Weeknights with Giada:
Quick and Simple Recipes to Revamp Dinner
Hardcover
240 pages

Eight Chapters:  Soups & Salads; Bruschettas, Sandwiches, & Pizzas; Pasta & Grains; Meat, Poultry & Fish; Change of Pace; Breakfast for Dinner; Veggies & Sides; and Desserts

When I heard that Giada was coming out with a new cookbook I preordered it.  I knew I would love it and I was right.  Weeknights with Giada is full of family-friendly, super easy, inventive and fun recipes for the weeknights.  There are lots of days where I love to spend all day in the kitchen, but then there are also days where I need quick and easy and this book delivers.  On top of all that, the book is absolutely gorgeous, full of both family photos and gorgeous food.  You will find lots of Italian-inspired recipes in this book, but you'll also find that Giada branches out with recipes like Sweet and Spicy Greek Meatballs, Chicken Adobo, Thai Turkey Lettuce Cups, and Chicken with Peruvian Chile Sauce.  But most importantly, everything I tried was delicious!

**The recipes for each of the dishes below can be found by clicking on the recipe name.  The link will take you to the recipe on the Food Network.
Just for fun let's start where it counts.....DESSERT!!  Giada's Peanut Butter Cookies with Blackberry Jam.  These are no everyday peanut butter cookie.  These cookies have cocoa powder added to them, which is perfect for those of us who are addicted to the combo of peanut butter and chocolate.  I made some of the cookies with the blackberry jam and some without any jam at all.  Both were a huge success!  The recipe makes 10 huge cookies and believe me, they were gone in no time at all!
 From the Veggies & Sides chapter is probably my favorite recipe of the bunch, Giada's Scallion and Mozzarella Cornbread.  Holy cow is this stuff good!  The buttermilk in this recipe makes for an extremely tender and incredibly moist cornbread.  You can actually see the mozzarella in the cornbread....it is so cheesy.  And, we just loved the studs of olives and scallions running throughout.   I'm gonna go out on a limb here and tell you that this is probably the best cornbread I've ever had.  In fact, I'm making another version of it today.
If you're a potato lover, then you will fall in love for these Baked Potatoes with Sausage and Arugula.  A fluffy baked potato is topped with Italian sausage and a very cheesy creamy tomato sauce.  Since there is quite a bit of arugula mixed into the sauce I've deemed these healthy.  My family absolutely loved these and asked for more so I went ahead and made them again (twice in the same week).  This is a recipe that I can see myself making again and again, which is the mark of a very successful recipe.  Food bloggers rarely make the same thing twice, right?

All in all, this is a fabulous book and one that I am very happy to have in my collection.  In fact, I'll be sharing more recipes soon!

Recipes tagged to make: Literally everything...Shrimp and Sausage Cioppino; Burgers a la Pizzaiola; Ricotta, Lentil & Rice Rolls; Herbed Lamb Chops with Homemade BBQ Sauce; California-Style Chopped Salad with Shrimp; Sweet Corn & Basil Lasagna; Chicken with Tarragon & White Wine; Black Forbidden Rice with Shrimp, Peaches & Snap Peas; and Grilled Creamed Corn with Spinach and Parmesan....just to name a few!

Monday, March 19, 2012

Tuscan-Inspired Pork Loin with Crispy Potatoes and LOTS of Garlic

This Tuscan-Inspired Pork Loin is a recipe I discovered back before I started blogging.  It happens to be one of the first insanely delicious meals that ever came out of my kitchen. I can't believe I've never posted it before.  This is easily one of our favorite meals.  

First I should warn you.  This recipe is definitely a meal for the garlic lover(s).  There are three cloves of garlic rubbed over the pork roast and then there is an entire head of garlic that roasts alongside the potatoes.  It's pure garlic heaven!  The result is the most wonderful and tender pork, but the star of this dish is really the potatoes.  Oh my gosh are these potatoes succulent and luscious (I totally stand over the pan and inhale a few before serving).  Er, did I just say that out loud?
POTATOES BEFORE
Speaking of the potatoes, you will want to cram as many as you can into your pan.  Don't follow the recipe below, which tells you to use only 2 potatoes.  Instead, measure your pan and fit as many potatoes as your pan will hold.  Believe me.  I cram them in there each and every time and everyone still ends up fighting over them.

POTATOES AFTER


Tuscan-Inspired Pork Loin with Crispy Potatoes and LOTS of Garlic
Adapted from The Ultimate Cookbook by Bruce Weinstein & Mark Scarbrough
Serves 6

2 large baking potatoes (use as many potatoes as will fit your pan)
1 whole head of garlic, plus 3 garlic cloves
4 tablespoons chopped fresh rosemary or sage
5 tablespoons olive oil
2 teaspoons finely grated lemon zest
1 teaspoon salt
1/2 teaspoon or 1 teaspoon red pepper flakes (optional)
One 2 to 2-1/2 pound boneless center cut pork loin, trimmed
freshly ground black pepper

Take your pork loin out of the refrigerator and allow to sit at room temperature while doing prep work. 

Cut the potatoes into 2-inch pieces (you can peel them, but the skin will get crunchy as they roast.) Place in a large bowl and cover with water by 2 inches.  Set aside at room temperature for 20 minutes so the potatoes lose some starch.  See note above***:  Don't simply make this recipe as followed with only 2 potatoes.  You will end up wishing you made more of them.  Instead, squeeze as many potatoes as will fit in your pan.  I use a 10" cast iron skillet and I can fit about 1-1/2 pounds red baby potatoes.

Meanwhile, position the rack in the center of the oven and preheat the oven to 375F.  Mix 3 minced garlic cloves, 2 tablespoons chopped rosemary or sage, 2 tablespoons olive oil, lemon zest, 1/2 to 1 teaspoon red pepper flakes (optional), and salt in a large bowl; rub this mixture all over the tied pork loin.

Drain the potatoes and blot dry with paper towels.  Place in a 12 - 14-inch oven-safe skillet (preferably cast iron).  Pour the remaining 3 tablespoons oil over the potatoes and set over medium-heat.  

Once the potatoes start to sizzle, cook, stirring occasionally, until they begin to turn translucent at their edges and brown a bit.  about 5 minutes.

Break up the garlic cloves from the whole head (do not peel) and sprinkle them among the potatoes; add the remaining rosemary or sage, sprinkling it among the potatoes.

Nestle the pork loin in the middle of the skillet.  Place in the oven and roast until the meat has browned, until an instant-read meat thermometer inserted into the center registers 155F, about 1 hour and 10 minutes, turning the loin once or twice and tossing the potatoes occasionally.  Grind some black pepper over the roast just before serving.


For A Pan Sauce:
Remove the pork from the roasting pan when done and toss the potatoes and garlic cloves before serving.  If you'd like to make a gravy, place cast-iron pan over medium heat, pour in 1/4 cup chicken broth or white wine, and bring to a simmer, scraping up any browned bits in the pan.  Skim the sauce for any fat, then reduce by half, about 1 minute.
This recipe comes from The Ultimate Cookbook by Bruce Weinstein & Mark Scarbrough, which came out back in 2007.  It is more of a tome (the size of Mark Bittman's books) than a cookbook.  There are no pictures, but there are 900 recipes packed inside and I never get tired of browsing through this book for new ideas.

Friday, March 16, 2012

Crostini with Asparagus

This has been a wild week.  You know those weeks where you're on the run every minute and barely have time to think?  Yep, it's been a week like that.  The good news is that we received the most wonderful news about my 5 year old son, Jackson.  When Jackson was 6 months old he was diagnosed with severe food allergies: wheat, eggs, soy, beef, pork, turkey, and any kind of legume (peanuts, tree nuts, green beans, lima beans, kidney beans...you name it).  At first it was daunting and overwhelming, but soon we adjusted and made the best of it.  Every year we would go back for allergy testing and every year Jackson's allergies would get worse.  When he was three, the doctor told me not to bother coming back the following year.  No point paying a ton of money for testing when the results were so disappointing all the time.

This Tuesday we got in the car and headed to the allergist for our first appointment in two years.  It felt like a necessary evil and I really wasn't expecting any improvement.  Imagine my surprise when the doctor told me that Jackson SHOULD be able to start eating wheat, eggs, and soybeans!!   It was really the most pleasant surprise and although I'm not really a crybaby, I did cry right there in the doctor's office.  Tears and all.   I was absolutely elated.  It felt like a miracle.  A huge relief.  A sign of hope.
 
Right now we are introducing wheat to Jackson like you would to a baby.  Small bites here and there.  He has had some allergic reactions but they are much less severe than before which gives us hope that he can overcome the allergy.  And, if nothing else, we know that the wheat, egg, and soybean allergies WILL eventually go away.  So, this week was a lesson in hope.  Just when you think there is none.  It's a beautiful thing.  

Since I'm on a feel good streak this week I decided to make something with asparagus.  I think we all have foods that make us feel good and for me one of them is asparagus.  I loved this crostini made with scrambled eggs, parmesan cheese, lots of black pepper, and of course, pretty spears of green asparagus.  This makes for a wonderful breakfast but would also be gorgeous for a nice spring brunch.     
Crostini with Asparagus
Adapted from Twelve 
by Tessa Kiros
Serves 6

12 thin-stemmed asparagus
4 eggs
3 tablespoons milk
2 tablespoons freshly grated Parmesan cheese
6 thick, large slices white country-style bread, halved
1 tablespoon butter

Rinse the asparagus well to get rid of any sand.  Trim away the woody ends.  Tie them up into a neat bundle with kitchen string, and boil the asparagus in lightly salted water for about 10 inutes, or until tender - but not too soft - testing the spear to check for readiness.  Drain and cut off about 1/3 of the end of each asparagus and chop (reserve for eggs).

Whip the eggs lightly in a bowl with the milk, season with salt and add the Parmesan cheese and the chopped asparagus.  Grill the bread slices on both sides and put 2 slices onto each individual serving plate.

Melt the butter in a saucepan and add the eggs.  Cook on a medium heat and stir with a wooden spoon to scramble them for a couple of minutes, leaving them slightly creamy.  Spoon the eggs over the bread slices, top with the asparagus spears and add some black pepper.  Serve immediately. 
Theme:  Go Green!


Sunday, January 15, 2012

Fried Risotto Balls

Today I learned that I've been missing out on fried risotto balls, otherwise known as arancini, my entire life.  Oh my gosh!  If I knew how incredibly delicious they were, I would've been making them all along.  So, take a nudge from me, please.  Make risotto.  Any risotto will do.  The tomato risotto below is especially nice.  Then make sure that you don't eat all the risotto.  Same some of it.  Heck, save all of it (you'll be glad you did).  Then make these fried risotto balls.  You will go crazy for them!! And, I do mean crazy!!

Here's what I did.  I started by making this insanely delicious Tomato Risotto.  This Tomato Risotto is all kinds of delicious on it's own.  It's creamy and delicious, with loads of mozzarella stirred in, and chunks of smashed garlic. Try not to take a bite though because you'll want to eat it and then you won't be able to stop.  Set the risotto aside. Hide it away in the back of the fridge so that it's waiting on you when you want to make the fried risotto balls.  Try to be patient.  It will pay off when you pop that first fried risotto ball in your mouth! 
Tomato Risotto
Adapted from Apples for Jam by Tessa Kiros
Serves 3

4 tablespoons olive oil
1/2 onion, finely chopped
4 cloves garlic, peeled and smashed
pinch of dried chile flakes
5-6 cups good veggie or chicken broth
1 cup risotto rice
1 cup canned tomatoes, pureed
2 large basil leaves, torn (I had to use dried basil)
1/4 cup grated Parmesan cheese
2/3 cup (1/2-inch blocks fresh mozzarella cheese)
2-1/2 tablespoons olive oil, to serve
grated Parmesan cheese, to serve
Freshly ground black pepper, to serve


Put all the broth in a small pan and leave on low heat so it stays warm.

Heat the olive oil in a wide heavy-bottomed pan.  Saute the onion and garlic over low-medium heat for about 5 minutes, or until lightly golden.  Stir in the chile flakes and rice, and cook for another minute.  Add half the tomato puree, half the basil, and 1-1/2 cups of the hot broth.

Reduce the heat to low and simmer for 10 minutes, stirring now and then.  Set the rest of the tomato puree and the remaining broth, and simmer for 10 minutes, or until the risotto is cooked (if it needs another few minutes or a little more liquid, just use hot water).  Remove the garlic cloves (I left them in as I like them) and throw them away.  Stir in the Parmesan, mozzarella, and remaining basil.  Serve as soon as the mozzarella starts to melt, drizzled with olive oil and with a good grating of black pepper for the adults.  Pass around the Parmesan.
When you are ready to find bliss, take out your reserved risotto.  Add some Parmesan, a little bit of egg, and make tablespoon-sized balls.  Slip a small piece of mozzarella into the middle of the ball and reshape.  Place the rounded balls into the egg, then the breadcrumbs, and allow to chill in the fridge for 30 minutes.  This chill time is crucial because this allows the breadcrumbs to adhere better so they don't fall off when frying.  Once chilled, fry in about 1 inch of olive oil for 2-3 minutes, turning quite a bit until they are golden brown and warmed through.  Allow to cool and prepare to be totally enamored!

Fried Risotto Balls
Adapted from Apples for Jam by Tessa Kiros
Makes 36

About 3 cups of cold risotto (you can use any risotto, but Tessa recommends the tomato risotto)
4 tablespoons grated Parmesan cheese
2 eggs
1/2 cup small cubes fresh mozzarella cheese 
1-1/2 cups dry breadcrumbs
olive oil, for frying 
lemon wedges, to serve

Mix the risotto and Parmesan together in a bowl.  Lightly beat one of the eggs and gradually stir into the risotto, stopping when the risotto is damp but still firm enough to be shaped.  Moisten your hands with a little water, take a heaping tablespoon of the mixture, and roll it into a ball.  Make a tunnel into the center with your finger and push a mozzarella cube into it.  Squeeze the ball to close the opening and seal in the mozzarella.  Do this with the rest of the mixture.

Lightly beat the other egg in a flat bowl.  Put the bread crumbs on a plate.  Roll the balls in the egg and then the bread crumbs and put on a cookie sheet or large plate.  Chill for at least 30 minutes.  (This is a necessity.  Chilling allows the breadcrumbs to dry out so they adhere better when fried).

Pour about 1 inch of olive oil into a frying pan and heat until hot but not smoking.  Fry the balls in batches, gently moving them around in the oil and turning them often so that they brown evenly.  Each batch will take about 2 minutes, then you can lift them out onto a plate lined with paper towels to absorb the excess oil.  Fried risotto balls are best served warm with a squeeze of lemon juice but are also fine eaten at room temperature.


Theme: Rice is Nice!


Thursday, October 20, 2011

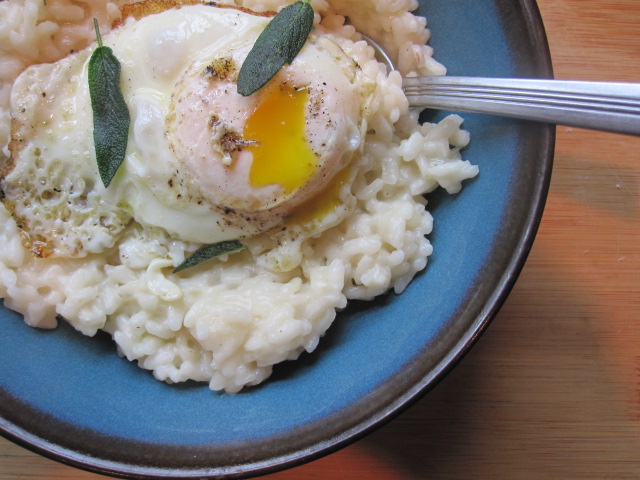
Risotto with Fried Egg

When I think of peasant food I always think of the most delicious and comforting dishes.  Recipes born out of necessity that stand the test of time, passing from one generation to the next.  I think mostly, for me, the very definition of peasant food is making something with what you have on hand.  Now that might not sound appealing to some; but, to people like us (who love food) we know that making something delicious with what we have on hand is the sign of a good cook.  It's the true test.  And, quite often, it's these recipes that are the most well-loved of all.


Take Tessa's recipe for Risotto with Fried Egg for example.  It's a very basic dish using ingredients that everyone is sure to have on hand, but it is the method with which it is put together that is exciting, fresh, and something I'm quite sure everyone would be pleased to eat.  Creamy cheesy rice, with crispy fried sage leaves, and a nice egg with a runny yolk so that it can drip down into the rice.  Total comfort food!  Better yet, it would be great served for breakfast, lunch, or dinner. 
 Risotto with Fried Egg
Adapted from Apples for Jam by Tessa Kiros
Serves 4

 Tessa says: "These are all the things my family loves - white risotto, egg, Parmesan - on one plate.  The egg yolk must be soft when you serve it so that it can drip into the rice, and we like the white to be golden and frayed around the edge."

3 tablespoons butter
 4 tablespoons olive oil
2 shallots, chopped
1-2/3 cup risotto rice
1/2 cup white wine
4 cups hot vegetable broth
freshly grated nutmeg
salt 
1/2 cup grated Parmesan cheese
about 8 fresh sage leaves
4 eggs
grated Parmesan and black pepper, to serve

Heat half the butter and 2 tablespoons of oil in a heavy-bottomed pan suitable for making risotto.  Saute the shallots over low heat until light gold and then stir in the rice with a wooden spoon.  Stir for a few minutes to completely coat the rice and let it cook just a bit.  Add the wine, and when that has evaporated, add all of the broth.  Add a few good grinds of nutmeg and taste for salt.  Simmer uncovered over high heat for about 15 minutes, or until the rice has absorbed much of the liquid.  If it seems as if it needs a bit more liquid, add some hot water.  Remove from the hat and stir in the remaining butter and the Parmesan.  Taste for salt, adjusting if necessary.  Leave with the lid on so that the steam continues to cook the rice.

Heat the remaining oil in a large nonstick frying pan and briefly fry the sage leaves until crisp.  Remove with tongs.  Gently break the eggs into the pan and sprinkle a little salt on the yolks.  Cook until the edges of the white are a bit golden.  Cover the pan with a lid and fry until the yolks are just slightly opaque on the surface but still soft inside (they are best when the undersides are golden and a bit crisp).  

Scoop rice onto serving plates and top each serving with an egg and a couple of sage leaves, being careful not to break the yolk just yet.  Serve with a sprinkling of Parmesan and a few grinds of black pepper for those who want it.

Theme: Peasant Food

Thursday, May 26, 2011

Under The Tuscan Sun with Garlic and Greens Spaghetti

In my mind I've run away to Tuscany so many times that I've lost count.  I've taken leisurely rides through the gorgeous countryside, strolled through the Uffizi, got drunk on wine and limoncello, and ate everything that crossed my path.  I've made pasta from scratch in a gorgeous rustic kitchen and even picnicked with a strikingly handsome Italian man.  Naturally in these dreams I'm in my twenties, single, several pounds lighter and without children.  Sometimes one can only dream.

In reality I'm very far from Tuscany.  Here in rural Kentucky it is raining for about the 100th day in a row.  My 4 year old son is wearing cheese puffs all over his face like it's his job and my 10 year old daughter is nagging me that she's hungry even though she just ate.  I can't even remember the last time I had a good stiff drink, saw fine art, or went on a picnic, and my poor husband is working about ten hours a day.  What's more is that I'm no where near my twenties, in fact this year I'll be closer to 40 than 30.  Yikes, where does the time go?

So, the only consolation prize I could think of was to make a huge pot of spaghetti, with no less than 18 cloves of garlic, and watch Under The Tuscan Sun.  Because if you can't go to Italy in person, then you might as well go there in the movies. 

Garlic and Greens Spaghetti
Adapted from the new Food Network Great Easy Meals
Serves 4

18 cloves garlic, thinly sliced (about 2 heads)
1/3 cup extra-virgin olive oil
2 medium onions, halved and sliced
1/8 teaspoon red pepper flakes, or more to taste
Kosher salt
12 cups torn winter greens, such as kale, chard, escarole or mustard greens (about 2-1/2lbs.)
12 ounces spaghetti
1/4 cup grated pecorino romano cheese

Bring a large pot of salted water to a boil.  Meanwhile, cook the garlic in the olive oil in a large skillet over medium-high heat, stirring occasionally, until golden brown and crispy, about 3 minutes.  (Be careful not to overbrown the garlic or it will taste bitter.) Using a slotted spoon, transfer the garlic chips to a paper-towel-lined-plate.  Pour off all but 2 tablespoons oil into a small bowl to use as a dip for crusty bread, if desired.  Add the onions and red pepper flakes to the oil in the pan; cook, stirring, until the onions are light brown, about 10 minutes.  Season with 1-1/2 teaspoons salt.

When the onions are almost done, add the greens to the boiling water and cook, uncovered, until just tender, about 2 minutes.  Using tongs, remove the greens, shaking off the excess water; add them to the skillet with the onions (set the pot of water aside).  Cook, stirring occasionally, until tender, about 5 minutes.

Return the cooking water to a boil.  Add the spaghetti and cook until al dente, 8-10 minutes.  Remove and reserve about 1 cup cooking water; drain the pasta and transfer to a serving bowl.  Add the cheese and toss.  Add the greens and some of the reserved pasta water and toss, adding more water as necessary to keep the pasta from clumping.  Top with the garlic chips.

Per serving: calories 565; fat 16g (sat 4g); cholesterol 8 mg; sodium 940mg; carbs 28g; fiber 4g; protein 28g

Yummy slivers of fried garlic.....
Notes/Results:  Warning....I LOVE garlic, but this may very well be the most garlicky thing I've ever ate in my life.  I did love this meal, but I will warn you that if you chose to make this then you should be prepared to smell like garlic and taste like garlic for a good day or more.  That being said, this is a delicious meal, exactly right up my alley.  Eighteen cloves of garlic are sliced and toasted in olive oil until just golden brown.  Note:  Toasted garlic is not mellow like roasted garlic, it is quite potent still.  The pasta is tossed with sauteed onions, kale, a little bit of pasta water, pecorino, and then topped with the garlic chips.  An added bonus with this recipe is that the oil the garlic has been toasted in can be saved and used for dipping crusty bread into.  Garlicky pasta, garlicky oil for bread dipping, and a good movie..how can you beat that?  Now, if only I looked like Diane Lane....

 Head on over to Food 'n Flix to see what's playing!

Sunday, March 13, 2011

Deep-Fried Bocconcini with Spicy Tomato and Garlic Chutney

 A couple of years back my local Williams-Sonoma featured cooking classes with various topics like risotto, pasta, pizza, weeknight meals, etc.  They would hire well-known local chefs to host 2-3 hour cooking classes for a class of 12.  Each cooking class was a whopping $40, but this was before I discovered blogging and I was desperate for anything that had to do with cooking, so I paid the price. I can still remember how excited I would get before those cooking classes.  It was as if each new class was an exciting new adventure for my senses.

There is one cooking class that I remember extremely well.  It was the cooking class all about CHEESE. It was a full house that night as they allowed 14 people to attend and we were all crammed around an island in the middle of the store.  The chef that night was one of the most well-known chefs in town, a personal chef to the sheik who owned the largest horse farm in Lexington.  I don't remember what we made that night, probably some fancy foods with cheese. 

What I do remember is this.

Halfway through the class, one of the quietest ladies in the audience spoke up.  I think she just assumed that since it was a class about CHEESE that we were going to make fried cheese.  When she found out that we weren't making fried cheese she just wasn't going to let it go. The chef was trying to move on, but the woman just wouldn't let up.  She asked question after question, all regarding fried cheese, until most of the class and even the chef  became annoyed. On the other hand, I had to suppress my giggles because I thought it was kinda cute.  She had paid $40, just like the rest of us, and she was not walking away until she knew how to make fried cheese.  Who can blame her?  Fried cheese is one of the best things on the planet!
 Deep-Fried Bocconcini with Spicy Tomato and Garlic Chutney
Adapted from FoodNetwork.com
Serves 6-8


Bocconcini:
16 (1-inch diameters balls) bocconcini mozzarella cheese
2 cups flour
Kosher salt and black pepper
4 eggs, beaten
3 cups seasoned Italian bread crumbs
Vegetable oil, for frying


Chutney:
8 cloves garlic
1 (1-inch) piece fresh ginger, peeled and coarsely chopped (left out, didn't have any on hand)
1/4 teaspoon kosher salt, plus more for seasoning
1/2 cup red wine vinegar
1/4 cup sugar
2 tablespoons extra virgin olive oil
1 teaspoon ground cumin
1/4 teaspoon cayenne pepper
1 (15-ounce) can diced tomatoes

For the bocconcini: Drain the bocconcini and pat dry with paper towels. Put on a paper towel-lined plate and allow to dry in the refrigerator for 2 hours. Put the flour in a medium bowl and season with salt and pepper, to taste. Put the eggs in a second medium bowl and the bread crumbs in a third medium bowl. Coat the bocconcini in flour and then dip into the eggs. Roll the bocconcini in the bread crumbs until coated. Dip the coated bocconcini, again, in the eggs and then coat with bread crumbs. Freeze the breaded bocconcini for 20 minutes.

For the chutney: In a blender, combine the garlic, ginger, 1/4 teaspoon salt, vinegar, sugar, olive oil, cumin and pepper. Blend until smooth. Pour into a medium, heavy-bottomed saucepan and add the tomatoes. Bring the mixture to a boil over high heat, then reduce the heat and simmer, stirring occasionally, until most of the liquid has evaporated and the mixture is thick, about 45 to 55 minutes. Using the back of a wooden spoon, gently break up the tomatoes as they begin to soften during cooking. Season with salt, to taste. Let the chutney cool to room temperature, about 35 minutes. Place in a serving bowl.

In a large heavy-bottomed saucepan, pour in enough oil to fill the pan about a third of the way. Heat over medium heat until a deep-frying thermometer inserted in the oil reaches 375 degrees F. (If you don't have a thermometer a cube of bread will brown in about 1 to 2 minutes.) In batches, fry the bocconcini until golden brown, about 15 to 20 seconds. Drain on paper towels.

Arrange the bocconcini on a platter and serve the chutney alongside as an accompaniment.
Notes/Results: Absolutely addictive and delicious!  There is just something about those cute little balls of crispy melting cheese that are irresistible.  The tomato and garlic chutney is perfect for me as I like spicy food, but it is pretty darn spicy so you may consider holding back on the cayenne. I do want to note that you need some time to make this recipe as it requires some planning ahead.  This isn't one of those recipes that you can just throw together. The cheese needs to be removed from the container, drained, and allowed to drain/dry in the refrigerator for 2 hours.  In addition, the chutney takes about 35-45 minutes to cook down on the stove.  Also, once the cheese is breaded, it has to set up in the freezer to harden for at least 20 minutes
Another delicious Giada recipe that I would definitely make again!  
Cooking the recipes of Giada De Laurentiis for two more weeks!

Saturday, February 5, 2011

Bucatini All'Amatriciana with Spicy Fontina Meatballs

This recipe is full of secrets.  Spicy little secrets.  Cheesy little secrets.  Delicious little secrets.  Fontina cheese oozes out of the meatballs to reveal a hidden center.  It doesn't end there.  The Amatriciana sauce is full of it's own secrets:  spicy toasted red pepper flakes, meaty chunks of pancetta, and handfuls of Romano cheese.  The end result is a very cheesy, slightly spicy, robust version of spaghetti and meatballs that will have everyone in your family singing your praises and asking for seconds.

In her cookbook, Giada notes that her Aunt Raffy likes to add a bit of wine to the simmering tomato sauce.  I tend to agree with Raffy on this one and added about 1 cup of white wine to my sauce as it was simmering.  Giada's recipe also calls for smoked mozzarella for stuffing the meatballs, but I'm not real fond of smoky cheese so I opted for creamy Fontina.
Yummy cheese oozing out of the baked meatballs

Bucatini All'Amatriciana with Spicy Fontina Meatballs
Adapted from Giada at Home
Serves 4-6

Sauce
2 Tablespoons olive oil
6 ounces pancetta, diced 
1 yellow onion, finely chopped
2 garlic cloves, minced
Pinch of crushed red pepper flakes
1 (14 oz) can crushed tomatoes
1/2 teaspoon salt, or more to taste
1/2 teaspoon freshly ground black pepper, or more to taste
1/2 cup grated Pecorino Romano cheese
Optional: About 1 cup wine (I used white)

Meatballs
1 small onion, grated
3/4 cup chopped fresh flat-leaf parsley leaves
2/3 cup plus 1/4 cup freshly grated Parmesan cheese
1/3 cup Italian-style seasoned dried bread crumbs
1 large egg
2 tablespoons ketchup
3 garlic cloves, minced
1/4 teaspoon crushed red pepper flakes
1 teaspoon salt, or more to taste
1/2 teaspoon freshly ground black pepper
8 ounces ground beef
8 ounces ground veal
2 ounces fontina cheese, cubed into 16 -1/2"- cubes

1 pound percatelli or other long pasta

For the sauce: In a large, heavy skillet, heat the oil over medium-heat.  Add the pancetta and cook, stirring constantly, until golden brown, 5-7 minutes.  Using a slotted spoon, remove the pancetta and set aside.

Add the onion to the skillet and cook for 5 minutes.  Stir in the garlic and red pepper flakes and cook until fragrant, about 30 seconds.  Add the tomatoes, salt, black pepper, and the cooked pancetta.  Simmer, uncovered, over medium-low heat until the sauce thickens, about 15 minutes.  Stir in the Pecorino Romano cheese and season with salt and pepper, if needed.


For the meatballs: Position an oven rack in the lower third of the oven and preheat the oven to 400F.  Line a rimmed baking sheet with parchment paper.

In a large bowl, combine the onion, 1/2 cup of the parsley, 2/3 cup of the Parmesan cheese, the bread crumbs, egg, ketchup, garlic, red pepper flakes, salt and pepper.  Add the beef and veal.  Using your hands, combine the ingredients gently but thoroughly.  Shape the meat mixture into 16 1-1/2-inch-diameter meatballs and place on the prepared baking sheet.  Make a depression in the center of each meatball and place a cube of fontina inside.  Re-form the meatball so that the fontina is completely covered with the meat mixture.

Bake the meatballs for 15 minutes, or until cooked through.

Meanwhile, bring a large pot of salted water to a boil over high heat.  Add the pasta and cook until tender but still firm to the bite, stirring occasionally, about 11 minutes (depending on the type of pasta used). 

Drain the pasta and place in a large serving bowl.  Add the sauce.  Toss gently and season with salt and pepper, if needed.  Sprinkle with remaining 1/4 cu parsley and 1/4 cup Parmesan cheese.  Put the meatballs in a separate bowl and serve alongside the pasta.
 
Notes/Results:  This recipe is the ultimate in cheesy as there is quite a bit of cheese in both the sauce and the meatballs. We all loved biting into the meatballs and tasting that cheesy center.  A good thing for sure! The sauce is slightly spicy which is a welcome break from the norm.  Of course, the meaty chunks of pancetta in the sauce were as tasty as can be.  This is a keeper recipe that I would be happy to make again. 


Now Celebrating the Recipes of Giada De Laurentiis

The First Sunday of Each Month @ Brenda's Canadian Kitchen

Tuesday, January 11, 2011

Grilled Sausage Ring with Parsley and Provolone Over Pepperonata

Grilling a ring of sausage has been on my culinary to-do list for years.  Call me silly, but there is just something about a spiraling circle of sausage that is extremely appealing to the eye, or at least my eye.  The issue is that I can't find rings of sausage in any of my local markets.  As far as I know, there are no local Italian delis.  And, as much as I like to cook, I'm just not into the whole "making fresh sausage" thing. 
Lucky for me, on a recent trip to Ohio, we got the chance to go to Cleveland's West Side Market. The West Side Market is such a fabulous market, full of culture and every kind of food item you could long for.  My head spins from the time I walk in until the time I leave.  One of our favorite stalls is Dohar Meats, a Hungarian-based old world butcher shop.  Dohar's reputation is golden in Cleveland.  In fact, many customers swear up and down that Dohar's products are even better than those from the "old country", or their native Hungary.  Dohar's Paprika Bacon and Garlic Sausage fly off the shelves in huge increments.  On the day we arrived, we were buying 4 pounds of Garlic Sausage for ourselves and another 4 pounds for my Dad and his wife.  If you are in the area, or ever get a chance to go to Cleveland's West Side Market, you have to try Dohar's Garlic Sausage.  It is "the best sausage I've ever ate."
A ring of sausage this special deserved a special recipe and this recipe from Carmine's Family-Style Cookbook did not disappoint.  Should you be lucky enough to get your hands on some authentic Italian or Hungarian sausage, then this recipe is as good as gold.  This was a truly wonderful family meal that goes very well with roasted potatoes. 
Grilled Sausage Ring with Parsley and Provolone Over Pepperonata
Adapted from Carmine's Family-Style Cookbook
Serves 4
Ingredients:
3 Cubanelle Peppers or Other Mild Peppers
2 Hot Italian Peppers or Other Hot Peppers
2 Medium or 1 Large Green Pepper
1 Red Bell Pepper
1 Yellow Bell Pepper
4 Tablespoons Olive Oil
1 Tablespoon Chopped Garlic
2 Large Spanish Onions, Peeled and Thinly Sliced
20 Cherry Tomatoes
15 Leaves Fresh Oregano, Chopped
1/2 Teaspoon Dried Oregano
1 Large Bay Leaf
Salt and Freshly Ground Black Pepper
1-1/2 to 2-Pound Sausage Ring with Parsley and Provolone or Link Italian Sausage*
*NOTE: Most Italian delis and markets sell sausage rings flavored with provolone and parsley.  These are long ropes of sausage, not divided into links, and about half the diameter of Italian link sausages.  They are called "sausage rings"  or "sausage rolls" because the rope is wrapped into a tight, snail-like roll and held together with large toothpicks.  If you can't find a sausage ring, buy link sausage flavored with provolone and parsley, and if neither one is sold in your local markets, buy the best Italian sausage you can find. 
Directions:
1.  Core the peppers, cut them in half, and cut them into 1/8-inch-thick slices
2. In a large saute pan, heat 2 tablespoons of the olive oil over medium-high heat.  When the oil is hot, add the peppers.  Cook them for 2 minutes without stirring.  Stir them well and cook them for 2 more minutes without stirring.  Repeat this routine 2 to 3 times or until the peppers start to brown and wilt.  Add the garlic and saute the mixture for 2 minutes or until the garlic softens.  With a slotted spoon transfer the peppers to a large bowl.  Set them aside.
3. Add the remaining 2 tablespoons of olive oil to the pan.  When the oil is hot, add the onions.  Saute them for about 3 minutes or until they are lightly browned.  Return the peppers to the pan.  Add the tomatoes, fresh and dried oregano, and bay leaf.  Season the sauce to taste with salt and pepper.  Reduce the heat to medium and cook the sauce, partially covered, stirring occasionally, for 10 to 13 minutes or until the peppers have softened completely.
4. Prepare a charcoal or gas grill so that one side of the coals or heating elements is medium-hot and the other side has a low heat; first, lightly spray the grilling rack with vegetable oil spray to prevent sticking.  Or preheat the broiler.
5. Lightly brush the sausage with olive oil.  Grill it on high heat for 2 to 3 minutes or until it is browned.  Turn it over and grill the other side for 2 to 3 minutes or until it is browned.  Transfer it to the lower heat and grill it for 7 to 8 minutes.  Check for doneness by cutting into the sausage.  Return it to the high heat and grill it for about 1 minute on each side to complete the cooking.
6. Spread the pepperonata on a large platter.  Lay the sausage ring on top.  Serve with crusty bread.
Notes/Results:  This was one incredible meal!  I garnished the sausage ring with the pepper and onion mixture and sprinkled provolone cheese over the top.  We served this sausage with Romano Roasted Potatoes and everyone was swooning in delight.  I do want to note that I used the entire 4 pound ring of sausage in this recipe (the recipe calls for 2 pounds).  Because I was doubling the meat, I also doubled the peppers and onions.  I'll definitely be stocking up on this sausage the next time I'm in Cleveland.
Mmmmmmm...........Delicious!

Tuesday, December 21, 2010

A Comfort Food Feast: Giada's Pot Roast with Porcini Mushrooms, Herbed Cheese Polenta, and Brussels Sprouts with Pancetta

All you could hear was the sound of forks hitting plates.  No one said a word.  They were too busy shoving food in their mouths.  There was no talking, no drinking, and there was no one asking for salt, napkins, etc.  The food was inhaled.  The entire 4 pound roast.... gone in one sitting!  Everyone was so pleased with this meal that it was requested again, and soon. 

Thank you to all my wonderful blogging friends who pointed out Giada's recipe for Pot Roast with Porcini Mushrooms.  You sang it's praises, posted some astoundingly drool-worthy photos, and inspired me to make it for myself.  It was glorious.  It was delicious.  It was savory, tender, succulent.....and that sauce was out of this world.  Seriously one of the best pot roasts to ever touch my lips.  I will make it again and again.

I won't lie.  The pot roast was infinitely better served atop this creamy, cheesy, sinfully rich Herbed Cheese Polenta
 And, because my nine-year old daughter has a new love for Brussels Sprouts, I made Giada's Brussels Sprouts with Pancetta.  A five-star veggie dish for sure!
 It was an extremely rewarding and comforting feast.  A welcome change from the quick meals and cookies that we've been eating all week.  If you're looking for a wonderful meal, here it is.  Be ready to dig in.  Try not to cry when you don't have any leftovers.
Pot Roast with Porcini Mushrooms
Adapted from Giada's Family Dinners
Serves 8-10, or maybe just 4
1 (5 pound) boneless beef chuck roast
salt and freshly ground black pepper
2 tablespoons olive oil
2 onions, chopped
6 garlic cloves, coarsely chopped
1 cup dry red wine
1-3/4 cups canned low-sodium beef broth (I didn't have broth on hand so I used water)
1/2 ounce dried Porcini Mushrooms
1 large spring of fresh rosemary (I also didn't have any rosemary, so I omitted this)
Preheat the oven to 350F.  Pat the beef dry with paper towels and sprinkle generously with salt and pepper.  Heat the oil in a heavy, 6-quart pot or Dutch oven over medium-high heat.  Add the beef and cook until browned on all sides, about 12 minutes.  (Don't rush this step, which is what creates the deep rich flavor in the finished dish.) Transfer the beef to a bowl.
Reduce the heat to medium.  Add the onions to the same pan and saute until tender, scraping up the brown bits on the bottom of the pot, about 5 minutes.  Add the garlic and saute for 1 minute.  Add the wine and boil for 1 minute.  Stir in the broth and mushrooms.  Return the beef to the pan and bring the liquids to a boil.  Cover the pot and transfer to the oven.  Braise until the beef is fork-tender, about 3 hours, turning the beef over halfway through.
Transfer the beef to a cutting board.  Tent with foil and let stand for 15 minutes.  Meanwhile, spoon any excess fat off the top of the pan juices.  Transfer the pan juices and vegetables to a blender and puree until smooth.  In a medium, heavy saucepan, combine the sauce and rosemary sprig.  Bring to a boil, then season the sauce to taste with salt and pepper.
Cut the beef across the grain into 1/2-inch-thick slices.  Arrange the sliced beef on a platter.  Spoon some of the sauce over and serve, passing the remaining sauce in a gravy boat.


Herbed Cheese Polenta
Adapted from Giada's Family Dinners
8-10 servings
9 cups water (I added up to a cup more when the polenta became too thick)
1 tablespoon salt
2-1/2 cups yellow cornmeal or polenta
1-1/2 cups freshly grated Parmesan cheese
1-1/2 cups whole milk (I used half and half)
10 tablespoons (1-1/2 sticks) unsalted butter, cut into chunks
1/3 cup chopped fresh flat-leaf parsley
1 tablespoon finely chopped fresh rosemary (left out just because I didn't have any)
1 tabelspoon chopped fresh thyme
3/4 teaspoon freshly ground black pepper
Bring the water to a boil in a large, heavy pot.  Add the salt.  Gradually whisk in the cornmeal..  Reduce the heat to low and cook, stirring often, until the mixture thickens and the cornmeal is tender, about 15 minutes.  Remove from the heat.  Add the cheese, milk, butter, herbs, and pepper.  Stir until the butter and cheese melt.  Transfer the polenta to a bowl and serve.

In the interest of not writing a book, the recipe for the Brussels Sprouts with Pancetta can be found HERE, you will be redirected to the Food Network.

Notes/Results:  Absolutely amazing!!  Just a couple things to share.  I was really upset when I found that I didn't have the beef broth to make the roast, but I ended up subbing water and found the end result was still fantastic.  I halved the recipe for the polenta, which worked out great.  I subbed half and half for whole milk just because it was what I had on hand.  I added about 1 extra cup of water to the polenta while is was cooking.  I found that the polenta was too thick as the recipe was written.  All in all, a couple of subs and additions, but the end result of all three recipes was fabulous.  All three recipes are keepers!
Cooking the recipes of Giada De Laurentiis