Showing posts with label mexican. Show all posts

Thursday, October 17, 2013

Mushroom & Shallot Migas {The New Southwest #Cookbook Spotlight}


For the next few weeks I'll be participating in The New Southwest Cookbook Spotlight hosted by my good friend, Heather of girlichef. The New Southwest: Classic Flavors with a Modern Twist is a brand new cookbook written by fellow food blogger, Meagan Micozzi. Meagan's adventure with southwestern inspired cuisine began when she relocated to Arizona and found comfort and inspiration in the local foods, flavors, and ingredients. Meagan created her food blog, Scarletta Bakes, to chronicle her adventures with southwestern food.  Her blog is now wildly popular for it's innovative approach to southwestern cuisine. If you've been reading her blog for long then you are probably already in love.  If you haven't been introduced yet then please go ahead and check her out. It's a love at first sight kinda thing.


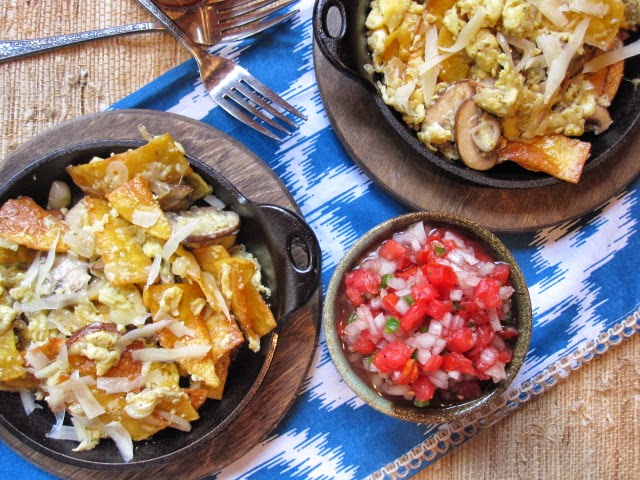
This week we are all making Migas, an egg dish starring leftover bread or tortillas.  Traditional Migas feature fried tortilla strips, tomato, onion, and jalapeno.  Meagan's Mushroom & Leek Migas feature fried tortilla strips, mushrooms, leeks*, and Manchego cheese.  I chose to make Meagan's migas for dinner one evening and they were an all-around hit!  Everyone raved about how they loved the crunch of the fried tortilla strips, the meatiness of the mushrooms, and the nutty flavor of the Manchego cheese.  We topped our migas with our favorite Pico de Gallo and it was a perfect veggie-packed meal.  So simple but very pleasing.  I'll definitely be making this again!

Stay tuned for more. There will be more recipes, as well as reviews, and several chances to win your very own copy of The New Southwest!  Click HERE to read about the Cookbook Spotlight and see a list of all the participants. A big thank you to Meagan for such a beautiful cookbook, the folks at Hippocrene, and to Heather of girlichef for giving me the opportunity to participate in this spotlight.


Mushroom & Shallot Migas
Adapted from The New Southwest 
by Megan Micozzi of Scarletta Bakes 

4 five inch corn tortillas
1-1/4 cups vegetable oil, divided
a little pat of butter*
1/4 cup heavy cream
salt and pepper to taste
8 ounces baby bella mushrooms, brushed clean and sliced (about 2 -1/2 cups)
2 shallots, sliced*
2 tablespoons minced fresh garlic
1 cup shredded Manchego cheese

Notes: The recipe calls for 1 leek, ends removed, and chopped.  I really don't care for leeks so I used two shallots sliced thinly.  Also I used only enough vegetable oil to fry the tortillas.  Instead of oil I used a little butter to saute the mushrooms and shallots and cook the eggs. 

To prepare the corn strips:  Cut the tortillas in half and then slice them into thin strips (1/2" to 3/4" wide).  Heat 1 cup of vegetable oil in a large in a large, heavy-bottomed saute pan (I prefer cast iron) over medium-high heat.  Working in batches, fry the tortilla strips for 1 to 2 minutes, flipping pieces as they fry and removing the crispy, browned strips to a paper towel-lined baking sheet to drain and cool.

Whisk the eggs and heavy cream together in a large bowl and season liberally with salt and pepper.  Set aside.

In a medium-sized skillet melt a bit of butter.  Saute the mushroom slices for approximately 3 minutes or until tender and fragrant.  Add the shallots and saute for 1 more minute.  Add the garlic and saute for 1 more minute.  Pour in the egg mixture and cook, stirring constantly in a circular motion until eggs begin to solidfy.  Just as eggs begin to solidfy, stir in the fried tortilla strips.  Continue cooking, stirring frequently, until eggs are light, fluffy, and cooked through.

Remove from heat, top with cheese, and serve immediately.  Goes very well with a good pico de gallo (as pictured above).

This recipe from The New Southwest by Meagan Micozzi copyright 2013, used with permission from Hippocrene Books.

*recipe from The New Southwest by Meagan Micozzi copyright 2013, used with permission from Hippocrene Books.
- See more at: http://www.girlichef.com/2013/10/MushroomLeekMigas.html#more


This post is part of The New Southwest Cookbook Spotlight sponsored by Hippocrene and hosted at girlichef. - See more at: http://www.girlichef.com/2013/10/MushroomLeekMigas.html#more

Sunday, July 21, 2013

Salsa Mexicana Classica (Pico de Gallo) and Taco Loco in Cabo San Lucas, Mexico

Back in April my husband and I took a trip to Cabo San Lucas, Mexico for our tenth wedding anniversary.  We landed at the airport early in the day, and it was still a little too early for check in, so we decided to check out downtown Cabo.  Our original plan was to go to Sammy Hagar's Cabo Wabo Cantina, but on our way there we found a gem of a restaurant, Taco Loco.
Taco Loco is inside Plaza de los Mariachis, right in front of the Cabo Wabo Cantina.  I'm not sure how Sammy Hagar keeps his place in business, because the aromas coming from Taco Loco cannot be ignored.
If the aromas don't draw you in, then the charming outdoor ambiance surely will.  There are little wooden tables and festive music as you dine outside, right in the middle of the marketplace.
You might buy a necklace, bracelet, and earrings from this sweet little lady.  Or, you might even eye up a hammock while you're drinking and dining (as my husband did).
You will, for sure, be approached by several mariachis.  Believe me, you don't want to pass up a performance.  The mariachis were very happy, extremely entertaining, and always had us laughing.  Felipe (pictured above) was our absolute favorite.  Felipe has a fantastic sense of humor and a zest for life that is unparalleled.  When he performs he gives it his all...and then some.  He sang me a version of Van Morrison's Brown Eyed Girl  (even though I have blue eyes) that had us laughing so hard we cried.  Felipe was probably the happiest person I'd ever met in my life.  I think I'll remember him forever.
Taco Loco's food is fresh and delicious. We sampled so many delicious dishes (fish tacos, shrimp tacos, grilled shrimp, chicken burritos, bean and cheese nachos, and some of the most delicious margaritas).  However, my very favorite thing was the salsa bar.  When the waiter delivered your plate he would give you a bowl for salsa and toppings.  Or, you could simply take your plate over to the salsa bar and load up.  There was a rainbow of salsas and toppings to chose from!  
Lucky for me, I happened to try their Pico de Gallo on our first day there because it was CRAZY good! I'd never been much of a salsa/pico fan before, but this stuff was life-changing!  It was screaming with fresh flavor and just the right amount of heat. I found myself craving it enough that I had to go to Taco Loco for a daily fix.  Each visit I would fill my salsa bowl to capacity and put that pico on everything I possibly could.   

I vowed to make Pico when I came home from vacation, but I wanted to wait until I could get my hands on some fresh summer tomatoes.  This recipe comes from the king of Mexican cooking, Rick Bayless, and it is pretty spot on.  It takes some time to chop all the ingredients, but it is so worthwhile.  This seems like a simple, already done-that kind of recipe, but a bowl of salsa like this is very inspiring.  You will find yourself wanting to put this salsa on everything.  

I turned a rather boring meal of grilled chicken, white rice, and smashed black beans into a real fiesta by adding a scoop of this salsa.  Later that night, I made a plate of nachos with chicken, beans, cheese and salsa on top, which the kids went crazy for.  Then in the morning I topped my scrambled eggs with the salsa.  My bowl of salsa was empty in no time.  Now I'm back to stalking my tomato plants and dreaming of Cabo!


Salsa Mexicana Classica
(Essential Tomato-Serrano Salsa)
by Rick Bayless
found on Epicurious
Makes 2 cups


12 ounces (2 medium-small round or 4 or 5 plum) ripe tomatoes 
Fresh serrano chiles to taste (roughly 3 to 5, 1/2 to 1 ounce total, or even more if you like it really picante), stemmed 
A dozen or so large sprigs of cilantro 
1 large garlic clove, peeled and very finely chopped (optional)
 1 small (4-ounce) white onion
1 1/2 teaspoons fresh lime juice 
Salt, about 3/4 teaspoon


Core the tomatoes, then cut in half widthwise and squeeze out the seeds if you wish (it will give the sauce a less rustic appearance). Finely dice the flesh by slicing it into roughly 1/4-inch thick pieces, then cutting each slice into small dice. Scoop into a bowl. 

Cut the chiles in half lengthwise (wear rubber gloves if your hands are sensitive to the piquancy of the chiles) and scrape out the seeds if you wish (not only will this make the salsa seem less rustic, but it will make it a little less picante). Chop the chiles as finely as you can, then add them to the tomatoes. Carefully bunch up the cilantro sprigs, and, with a sharp knife, slice them 1/16-inch thick, stems and all, working your way down from the leafy end until you run out of leaves. Scoop the chopped cilantro into the tomato mixture along with the optional garlic. Next, finely dice the onion with a knife (a food processor will turn it into a sour mess), scoop it into a small strainer, then rinse it under cold water. Shake to remove the excess water and add to the tomato mixture. Taste and season with lime juice and salt, and let stand if you have a little time, for the flavors to meld before using or scooping into a salsa dish and serving.


Theme: Potluck!

Wednesday, October 3, 2012

Muy Bueno Cookbook Review and Giveaway!!

Muy Bueno
Three Generations of Authentic Mexican Flavor
Authors: Yvette Marquez-Sharpnack, Veronica Gonzalez-Smith, 
& Evangelina Soza
Publisher: Hippocrene
Softcover: 288 pages

Chapters Include: Introduction - Glossary of Chiles - Tamales - Breads - Salsas - Drinks - Aquas y Paletas - Appetizers - Soups - Entrees - Sides - Desserts- Gracias - Spanish Recipe Index - and Recipe Index

The Muy Bueno cookbook is honestly one of the prettiest cookbooks I've seen in some time.  You can literally get lost in the beautiful pictures and stories that are shared in this book.  During my journey with this cookbook I tried several recipes, and they were all terrific, but it was the sentiment of the book that really captured my heart. This book is so much more than recipes.  It's the tale of three generations of women spending time together in the kitchen and bonding through food.  It's a testament to the wonderful memories you can create in the kitchen.


Here is a recap of the dishes I tried from Muy Bueno:

Mexican Chorizo and Cheese
Adapted from Muy Bueno
Serves 6

5 ounces Mexican chorizo, casings removed
1/2 cup sliced white onion (1/2-inch strips)
1/2 cup silver/blanco tequila
12 ounces quesadilla or asadero cheese, shredded (I used monterey jack)
1 tablespoon chopped cilantro (I used green onion)
6 corn or flour tortillas, warmed

Preheat oven to 350F.  In an oven-safe skillet (cast iron is perfect), cook the chorizo on your stovetop until almost done, about 15 minutes (mine was done in about 8 minutes).  Drain excess fat.  Add the onion to the chorizo and cook until browned.  Remove pan from the heat.

Carefully add the tequila.  Return to heat and simmer, uncovered, for 15 to 20 seconds or until most of the tequila has dissipated.  Remove from heat.

Stir in the cheese and combine well.  Place skillet in the oven and bake uncovered for about 10 to 15 minutes or until cheese is completely melted and slightly golden brown on top.  Sprinkle with fresh cilantro.  Serve with corn or flour tortillas.

*If you need to double the recipe, do not double the tequila, use only 1/2 cup.

These are the recipes I'd like to try:  Red Chile & Pork Tamales - Cranberry Margarita - La Llorona - Albondigas - Chicken Tinga - Ham and Avocado Torta - Old Fashioned Mexican Oatmeal - Jalapenos with Soy Sauce - and Vangie's Famous Thanksgiving Stuffing
GIVEAWAY
Hippocrene has generously offered one of my readers the chance to win their very own copy of the newly released Muy Bueno: Three Generations of Authentic Flavor cookbook (US shipping addresses only, please).  All you need to do is leave a comment letting me know that you're interested in winning a copy of the book! It's as easy as that!!  The giveaway will run until Saturday, October 6th at midnight (EST).  The winner of the book will be drawn via random number generator and announced on Sunday, October 7th.

*Visit the Muy Bueno Cookbook Spotlight and Cook-off Announcement page for more chances to win a copy of the book.  Simply scroll down to week three and click on the links to each participant for additional chances to win a copy of this cookbook.  


Thanks to Heather at girlichef, and to the publisher Hippocrene, for the opportunity to review this book!  This post is part of the Muy Bueno Cookbook Spotlight & Cook-Off sponsored by Hippocrene and hosted at girlichef 

Muy Bueno Cookbook Cook-Off and Spotlight (small)

Sunday, September 30, 2012

Stuffed Bell Peppers with Ground Beef and Potatoes {Muy Bueno Cookbook Spotlight and Cook-off}

When I first received my copy of the soon-to-be-released Muy Bueno: Three Generations of Authentic Mexican Flavor Cookbook, I did what I always do. I grabbed a notebook and pen and sat down to explore my new book.  One of my favorites things to do with a new cookbook is write a list of all the recipes I want to try.  Usually my list is about half a page long. This time, however, I opened my Muy Bueno cookbook and once my pen hit the paper it never came back up.  Soon I realized that I literally wanted to make every single recipe.   

Instead of listing every recipe in the book I decided to catalog the top few that drew my attention the most.  The recipes destined for my kitchen right away.  Let me tell ya...that took awhile.  However, there was one recipe that was so colorful it drew me in, bell peppers in a rainbow of colors stuffed with a hearty mix of ground beef and potatoes. 

Stuffed peppers are special to me.  My Mom's specialty always was and continues to be her stuffed peppers.  She makes an awesome stuffed pepper filled with beef, rice, tomatoes, and cheese.  They are a real hit around here.  Mom's stuffed peppers are so good that I never even attempted to make stuffed peppers myself.  Until now. 

This recipe, from the Muy Bueno cookbook, is different enough that it simply can't be compared to Mom's stuffed peppers.  My Mom's recipe is more about the filling where in this Muy Bueno version I feel like the bell pepper itself is the star.  You really taste the pepper.  This version is very fresh and feels almost virtuous, perfect for this time of year when temperatures still remain high but comfort food is calling.
Stuffed Bell Peppers with Ground Beef and Potatoes
Pimientos Rellenos con Picadillo
Makes 3 stuffed bell peppers

3 bell peppers (your choice of color)
1 batch picadillo (recipe follows)
1 tablespoon olive oil
1/2 cup crumbled queso fresco (I subbed feta cheese)
cilantro, for garnish (optional)

For Picadillo:
1 tablespoon olive oil
1/2 cup chopped white onion
1 pound ground beef
2 cloves garlic, minced
1 teaspoon salt
1 cup chopped roma tomatoes
1 small russet potato, peeled and finely chopped

To make picadillo: In a large skillet heat oil over medium heat.  Add onion and cook for about 2 minutes, until translucent.  Add ground beef and brown,  Using a potato masher, mash meat so you have small pieces of meat with no big chunks.  Drain off excess grease.  Add garlic, salt, tomatoes, and potatoes and cook over low heat for about 15 minutes, until potatoes are done.  Salt to taste.

To make the stuffed peppers:  Preheat the oven to 350F.  Make picadillo for stuffing the bell peppers (see above). Rinse the peppers, Cut the tops off and remove the white flesh and seeds.  Rinse out the inside of each pepper.  In a large stockpot parboil the peppers, about 3-5 minutes, depending on how soft you want them to be in the final dish.  Remove the peppers and drain any excess water that is inside them.  

Brush each pepper with olive oil.  Heat up a comal (or griddle) and place the peppers on their side on the comal, about 1 minute on each side, just long enough to sear the sides of each pepper.

Prepare a baking dish (about 10.5 inches by 7 inches/a bread loaf pan would be perfect) that will accommodate your 3 peppers.  Spray the dish with cooking spray to keep the peppers from sticking to it.  Pour about 1/4 inch water into pan.  

Stuff each pepper with some picadillo and place it in the baking dish.  Cover with foil and crimp the edges onto the dish creating a seal.  Bake for about 25 to 30 minutes.  

Remove from oven and let rest for about 5 minutes.  Plate 1 pepper per plate, top with crumbled queso fresco (or feta), and garish with cilantro. 
This post is part of the Muy Bueno Cookbook Spotlight & Cook-Off sponsored by Hippocrene and hosted at girlichef*


Stay tuned for next week when I will be hosting a Muy Bueno Cookbook Review and Giveaway!  You don't want to miss out on a chance to win a copy of this gorgeous book!

Tuesday, September 25, 2012

My Top Five Rick Bayless Recipes

Over the last six months I've been cooking up the recipes of Rick Bayless with my friends at the I Heart Cooking Clubs group.  After spending six months with a chef I always end up with a few favorites.  These are the dishes that my family loved the most.  In fact, all of the dishes below have been repeated in my kitchen at least once, if not more, since I first made and shared them here on my site.  
 
First up, and quite possibly the most popular of all the Rick Bayless dishes I tried, are these Cafe Tacuba-Style Creamy Chicken Enchiladas.  These enchiladas are a perfect and comforting family meal.  Roasted poblanos and spinach are combined to make a very flavorful and creamy sauce that is poured over casserole-style enchiladas.  These enchiladas are awesome!
 Next up are these Quick Fried Shrimp with Sweet Toasty Garlic.  If you love garlic, these are an absolute MUST MAKE.  Total heaven on a plate.  I should know.  I pretty much ate the whole batch myself.  
These Crusty Black Bean-Chorizo Subs were our first introduction to the Mexican torta and they were a huge hit.  It is worth seeking out traditional Mexican bolillo rolls at your supermarket because the bread really does make a difference.  We loved these layered sammies with smashed black beans, spicy chorizo, creamy avocado, and salty feta cheese all served up on some good crusty bread.  I crave these sandwiches.
To prove that we love a good Mexican torta, here is another hit recipe.  My Mom, and my husband, went crazy for these Crispy Chicken Tortas.  Here again, you have a layer of seasoned and smashed black beans, a crispy breaded chicken cutlet, monterey jack cheese, and creamy avocado on a crusty bolillo roll.  My Mom declared this one of her favorite meals I've ever made and even asked that I make these for her birthday.  The ultimate compliment.
This Quick and Easy Arroz con Pollo is another great family meal.  Rick calls for whole pieces of chicken in this recipe, which would probably be equally delicious, but I decided to make a quicker version with some leftover sliced rotisserie chicken.  You know how sometimes a dish turns out perfectly seasoned?  This is how I feel about this dish.  Everything about this dish was perfectly seasoned and balanced and the rice was incredibly fluffy.  This is a great staple dish and the leftovers, if there are any, definitely improve with time.
 
 This wraps up my time with Rick.  I'm so happy I had the chance to explore his cookbooks and try so many of his recipes.  Starting next week we're going to be cooking the recipes of Madhur Jaffrey.

Theme: Adios y Gracias, Rick!

Sunday, September 23, 2012

Mexican Shortbread Cookies (Polvorones Mexicanos)

This weekend the weather was a little on the chilly side so it was the perfect time to stay indoors and do some Halloween decorating.  Once all the decorations were up we decided to make a batch of these Mexican Shortbread Cookies (otherwise known as Polvorones).  Of course, since we were in Halloween mode, we had to decorate them with Halloween colored sprinkles.

These cookies were a big hit with the kids.  I think it's a well-known fact that all kids LOVE sprinkles, right?  Let's just say they had a fantastic time decorating and eating these cookies. These cookies can be decorated with all kinds of toppings (finely chopped Mexican chocolate or mini chocolate chips, finely chopped nuts, pumpkin or sunflower seeds, sesame seeds, chopped dried fruit, oatmeal, and of course the ever famous sprinkles).  While the kids loved them best with sprinkles I think I'd like to try them with a little bit of cinnamon and sugar sprinkled on top.

The way this recipe is written you make the dough, chill it for 30 minutes, then roll it out and cut out shapes from the dough.  I must confess that one of my least favorite things to do is roll out dough and cut out shapes.  It's just way too messy and time-consuming in my opinion.  Instead of doing all that, I chose to place the dough onto plastic wrap, shape it into a log, and chill it for 30 minutes.  When I unwrapped the dough I simply cut the dough into circles/discs.  It worked out great.  I'd definitely take that short cut again.

Polvorones Mexicanos
(Mexican Shortbread Cookies)
Adapted from Mexican Everyday by Rick Bayless
Makes 24 three inch cookies
(recipe can be cut in half successfully)

1 cup butter, softened
2-1/2 cups all-purpose flour
1/2 cup granulated sugar
1 teaspoon salt 

Toppings: Decorative sprinkles, mini chocolate chips, cinnamon/sugar, dried fruit, or chopped nuts


In a large bowl, combine the flour, sugar, and salt.  Using a potato masher, combine the butter into the flour mixture until no big pieces of butter are visible.  Continue to work the dough with your hands until the dough forms a ball.  Wrap dough in plastic and refrigerate for 30 minutes.

Preheat oven to 350F.  Roll out the dough, between two sheets of plastic wrap, to 1/4-inch thickness.Peel off the top layer of plastic wrap and cut out cookies with a 3-inch cookie cutter.

Decorate the cookies with any toppings you like (sprinkles, chocolate chips, cinnamon and sugar, etc.)  Gently press down on the sprinkles (or other topping) so that they stick to the cookie.  Carefully transfer the cookies to an ungreased baking sheet, placing the cookies about 1 to 2-inches apart.  Bake at 350F for 15 to 17 minutes, rotating the cookie sheet once, after 10 minutes.  Let the cookies cool for about 2 minutes on baking sheet, then transfer to wire rack to cool completely.
Theme: What's in your lunchbox?

Saturday, September 8, 2012

Quick and Easy Arroz con Pollo


This is by no means a traditional Arroz con Pollo, but it's definitely a quick and easy version that has all the familiar flavors and is every bit as comforting. What makes this dish a little quicker, and easier, is the use of a store-bought rotisserie chicken.  

Once a week I buy at least one rotisserie chicken.  My son usually eats the legs and thighs over the course of a few days so I always need a plan for the leftover chicken breast.  I love being creative with the leftover chicken breasts and actually have created a running list of recipes to try with these leftovers.  I must confess that most times my leftover chicken turns into some rather tasty chicken quesadillas, mostly because we all love them so.  Other times, the chicken finds it's way into enchiladas, chicken croquettes, or some kind of dip, like this fabulous barbecue chicken dip. Either way, this leftover chicken is a cook's best friend. I can't tell you how many times it's saved me.

This time around, my leftover chicken inspired me to make a quicker and easier version of this tasty Latin American classic, Arroz con Pollo.  I actually prefer this version because I've come to enjoy the texture of shredded chicken much better than chunks or large pieces of chicken. This was a lovely meal.


Quick & Easy Arroz con Pollo with Black Beans
Adapted from Mexican Everyday 
by Rick Bayless
Serves 4

1-2 tablespoons canola oil
2-1/2 tablespoons chili powder (any type of chili powder: regular, chipotle, or ancho)
salt and pepper, to taste
1 medium white onion, diced
1 cup long grain white rice
sliced or shredded chicken from one rotisserie chicken (about 2 cups)
2 big or 4 small garlic cloves, finely chopped
1-1/2 cups chicken broth
One 15-ounce can black beans, drained and rinsed (optional)*
1/4 cup chopped green onions
1/3 cup chopped cilantro
1/2 - 1 cup salsa for serving, if desired
warm toasted tortillas, if desired

Add the oil to a large saute pan or Dutch oven over medium-high heat.  Add in the diced onion and rice, stirring as you go, and cook until the rice turns from translucent to opaque.  Add the garlic and the 2 and a half tablespoons of chili powder and cook for 1 minute, then add the broth and salt and pepper to taste.  Stir well.  When the mixture comes to a boil, reduce the heat to medium-low and cover the pot.  Cook for 15 minutes.

Do not stir the rice if you want it to be fluffy!

Add the sliced or shredded chicken and black beans to the top of the pot (without stirring the rice), recover the pot, and cook over very low heat until the chicken and beans are warmed through and the flavors mingle, about 5-6 minutes.

Do not stir the rice if you want it to be fluffy!

Uncover, sprinkle with green onions and cilantro on top of the mixture (do not stir the rice).  Recover the pot and let stand off the heat for 5 to 10 minutes.  
 
Fluff the rice with a fork and serve with salsa or warmed tortillas, if desired.

Theme: Esta Rojo!

Friday, August 24, 2012

Cafe Tacuba-Style Creamy Chicken Enchiladas

I've been cooking the recipes of Rick Bayless once a week for five full months now.  This recipe, for Cafe Tacuba-Style Creamy Chicken Enchiladas, is hands down my favorite Rick Bayless recipe from the whole five month period.  I am so glad I spotted this dish over on the Sweet Life or else I may have missed out on it's deliciousness.

These enchiladas are absolute perfection in my opinion.  The sauce is a flavorful and creamy combination of spinach and poblano chiles with just the right hint of garlic. That delicious sauce blankets the corn tortillas and chicken to make for one extremely comforting dish.  These enchiladas were pretty much inhaled at my house.  Next time around I'd consider doubling the recipe so there would be leftovers.

Instead of rolling individual enchiladas I chose to make more of an enchilada bake.  I used twelve corn tortillas, layering six of them on the bottom of the dish, adding the filling, then layering the remaining six corn tortillas on top (the directions below reflect this). This style is much easier, quicker, and way less messy and I like the end result just as well.  I would recommend this style over hand rolling twelve enchiladas any day of the week.  However, if you choose to hand roll the enchiladas then you will need to soften your corn tortillas by heating them until they are pliable and brushing them with a little oil so you can work with them.

One Note:  Once I assembled the enchilada bake I felt like there was way too much sauce to pour over the top.  I went ahead and poured all that sauce on anyway and I'm glad I did.  The enchiladas really soak up that sauce and everything turned out excellent.  So, if you decide to make this recipe, go ahead and pour all that sauce on top.  You'll be happy you did!
 
Cafe Tacuba-Style Creamy Chicken Enchiladas
Adapted from SweetLife
Serves 4-6


2 poblano chiles
1 cup roughly chopped spinach leaves
2 cups milk
2 cups chicken broth
6 tablespoons butter 
 3 garlic cloves, finely minced
1/2 cup flour
salt
3 cups coarsely shredded cooked chicken (I bought a rotisserie chicken)
12 corn tortillas
A little vegetable oil for brushing or spraying
About 1 cup Mexican melting cheese (Chihuahua, quesadilla, asadero, monterrey jack, or mild cheddar)
cilantro for garnish
 
Preheat oven to 350F.
 
Make the sauce– Roast the poblanos directly over a gas flame or a baking sheet 4 inches below a very hot broiler. Turning regularly, until the skins have blistered and blackened on all side, about 5 minutes for an open flame, about 10 minutes under the broiler. Cover with a kitchen towel and, when handleable, rub off the blackened skin, tear open and pull out the seed pod and stem. Quickly rinse to remove any stray seeds or bits of skin. Roughly chop and put in a blender jar. Add the spinach. 
 
In a medium saucepan, combine the milk and broth, set over medium-low heat to warm.
 
In a large (4quart) saucepan, melt butter (or heat the oil) over medium heat. Add the garlic and cook for a minute to release its aroma, then add flour and stir the mixture for a minute. Raise the heat to medium-high.  Pour in the warm broth mixture and whisk constantly until the sauce boils. Reduce the heat to medium and simmer for 5 minutes. Remove from the heat. 
 
Pour half the hot sauce into the blender with the chiles and spinach. Cover loosely (I remove the center part of the lid, secure the lid, then drape a cloth over the whole thing.) and blend until smooth. Pour the mixture back into the saucepan with the remaining sauce. Taste and season well with salt, usually about 2 teaspoons. 
 
Finishing the enchiladas– smear about 1 cup of the sauce over the bottom of a 13×9 inch baking dish. Stir 1 cup of the sauce into the chicken.  Next, lay half of the tortillas (six) on top of the sauce that you added to the 13 x9 baking dish.  Now lay all of the chicken mixture on top of the tortillas making sure to spread the chicken in an even layer on top of the tortillas.  Finally, layer the remaining six tortillas on top of the chicken and cover the tortillas with the remaining sauce (this will seems like a lot of sauce but the enchiladas really absorb it well so go ahead and use it all).  Top the sauce with the shredded cheese and place in the oven for about 20-25 minutes or until the cheese begins to brown.  Remove the enchiladas and garnish with cilantro.
 

Sunday, August 12, 2012

Spicy Chorizo, Zucchini, and Egg Breakfast Tacos

After a late night, and a fair share of cocktails, you need a really hearty breakfast.  And, I'm not sure why, but I always crave spicy food the morning after.  The spicier the better.

This recipe is a combination of two recipes from Rick Bayless' Mexican Everyday cookbook.  I took inspiration from his Zucchini Tacos with Chorizo and also his recipe for Mexican Scrambled Egg Tacos and combined them. 

These breakfast tacos are a spicy blend of chorizo, onion, zucchini, chipotle chiles, and scrambled egg.  They're spicy, hearty, full of flavor and just what the doctor ordered after a night of partying.
Spicy Chorizo, Zucchini and Egg Breakfast Tacos
Inspired by Mexican Everyday by Rick Bayless
Makes about 4 breakfast tacos

8 ounces chorizo, removed from casing
1 teaspoon canola oil
1/4 cup finely chopped onion
1 chipotle chile en adobo, chopped (divided)
1 small zucchini, diced (about 1/2 cup total)
4 eggs
salt and pepper
1 teaspoon butter or canola oil
1/2 cup shredded monterey jack cheese
4 flour or corn tortillas
hot sauce or salsa for serving

Add 1 teaspoon canola oil to a medium sized skillet over medium heat.  Add chorizo to pan , stirring regularly and breaking up clumps, until cooked through, about 4 minutes.  Add finely chopped onion, half of the chopped chipotle chile en adobo, and the zucchini.  Cook over low heat until the flavors blend and the zucchini begins to soften, about 4-5 minutes.

In a medium sized bowl, beat four eggs.  Add the remaining half of the chopped chipotles in adobo as well as salt and pepper to taste.  In a second skillet, over medium-low heat, add one teaspoon butter or canola oil.  Add the beaten egg mixture and cook until the eggs are as done as you like.  Add the cooked eggs to the chorizo and zucchini mixture and stir until everything is mixed together. 

Heat flour or corn tortillas in a skillet over medium heat.  Add chorizo, zucchini, and egg mixture and top with cheese.  Enjoy!

Theme: Feel the Heat!


Thursday, August 2, 2012

Queso Fundido Burger

Introducing the Queso Fundido Burger.  A thick meat patty made of ground beef and cooked chorizo that is studded with spicy chopped chipotle chiles in adobo and topped with loads of melting monterey jack cheese, roasted poblano strips, caramelized onions, and garlic.  Serve it all on a lightly toasted bun and it's one incredible burger!


 Queso Fundido Burger
Adapted from RickBayless.com
Serves 4


2 fresh medium poblano chiles
1 medium onion, sliced into 1/4-inch slices
2 cloves garlic, minced
2 teaspoons oil
1 1/2 pounds ground chuck
8 ounces chorizo, cooked
1 to 2 canned chipotle chiles in adobo, finely minced, seeded if you wish
8 thick slices Monterey Jack cheese
4 hamburger buns, lightly toasted

Roast the poblanos over an open flame or 4 inches below a broiler, turning regularly until blistered and blackened all over, about 5 minutes for an open flame, 10 minutes for the broiler.  Place in a bowl, cover with a kitchen towel and let cool.  Rub off the blackened skin and pull out the stems and seed pods.  Cut into 1/4-inch strips.

Heat the oil in a medium skillet over medium.  Once the oil is hot, add the onions, stirring frequently until it begins to brown, 7 to 8 minutes.  Stir in the garlic and poblano and cook for 2 minutes.  Season with salt, usually about 1/2 teaspoon.  Scrape the rajas into a bowl and cover to keep warm.

In a large bowl, combine the ground beef, cooked chorizo, chipotles and 1 1/2  teaspoon salt.  Mix until well combined.  Divide the meat into 4 equal portions and form the patties.


Heat a gas grill to medium-high, or light a charcoal fire and let it burn until the charcoal is covered with white ash (and about medium hot); bank the coals to one side.  (It was too hot for me to grill outside so I just cooked the patties in a skillet on the stove, about 3-4 minutes per side). Place the hamburger patties on the grill and cook for a total of 4 to 5 minutes for medium rare.

Lay one piece of cheese on top of each burger, top with the warm rajas and then another piece of cheese.  Close the lid and continue cooking until the cheese has melted about 1 minute.  Remove from the grill and place on a toasted bun.  Serve immediately.
Theme: Green, Green, Green