Showing posts with label condiments. Show all posts

Sunday, September 15, 2013

Spicy Sweet Potato Wedges with Lemongrass Mayo

Please don't think of these as regular everyday sweet potato fries.  They are so much more than that!  These sweet potato wedges are mixed with a very lively combination of coriander (lots of it) and red chile pepper.  All that spicy flavor makes for a very savory and mouthwatering crust on the sweet potato wedges.  These wedges are delicious all on their own, but they pair very well with this bright and fresh lemongrass mayo.  I thought these wedges were very satisfying and comforting without weighing you down.  I'm absolutely addicted to them and can't wait to make them again!


Spicy Sweet Potato Wedges with Lemongrass Mayo
Adapted from Plenty
by Yotam Ottolenghi
Serves 4

3 medium sweet potatoes  (about 2 pounds)
4 tablespoons olive oil
1-1/2 teaspoon ground coriander
1 teaspoon salt
1 fresh red chile, finely diced

 Lemongrass Mayo

1/2 lemongrass stalk
1/2 cup mayo
grated zest and juice of 1 lime
1/2 inch fresh ginger, peeled and grated
salt and pepper, to taste

Preheat the oven to 400F.  Wash the sweet potatoes but don't peel them. Cut each lengthways in half.  Cut again lengthways into quarters and then once more in the same way so you are left with eight long wedges.

Place them on a roasting pan that has been lined with parchment paper and brushed lightly with some of the oil.  (Note: I didn't use the parchment paper and my wedges stuck slightly.  I worry that the parchment would impede the browning/caramelizing process so I would fore-go it next time as well. Toss the wedges with the remaining oil and sprinkle with a mixture of the ground coriander, finely diced red chile, and salt.  Roast for about 25-30 minutes or until the sweet potato is tender and golden brown.  Remove from the oven and allow to cool slightly.

To make the dipping sauce:
Very finely chop the lemongrass or grind finely in a spice grinder.  (Note: I found a jar of sliced lemongrass in the Asian section of my supermarket.) Whisk with all of the other ingredients for the dipping sauce and set aside. When ready to serve, place the wedges on a large, flat serving dish. Serve with the sauce on the side.
Theme: You Made Me Love You!

Sunday, August 4, 2013

Mini Turkey and Zucchini Burgers with Creamy Sumac Dipping Sauce

These Mini Turkey and Zucchini Burgers are exploding with flavor (zucchini, green onions, mint, cilantro, garlic, cumin and cayenne).  In addition to their wonderful flavor, these burgers are also incredibly moist.  In fact, the mixture was so moist I had to add breadcrumbs in order to shape the patties.   

These burgers are tasty all on their own, but they are absolutely addictive when paired with this refreshing and creamy sumac dipping sauce.  For those of you who have not tried sumac, it is a bright red spice that is popular in Middle Eastern cooking.  Sumac is usually described as sour, but I don't feel like that's a positive or accurate description.  I would describe sumac as a colorful, bright, and refreshing spice that is reminiscent of citrus.  I'm crazy for the bright red color and the special zip it adds to dishes. 

I took some liberties with the recipe for the sumac dipping sauce.  Originally, the dip was made with a base of sour cream and Greek yogurt.  I don't care for sour cream so I decided to sub mayonnaise in place of the sour cream/yogurt base.  My substitution worked perfectly and the recipe below reflects my change.  I will, however, add a special note for those of you who might like to try the recipe as it was written, with the sour cream/yogurt base.  


Mini Turkey & Zucchini Burgers with Creamy Sumac Dipping Sauce
Adapted from Jerusalem by Yotam Ottolenghi & Sami Tamimi
Makes about 18 burgers (serves 4-6)

1 pound ground turkey
2 cups grated zucchini 
3 green onions, thinly sliced
about 1/2 cup panko or breadcrumbs
1 large egg
2 tablespoons chopped mint
2 tablespoons chopped cilantro
2 cloves garlic, minced
1 teaspoon ground cumin
1 tablespoon salt
1/2 teaspoon black pepper
1/2 teaspoon cayenne pepper
about 6-1/2 tablespoons canola oil, for searing

Creamy Sumac Dipping Sauce
heaping 1/2 cup mayo
1 teaspoon grated lemon zest
1 tablespoon freshly squeezed lemon juice
1 small clove garlic, minced
1-1/2 tablespoons olive oil
1 tablespoon sumac
1/2 teaspoon salt
1/4 teaspoon black pepper

Note: This recipe was originally written to include a scant 1/2 cup sour cream plus a scant 2/3 cup Greek yogurt.  If you'd prefer this option then simply omit the mayo in the above recipe and replace it with the sour cream and Greek yogurt.  All other ingredients remain the same. 

First make the creamy sumac sauce by placing all the ingredients in a small bowl.  Stir well and set aside or chill until needed. 

Preheat the oven to 425F.  In a large bowl, combine all the ingredients for the burgers except the canola oil.  Mix with your hands and then shape into about 18 patties/burgers, each weighing about 1-1/2 ounces.

Pour enough canola oil into a large frying pan to form a layer about 1/16 inch on the pan bottom.  Heat over medium heat until hot, then sear the burgers in batches on all sides.  Cook each batch for about 4 minutes, adding oil as needed, until golden brown.

Carefully transfer the seared burgers to a baking sheet or cast iron skillet, as I've done here, and place in the oven for 5-7 minutes, or until just cooked through.  Serve warm or at room temperature, with the sauce spooned over on the side.

Theme: Mezze Madness!

Sunday, July 21, 2013

Salsa Mexicana Classica (Pico de Gallo) and Taco Loco in Cabo San Lucas, Mexico

Back in April my husband and I took a trip to Cabo San Lucas, Mexico for our tenth wedding anniversary.  We landed at the airport early in the day, and it was still a little too early for check in, so we decided to check out downtown Cabo.  Our original plan was to go to Sammy Hagar's Cabo Wabo Cantina, but on our way there we found a gem of a restaurant, Taco Loco.
Taco Loco is inside Plaza de los Mariachis, right in front of the Cabo Wabo Cantina.  I'm not sure how Sammy Hagar keeps his place in business, because the aromas coming from Taco Loco cannot be ignored.
If the aromas don't draw you in, then the charming outdoor ambiance surely will.  There are little wooden tables and festive music as you dine outside, right in the middle of the marketplace.
You might buy a necklace, bracelet, and earrings from this sweet little lady.  Or, you might even eye up a hammock while you're drinking and dining (as my husband did).
You will, for sure, be approached by several mariachis.  Believe me, you don't want to pass up a performance.  The mariachis were very happy, extremely entertaining, and always had us laughing.  Felipe (pictured above) was our absolute favorite.  Felipe has a fantastic sense of humor and a zest for life that is unparalleled.  When he performs he gives it his all...and then some.  He sang me a version of Van Morrison's Brown Eyed Girl  (even though I have blue eyes) that had us laughing so hard we cried.  Felipe was probably the happiest person I'd ever met in my life.  I think I'll remember him forever.
Taco Loco's food is fresh and delicious. We sampled so many delicious dishes (fish tacos, shrimp tacos, grilled shrimp, chicken burritos, bean and cheese nachos, and some of the most delicious margaritas).  However, my very favorite thing was the salsa bar.  When the waiter delivered your plate he would give you a bowl for salsa and toppings.  Or, you could simply take your plate over to the salsa bar and load up.  There was a rainbow of salsas and toppings to chose from!  
Lucky for me, I happened to try their Pico de Gallo on our first day there because it was CRAZY good! I'd never been much of a salsa/pico fan before, but this stuff was life-changing!  It was screaming with fresh flavor and just the right amount of heat. I found myself craving it enough that I had to go to Taco Loco for a daily fix.  Each visit I would fill my salsa bowl to capacity and put that pico on everything I possibly could.   

I vowed to make Pico when I came home from vacation, but I wanted to wait until I could get my hands on some fresh summer tomatoes.  This recipe comes from the king of Mexican cooking, Rick Bayless, and it is pretty spot on.  It takes some time to chop all the ingredients, but it is so worthwhile.  This seems like a simple, already done-that kind of recipe, but a bowl of salsa like this is very inspiring.  You will find yourself wanting to put this salsa on everything.  

I turned a rather boring meal of grilled chicken, white rice, and smashed black beans into a real fiesta by adding a scoop of this salsa.  Later that night, I made a plate of nachos with chicken, beans, cheese and salsa on top, which the kids went crazy for.  Then in the morning I topped my scrambled eggs with the salsa.  My bowl of salsa was empty in no time.  Now I'm back to stalking my tomato plants and dreaming of Cabo!


Salsa Mexicana Classica
(Essential Tomato-Serrano Salsa)
by Rick Bayless
found on Epicurious
Makes 2 cups


12 ounces (2 medium-small round or 4 or 5 plum) ripe tomatoes 
Fresh serrano chiles to taste (roughly 3 to 5, 1/2 to 1 ounce total, or even more if you like it really picante), stemmed 
A dozen or so large sprigs of cilantro 
1 large garlic clove, peeled and very finely chopped (optional)
 1 small (4-ounce) white onion
1 1/2 teaspoons fresh lime juice 
Salt, about 3/4 teaspoon


Core the tomatoes, then cut in half widthwise and squeeze out the seeds if you wish (it will give the sauce a less rustic appearance). Finely dice the flesh by slicing it into roughly 1/4-inch thick pieces, then cutting each slice into small dice. Scoop into a bowl. 

Cut the chiles in half lengthwise (wear rubber gloves if your hands are sensitive to the piquancy of the chiles) and scrape out the seeds if you wish (not only will this make the salsa seem less rustic, but it will make it a little less picante). Chop the chiles as finely as you can, then add them to the tomatoes. Carefully bunch up the cilantro sprigs, and, with a sharp knife, slice them 1/16-inch thick, stems and all, working your way down from the leafy end until you run out of leaves. Scoop the chopped cilantro into the tomato mixture along with the optional garlic. Next, finely dice the onion with a knife (a food processor will turn it into a sour mess), scoop it into a small strainer, then rinse it under cold water. Shake to remove the excess water and add to the tomato mixture. Taste and season with lime juice and salt, and let stand if you have a little time, for the flavors to meld before using or scooping into a salsa dish and serving.


Theme: Potluck!

Tuesday, November 6, 2012

Onion Fritters with Fresh Green Chutney

 The town I live in is pretty small and rural.  In fact, if you go down the street and make a left you'll run into a cattle farm.  To push my point even further, we were a dry county (no beer or alcohol sales allowed) until just about a month ago.  It's just a nice, small, old-fashioned kinda town.  While we do love living here, sometimes we miss living in a bigger city with all it's conveniences.  

However, just last week our little town had a grand opening for a brand new very fancy grocery store.  I was beyond ecstatic!  For four years I've been running to the "city", which is 30 minutes away, to get all my special hard-to-find grocery items.  Now all those special ingredients are right at my fingertips.  All I have to do is go down the street and make a left when I see the cattle farm.  It's literally minutes away.

My neighbors are laughing at me because I've been to the new grocery store every day since they've opened.  I know you all understand.  I can't believe that here, in what feels like the middle of nowhere, we now have a grocery store that has a sushi bar, and get this....a cupcake bar.  You can literally make your own cupcake.  Can I just tell you that this grocery store sells everything?  Heck, they even sell whole (skinned and deboned) frogs!  Crazy, huh?  

So anyway, I've basically been stalking the place with big wide eyes full of wonder.  It's safe to say that I've spent way too much money buying up all the ingredients that I've been dying to get my hands on all these years.

Chickpea flour, or besan, is one of the ingredients that I've been searching for until now. Chickpea flour can be used for many things, but what I've been wanting to make with it lately are these savory and totally addicting onion fritters. 

The batter for these fritters consists chickpea flour, egg, four different spices, green chile, and fresh cilantro.  The batter rests for awhile so that it has a chance to soak up all the great added flavors.   The diced onion is thrown in at the last minute right before frying.  These fritters are okay on their own, but magic happens when you dunk them in this Fresh Green Chutney.  The chutney is fresh from the addition of mint and cilantro, tangy from the yogurt, and a little bit acidic from the lemon juice.  It is a perfect pairing.  I served these as an appetizer prior to serving Jaffrey's Delicious Chicken Bits that I posted here last month.  If you're looking for a new way to prepare your chicken, please try those chicken bits.  They are absolutely incredible!

Onion Fritters with Fresh Green Chutney

1 large egg
4 tablespoons water
1 tablespoon fresh lemon juice
1 cup chickpea flour (also called besan)
3/4 teaspoon salt
1/2 teaspoon cayenne pepper
1/2 teaspoon garam masala
1/2 teaspoon cumin seeds
1 teaspoon ground cumin
1/4 teaspoon ground turmeric
1 fresh, hot green chile, finely chopped (do not remove seeds)
2 tablespoons chopped fresh cilantro
vegetable oil, for frying
1 medium-large onion, peeled and chopped into medium-size dice

Break the egg into a bowl and beat well.  Add the water and the lemon juice.  Mix.  Add in the chickpea flour and mix well with a whisk.  Put in the salt, cayenne pepper, garam masala, cumin seeds, ground cumin, turmeric, green chile, and cilantro.  Mix well and set aside for at least 10 minutes.  Mix again with a whisk.  The batter should be of a droppable consistency.  

Put the oil in a wok or deep fryer and set over medium heat. You should have at least 3 inches of oil in the center of the wok.  When the oil is hot, put the onion into the batter and mix.  (This should always be done just before frying).  Remove heaping teaspoons of the batter and drop it into the hot oil.  Use up all the batter this way.  Stir and fry the fritters for 7 to 8 minutes or until they are golden red.  Remove the fritters with a slotted spoon and drain on a plate lined with paper towels.  Serve hot, as soon as the fritters are made.

Fresh Green Chutney

6 tablespoons plain yogurt
 2 heaping tablespoons coarsely chopped mint
2 heaping tablespoons coarsely chopped fresh cilantro 
1 tablespoon fresh lemon juice
1/3 teaspoon salt or to taste

Put 2 tablespoons of the yogurt and the mint, cilantro, lemon juice, and salt into the container of an electric blender and blend until smooth, pushing down with a rubber spatula if necessary.

Put the remaining 4 tablespoons of yogurt into a bowl and beat lightly.  Add the paste from the blender.  Stir to mix.

This chutney may be stored, covered, in the refrigerator for 2 to 3 days.
Eat 'em all up til they're gone!

Theme: Relishes, Chutneys and Pickles

Wednesday, October 3, 2012

Muy Bueno Cookbook Review and Giveaway!!

Muy Bueno
Three Generations of Authentic Mexican Flavor
Authors: Yvette Marquez-Sharpnack, Veronica Gonzalez-Smith, 
& Evangelina Soza
Publisher: Hippocrene
Softcover: 288 pages

Chapters Include: Introduction - Glossary of Chiles - Tamales - Breads - Salsas - Drinks - Aquas y Paletas - Appetizers - Soups - Entrees - Sides - Desserts- Gracias - Spanish Recipe Index - and Recipe Index

The Muy Bueno cookbook is honestly one of the prettiest cookbooks I've seen in some time.  You can literally get lost in the beautiful pictures and stories that are shared in this book.  During my journey with this cookbook I tried several recipes, and they were all terrific, but it was the sentiment of the book that really captured my heart. This book is so much more than recipes.  It's the tale of three generations of women spending time together in the kitchen and bonding through food.  It's a testament to the wonderful memories you can create in the kitchen.


Here is a recap of the dishes I tried from Muy Bueno:

Mexican Chorizo and Cheese
Adapted from Muy Bueno
Serves 6

5 ounces Mexican chorizo, casings removed
1/2 cup sliced white onion (1/2-inch strips)
1/2 cup silver/blanco tequila
12 ounces quesadilla or asadero cheese, shredded (I used monterey jack)
1 tablespoon chopped cilantro (I used green onion)
6 corn or flour tortillas, warmed

Preheat oven to 350F.  In an oven-safe skillet (cast iron is perfect), cook the chorizo on your stovetop until almost done, about 15 minutes (mine was done in about 8 minutes).  Drain excess fat.  Add the onion to the chorizo and cook until browned.  Remove pan from the heat.

Carefully add the tequila.  Return to heat and simmer, uncovered, for 15 to 20 seconds or until most of the tequila has dissipated.  Remove from heat.

Stir in the cheese and combine well.  Place skillet in the oven and bake uncovered for about 10 to 15 minutes or until cheese is completely melted and slightly golden brown on top.  Sprinkle with fresh cilantro.  Serve with corn or flour tortillas.

*If you need to double the recipe, do not double the tequila, use only 1/2 cup.

These are the recipes I'd like to try:  Red Chile & Pork Tamales - Cranberry Margarita - La Llorona - Albondigas - Chicken Tinga - Ham and Avocado Torta - Old Fashioned Mexican Oatmeal - Jalapenos with Soy Sauce - and Vangie's Famous Thanksgiving Stuffing
GIVEAWAY
Hippocrene has generously offered one of my readers the chance to win their very own copy of the newly released Muy Bueno: Three Generations of Authentic Flavor cookbook (US shipping addresses only, please).  All you need to do is leave a comment letting me know that you're interested in winning a copy of the book! It's as easy as that!!  The giveaway will run until Saturday, October 6th at midnight (EST).  The winner of the book will be drawn via random number generator and announced on Sunday, October 7th.

*Visit the Muy Bueno Cookbook Spotlight and Cook-off Announcement page for more chances to win a copy of the book.  Simply scroll down to week three and click on the links to each participant for additional chances to win a copy of this cookbook.  


Thanks to Heather at girlichef, and to the publisher Hippocrene, for the opportunity to review this book!  This post is part of the Muy Bueno Cookbook Spotlight & Cook-Off sponsored by Hippocrene and hosted at girlichef 

Muy Bueno Cookbook Cook-Off and Spotlight (small)

Sunday, June 3, 2012

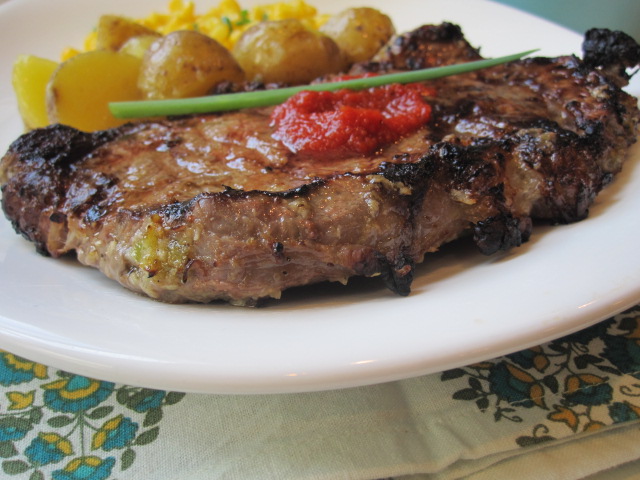
Carne Asada Brava with Chipotle Steak Sauce

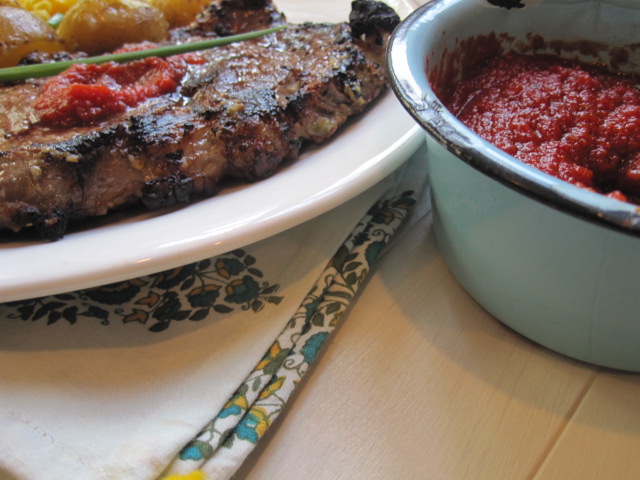
Tender juicy steak marinated in a bit of oil, lime juice, garlic, and jalapeno then grilled outdoors.  Succulent, spicy, and full of flavor.  Gorgeous steaks like this call for a little something special.  This Chipotle Steak Sauce is a fun way to spice things up and it's really good.  It may look a lot like tomato sauce, but I can assure you it tastes nothing like it.  It's spicy (from the three chipotles) and garlicky, almost reminiscent of Sriracha in a way.  I look forward to pairing this sauce with several other things.
"Brava" Steak
Carne Asada Brava
recipe found online here
Serves 6

 For the marinade:
6 large garlic cloves, unpeeled
4 fresh serrano or 2 fresh jalapeno chiles, stemmed
1/4 cup fresh lime juice
2 tablespoons vegetable or olive oil, plus more for the steaks
Salt
6 ribeye steaks about 1-inch thick (they'll weigh about 10 to 12 ounces each)


    The marinade:  In a small ungreased skillet, roast the unpeeled garlic and the chiles over medium heat, turning occasionally, until both are soft  and blotchy black in places - 5 to 10 minutes for the chiles, 10 to 15 minutes for the garlic.  Cool, then peel the garlic.  Place both garlic and chiles in a food processor along with the lime juice and oil.  Run the machine until the mixture is as smoothly pureed as possible. Season highly with salt, usually about 1 1/2 teaspoons.
  
    Marinate the steaks:  Smear the mixture over both sides of the steaks, cover and refrigerate for 1 hour.

  Grill the steaks:  Light a charcoal fire and let the coals burn until they are covered with gray ash; position the grill grate and let it heat for a couple of minutes. Spray or brush the steaks on both sides with a little oil.  Lay on the grill grates and let cook for 3 or 4 minutes, until the grates have nicely seared beautiful grill marks into the meat - don't attempt to move the steaks until you can see nice grill marks.  Flip the steaks and cook until as done as you like (typically about 2 to 3 minutes longer for medium rare).  I like to let the steaks rest for a few minutes (on a cool part of the grill, a grate suspended over the back of the grill or a very low oven) before serving to allow the meat to reabsorb all the juices.  Serve with chipotle steak sauce, salsa, or hot sauce of your liking.


Chipotle Steak Sauce
recipe found online here
Makes 1-1/2 cups

1 14-ounce can diced tomatoes in juice (preferably fire-roasted)
3 garlic cloves, peeled and halved
3 canned chipotle chiles en adobo
    1/2  teaspoon dried oregano, preferably Mexican oregano
2 tablespoons cider vinegar
Salt, to taste after cooking*

*Do not add the salt until after cooking.  If you add the salt prior it may become too salty once it cooks down

In a food processor or blender, combine, the tomatoes, garlic, chiles, oregano and vinegar.  Process until smooth.  Pour into a small (2-quart) saucepan and bring to a simmer over medium heat.  Simmer 15 minutes, remove from the heat and stir in water, if necessary, to give the sauce the consistency of steak sauce.  Taste and season highly with salt, usually 1 1/2 teaspoons.  Cool, pour into a bottle and refrigerate until needed.


Theme: Turn on the Grill!

Sunday, February 5, 2012

Very Thin Fries with Sriracha-Garlic Mayonnaise

Do you make your own mayonnaise?  I do, but it's only been recently.  Why only recently?  Well, I have an unnatural fear of eating anything that contains raw eggs.  However, one day I needed some mayonnaise for a recipe and I was completely out.  I didn't want to run to the store so I made my own.  It was an eye opening experience and now I simply can't go back to the storebought brands.  Homemade mayonnaise is so much better!  It's way easier than you'd ever imagine and you can flavor it up any way you chose. You simply can't go wrong.

I made this batch of mayonnaise for my husband who loves to dip his fries in mayo.  My husband is also a huge fan of sriracha so I added a heaping tablespoon of sriracha to spice it up.  The result was a pefectly balanced mayonnaise.  Not too spicy, just the right amount of heat.  Garlic loves mayonnaise so I left the cloves in.  If you're not a garlic fan you can take the garlic out before blending. 

I served the sriracha-garlic mayonnaise with Tessa's very thin fries.  Tears were shed over the fries.  Big tears.  The kids fought over them, literally.  I ended up doubling the recipe (8 potatoes total) and I still only manged to sneak a few for myself. 

Mayonnaise
Adapted from Apples to Jam by Tessa Kiros
Makes 1 cup

1 cup olive oil (or canola oil) 
(OR  a mixture of canola and olive oil)
1 big garlic clove, peeled and squashed a bit
1 whole egg
1 egg yolk
1/2 teaspoon Dijon mustard
1/2 tablespoon apple cider vinegar
juice of half a lemon
1/2 teaspoon salt
freshly ground black pepper

For Sriracha Garlic Mayo:  Do not discard the garlic cloves.  Leave them in the mixture and blend.  Add 1 heaping tablespoon of sriracha, and stir/blend.

Put the oils in a bowl with the garlic clove and leave for 15 minutes or so to infuse.  Remove the garlic, if you wish, or if you want extra garlic flavor leave it in.

In a small processor or with a handheld blender, whiz the eggs until they become very thick.  Add the mustard, vinegar, lemon juice, and 1/2 teaspoon of salt and whiz together.  With the motor running, add the oil drop by drop, and continue mixing until all the oil has been added and the mixture is thick and fluffy.  Taste for salt and pepper.  Remove mayo to a bowl and stir in one tablespoon of sriracha.  Serve immediately or store in fridge for up to 1 or 2 days.  

 Very Thin Fries
Adapted from Apples for Jam by Tessa Kiros
Serves 4

4 medium potatoes
canola oil or olive oil, for frying
salt

Peel the potatoes and cut them into slices about 1/4 inch thick, keeping them long.  Cut these into 1/4 inch sticks.  Rinse under cold water and dry thoroughly on paper towels.  

Pour about 2 inches of oil into a cast iron pan.  Place over medium-high heat until the oil is hot.  You will need to fry the potatoes in batches.  Just or minute or so after you have put the fries in the oil, give them a stir with a wooden spoon to make sure none are sticking.  Leave them for a minute or two to crisp up and then give another stir.  Let them fry until they are nice and crisp and lightly golden.  Lift them out into a bowl lined with paper towels to absorb the excess oil.  Transfer them to a clean bowl, scatter with salt and pepper (if desired), and serve at once.

Theme: Some Like it Hot - and Spicy!
Note:  Because homemade mayonnaise contains raw eggs, it's something that needs to be made and used within a day or two.  I reduced the original recipe, which was for 2 cups, down to 1 cup (which is still quite a bit of mayo to use in 2 days).  It is best to make only the amount you can use within that time.  

Monday, December 26, 2011

Finnish Mustard

It's no secret how much I love mustard.  Over the past three years I've pretty much professed my undying love for the golden-hued sauce of joy.  So, it should come as no surprise that I chose Tessa Kiros' Finnish Mustard to top my Christmas ham.  We all know that ham just begs for mustard.  They belong together.  Kinda like peanut butter and jelly. 

Finnish Mustard
Adapted from Falling Cloudberries by Tessa Kiros
Makes 1-1/3 cups

Tessa says, "We almost always had a jar of this in the house:  my mother loves her mustard.  This is wonderful - so quick to make and it will keep well for a few weeks in a glass jar in the fridge.  You could find it becomes essential for cold meat sandwiches or roast ham and with smoked sausages and gravlax.  I imagine it would be nice with any mustard powder you use, but this is the way my mother always makes it."

1/3 cup hot English mustard powder 
1/2 cup superfine sugar
1 teaspoon salt
1 cup heavy whipping cream
1 tablespoon olive oil
2 tablespoons apple cider vinegar
juice of half a lemon

Mix the mustard powder, sugar, and salt together in a bowl, squashing out the lumps with a wooden spoon.  Put in a small saucepan over low heat with the cream, oil, vinegar, and lemon juice, and bring to a boil, stirring constantly.  Cook for 7 to 8 minutes, stirring often, then remove from the heat when it darkens and thickens.  Stir now and then while it cools and then pour into glass jars.  Store it in two shorter jars rather tha a tall jar where it will be difficult to reach the last bit of mustard with a spoon,  Keep in the fridge.
Theme: Winter Wonderland

Tuesday, September 20, 2011

My Top Five Jamie Oliver Recipes

I've always had a soft spot for Jamie Oliver.  He's a little bit quirky and unique, but he's definitely his own person, and I really admire that.  Sadly, this is our last week with Jamie at I Heart Cooking Clubs. I thought I would celebrate Jamie's last week with a countdown of my Top Five Jamie Oliver Recipes.  

These are in order, starting with our very favorite.
(Click on the boldfaced recipe title to be directed to the original blog post).

First up is Jamie's recipe for Fish and Chips.  This is hands down the very best recipe for fish and chips that I've tried so far.  The beer batter was nice and light and puffed up beautifully in the hot oil.  My husband is a very tough critic, but he absolutely loved this meal and asks for it on a regular basis.  I am done looking for any other great fish and chips recipes, this is THE one.
Totally and completely head over heels in love with pasta, this is by far one of my daughter's favorite meals. She loves Jamie's Baby Farfalle with Creamy Smoked Bacon and Pea Sauce and is always asking me when I'll make it again.  I've made this recipe at least five times since I originally posted it and it always gets gobbled up.  The kids (and adults) go absolutely crazy over this dish.  The best part is that it's made with mostly pantry ingredients and is a real quick one pot meal.  This has become a go-to dish for us.
This is where my list gets a little biased.  My love for mustard definitely sprung this next recipe to the top of the list.  However, Jamie's Simple Cheesy Mustard, was enjoyed by everyone in my house (even the ones who don't particularly love mustard).  This sauce is so good I can't even describe it.  I loved this mustard sauce over broccoli, loved it even more with potatoes, and I can't wait to serve it on fish, burgers, or steaks.  Every last bit of this sauce was scraped out of the bowl.  I will definitely be making this sauce over and over.
Jamie's Chicken and Zucchini Kebabs were an all-around family favorite.  There was absolutely nothing boring about this chicken dish.  It was packed with tons of flavor and we pretty much inhaled it.  The herby, spicy, garlicky marinade would be good for almost any meat and/or veggie.  Healthy, pretty, and easy, this is a winner of a chicken dinner.
 
Lastly, this Shrimp and Avocado with an Old-School Marie Rose Sauce was a fantastic play of texture and flavor.   The hot crunchy shrimp with the cool creamy avocado, together with the crunch of the lettuce and the cool creamy Marie Rose sauce was a flavor and texture match made in heaven.  This is a dish that my Mom and I enjoyed for lunch and have continued to talk about ever since.


Some other honorable mentions were Jamie's One-Minute Berry Ice Cream, his Banana, Peanut Butter, and Honey Smoothie, and his Smashed Spiced Chickpeas.
Theme: Cheerio, Mate!

Friday, September 16, 2011

Chipotle Pimento Cheese

Pimento cheese, of any kind, is one of my favorite things to eat so when I saw this recipe for Chipotle Pimento Cheese in Lisa Fain's new cookbook, The Homesick Texan, I simply had to try it.

Usually pimento cheese is made with sharp cheddar cheese, mayo, and pimentos.  Lisa's version is different in that it contains both cheddar and monterey jack cheese, which makes for a great combination.  The pimento cheese is brought to life with onion, garlic, cumin, chipotle, cilantro, and brightened with a squeeze of lime juice.  It's the perfect appetizer for the weekend coming up and it would be absolutely terrific on top of a burger.  We loved it!

 Chipotle Pimento Cheese
Adapted from The Homesick Texan
Makes 2 cups

1 cup freshly grated Cheddar cheese (4oz.)
1 cup freshly grated Monterey Jack cheese (4 oz.)
1 teaspoon grated yellow onion
1 garlic clove, minced
1/2 cup mayonnaise
1/4 cup jarred sweet pimentos, diced
1 canned chipotle chile in adobo, diced
1/2 cup chopped cilantro
1/4 teaspoon ground cumin
1 teaspoon lime juice
salt and black pepper, to taste

In a large bowl, mix together the cheddar cheese and the Monterey Jack cheese, onion, garlic, mayonnaise, pimentos, chipotle, cilantro, cumin, and lime juice.  Taste and add salt and black pepper as needed.

Chill for one hour before serving.  Serve with tortilla chips, crackers or celery sticks.  Also makes a fine filling for a whole-hollowed out jalapeno.  Will last a week in the refrigerator.


This post is part of The Homesick Texan Cookbook Spotlight and Cook-Off sponsored by Hyperion and hosted at girlichef