Showing posts with label Donna Hay. Show all posts

Sunday, December 15, 2013

Donna Hay's Madeleines with Orange Glaze

I have an infatuation with little bitty things.  There's just something about little minis that is so cute and irresistible.  So when I spotted a teeny tiny madeleine pan I simply had to have it.  In my mind I had visions of mini madeleines in every kind of flavor imaginable.  So I bought the pan and it was so mini and cute that it actually fell out of the bag and got lost in my car.  For three months.  When I discovered the pan in the back of my car I was thrilled yet again.  In fact, I had the same visions of cute mini madeleines, but then I put the pan in the pantry for another two months.  To say I'm good at procrastinating is an understatement.

Every time I spotted that madeleine pan I felt like it was taunting me.  One day I took the pan out of the pantry and placed it on my kitchen counter as an incentive. I'll have you know that pan sat there on the kitchen counter for about two weeks before I gained the needed motivation.

Today I finally made these mini madeleines and I gotta tell you that mini is no longer cute to me.  AT ALL!  Turns out the mini madeleine pan only holds approximately one teaspoon of batter in each cavity.  Making these minis was the longest process ever!

However, I will tell you that these mini little madeleines with orange glaze are the daintiest little cake-like treats ever!  We really did love them!  They are very light and sponge-like in texture and the orange glaze really gives them a wonderful citrus flavor.  These would be a nice treat with a cup of tea.  Just do yourself a favor and buy a larger pan!


Madeleines
Adapted from Modern Classics Book 2
by Donna Hay
Makes 24

4 eggs
3/4 cup sugar
1-1/4 cups all purpose flour
2 teaspoons baking powder
6 ounces butter, melted and cooled
Optional: Zest of one orange

For Glaze:
Juice of one orange
About 1 cup of confectioner's sugar
Optional: zest of half an orange and/or leftover zest from above*

Preheat the oven to 350F.  Place the eggs and sugar in the bowl of an electric mixer and beat for 8-10 minutes or until very pale and thick.  Sift the flour and baking powder over the mixture and continue to beat at low speed until smooth.  Add the butter and beat until combined.

Grease two madeleine tins with 12 x 1-1/2 tablespoon capacity holes.  Spoon in the mixture and bake for 8-10 minutes or until risen and golden. 

Whisk together the juice of one orange and about a cup or so of confectioner's sugar until you get the consistency you're looking for.  For a thick glaze add more sugar.  For a thin glaze add more juice.

Theme: Fill The Tins!

Sunday, December 8, 2013

Donna Hay's Seared Salmon on Coconut Spinach

My friends and I are really into Jazzercise right now.  We've been going six days a week since September and we have an absolute blast each and every time.  At the beginning of November the owner announced a contest.  It was a simple contest.  Attend 20 classes and receive a free bag.  My friend and I became obsessed with being the first to win the bag and the secret plotting began.

We were bound and determined to win this contest.  We did the math and figured out that we would have to do ten classes in one week in order to win.  Now Jazzercise is lots of fun, but it certainly isn't a walk in the park.  It's a physically demanding, high impact, total body workout with lots of jumping.  So, comitting to ten classes in one week is a little crazy for two girls pushing their forties.  Of course we knew this, but it still didn't stop us.

We started on Monday morning and took a morning class.  Then we had to go back Monday night for a second class.  We were full of vigor and we giggled like crazy.  Tuesday and Wednesday we took it easy and took only one class per day.  We were feisty and full of energy and ready to win. Then Thursday came around and it was time to get serious.  We took three classes on Thursday and by the end of the third class we were almost drunk on adrenaline. Friday morning we were back at it bright and early and laughing like crazy.  Just a couple of crazy stay at home moms with nothing better to do than win a Jazzercise contest. Then we came back for a second class Friday night. By this time we were really sore, but we were so far into our goal we knew we couldn't give up.  We leaned on each other and somehow or another we made it through a Saturday and Sunday class.  Before you knew it we were just one short class away from our goal and better yet, we were actually going to win!  Monday morning I woke up for our tenth and final class and both of my knees and ankles were on fire.  Not wanting to give up I went ahead and went to class and it took everything I had to make it through that hour. 

I don't think I'll ever forget how good it felt to win that contest with my friend that morning!  I think we both rediscovered our inner strength that week.  We also discovered our limitations.  The next morning I woke up to two swollen and bruised ankles and two swollen and sore knees.  To say I overdid it is an understatement, but I have no regrets.  It was a fantastic week!

I had to nurse my legs for about two weeks.  During this time I had two goals.  The first goal was to stay off my feet as much as possible so I could recuperate and get back to class.  The second goal was to eat a very healthy diet so I wouldn't gain any weight.  I set my sights on quick and healthy dishes like this Seared Salmon on Coconut Spinach.  It's very healthy and very quick (you don't have to be on your feet too long) and it's also very delicious.  This was an extremely satisfying meal and one that I would make again.  We really enjoyed the flavors.

It's been two weeks and I think I'm finally ready to go back to Jazzercise tomorrow morning.  I'll have to take it easy on my knees and ankles for awhile, but it will feel so good to move around again and laugh with the girls.


Seared Salmon on Coconut Spinach
Recipe by Donna Hay 
found online at Sidewalk Shoes
Serves 4

For the Salmon
4 (6oz) salmon fillets
2 teaspoons grated ginger
1 tablespoon sesame oil
2 tablespoons soy sauce
1 large garlic clove, sliced

For the Coconut Spinach
2 cloves garlic, minced
2 small red chillies, seeded and chopped
2 tablespoons Asian chilli paste (Sriracha)
About 3/4ths can coconut milk
The juice of one lemon
2 bunches spinach, stems removed

Optional: Additional Sriracha for drizzling over salmon before serving

Place the salmon in a shallow dish with the ginger, sesame oil, garlic, and soy. Allow to marinate for 10 minutes on each side. Heat a frying pan over high heat and sear the salmon for 3-4 minutes on each side (cooking times may differ depending on how thick your salmon is and how well done you prefer it to be).

To make the coconut spinach:  Place the garlic, chillies, and chilli paste in a saucepan over medium heat and cook for 2 minutes. Add the coconut cream (or milk) and lemon juice and simmer for 4 minutes. Add the spinach and toss until wilted.

To serve, place some spinach on each plate and top with a piece of salmon.  This dish is also great served with rice.

Theme: Fast & Fabulous!

Sunday, December 1, 2013

Baked Chicken, Lemon, and Pea Risotto


There is something about making risotto that is so satisfying.  Standing over the stove toasting the rice, adding the broth little by little, and then stirring the rice until you achieve the desired consistency.  I love when I get to this point because the sky is the limit as far as adding ingredients.  Sometimes I'll stir in leftover bits of cheese, veggies and/or meat and seafood just to clean out the fridge. Other times I have a game plan and will plan out all my add-in's. 

From time to time I've seen recipes for baked risotto and I've always been curious so I decided to give it a try.  I wondered about the texture of the rice. Will it be creamy if there is no stirring involved? I wondered about convenience? Will it be easier to bake risotto?  I wondered if it would be as satisfying. Would I miss stirring the risotto? 

My curiosity got the best of me so I gave it a try.  I must say the baked risotto was definitely good, but nowhere as good as making risotto the traditional way.  We all loved the flavors in this dish but would have preferred the traditional method much more. The baked risotto was definitely missing that wonderful creamy texture that you get from all the stirring.  Additionally the rice was a little firmer, definitely al dente, if you will.  Baking the risotto was also less convenient.  Traditional risotto uses one pan.  Baking the risotto requires dirtying up two pans and a baking dish.  Not to mention, you have to heat up your stovetop and your oven. Baking the risotto also takes much longer.  In fact, it nearly doubles the cooking time. Finally and most importantly, I really did miss stirring the risotto. 

Final verdict: I'm glad I tried the baked risotto, but I see no reason at all to ever do it again.  From now on I will continue to make my risotto the traditional way and will happily stand by the stove and stir, and stir, and stir.


Baked Chicken, Lemon, & Pea Risotto
Adapted from Simple Essentials Chicken
by Donna Hay
Serves 4-6

2 tablespoons olive oil
7 ounces chicken breast, cubed
2 shallots, diced
2 cloves garlic, minced
1 tablespoon lemon zest
2 cups arborio or carnaroli rice
5 cups chicken stock
1-1/2 cups fresh or frozen peas
2 tablespoons lemon juice
1/2 cup finely grated Parmesan cheese
salt and pepper, to taste

Preheat the oven to 400F.  Heat a nonstick frying pan over high heat.  Add the oil and chicken and cook for 3 minutes on each side or until well browned.  Set aside.  Add the shallots, lemon zest, and garlic to the pan and cook for 5 minutes or until the shallots are softened.  Place the shallot mixture, rice, and stock in a baking dish.  Cover tightly with a lid or foil and bake for 20 minutes.  Add the chicken and peas to the risotto, cover tightly and bake for a further 20 minutes.  The risotto will still be quite liquid.  Stir the lemon juice, parmesan, and salt and pepper through the risotto.  Stir for 2 minutes to thicken the risotto and serve immediately.  Note: I added a little more parmesan cheese on top and baked the risotto for another 4-5 minutes to reduce the liquid a little more.  Then I broiled the risotto for about 2-3 minutes for a golden brown crust.


Theme: Easy Entertaining!

Sunday, November 17, 2013

Donna Hay's Pumpkin Pie with Brown Sugar Mascarpone

I am crazy about pumpkin pie.  Every year around this time I start craving a slice of pumpkin pie with a dollop of whipped cream on top.  Since no one else in my family likes pumpkin pie I usually resort to picking up a slice from a bakery.  This year I decided I was going to treat myself and make a pumpkin pie.  By the end of the week I was an expert at rationalizing.  I manged to convince myself that a slice of this pumpkin pie was a perfectly suitable breakfast.

Thankfully, this pumpkin pie is very light and would be perfect to follow a heavy Thanksgiving dinner.  It's sweet, but not overly sweet, and is lightly spiced compared to other versions.  I fell in love with the smooth and creamy texture of this pie.  Normally I like a touch of whipped cream on top of my pumpkin pie, but when I saw the recipe for this brown sugar mascarpone topping I was very curious. Let's just say I love the brown sugar mascarpone.  I'm fairly certain you will too.


Pumpkin Pie
Adapted from Modern Classics Book 2
by Donna Hay
Serves 8

1 sheet of storebought pie crust or homemade, recipe below*
1 cup pumpkin puree or butternut squash puree, recipe below*
1/3 cup brown sugar
2 eggs 
1/3 cup heavy cream
1/4 teaspoon ground cinnamon
freshly grated nutmeg for serving, optional

*Notes: Donna's recipe actually calls for her homemade sweet shortcrust pastry, but I opted to use a store-bought pie crust because I had one on hand. The recipe also calls for 1 cup of pureed butternut pumpkin, directions for that below, but I opted to use 1 cup of canned pumpkin puree because I also had that on hand. 

Preheat the oven to 350F.  Roll out the pastry on a lightly floured surface until 1/8 inch thick.  Place in a 9 inch tart ring.  Line the pastry with non-stick baking paper and fill with pastry weights or uncooked rice or beans.  Bake for 10 minutes, remove the weights and bake for a further 10 minutes or until the pastry is golden.  Reduce the oven temperature to 300F.

To make the filling, place the pumpkin, sugar, eggs, cream and cinnamon in a bowl and whisk to combine.  Pour into the tart shell and bake for 50 minutes or until the filling is set.  Cool in the tin.  Sprinkle with nutmeg, slice and serve with brown sugar mascarpone.

*For the Butternut Squash Puree: Peel, chop and steam 1 pound of butternut squash until cooked.  Cool completely and puree in a food processor

*For the Sweet Shortcrust Pastry:  Process 2 cups plain all-purpose flour, 3 tablespoons sugar, and 5 ounces of cold chopped butter in a food processor until the mixture resembles fine breadcrumbs.  While the motor is running, add enough iced water to form a smooth dough and process until just combined.  Knead the dough lightly, wrap in plastic wrap and refrigerate for 30 minutes. Roll out the pastry on a lightly floured surface or between sheets of non-stick baking paper until 1/8 inch thick, or whatever thickness required, and line the tart tin.  Bake as directed.


For the Brown Sugar Mascarpone:  Combine 2 cups mascarpone and 1/2 cup brown sugar in a bowl.  Spoon on top of the pumpkin pie or serve on the side.

Theme:Are You Calling Me A Tart?


***12 Weeks of Winter Squash***

This pumpkin pie is being linked to the 12 Weeks of Winter Squash Event hosted by my friends Heather and Joanne. Feel free to link up your winter squash dishes during the week at the linky below--or on one of the other participating blogs. Linky will open up at 12:01am on 11/18/13

Sunday, November 10, 2013

Brie and Crispy Bread Salad with Cranberry Dressing

Brie cheese is so heavenly and creamy and smooth and delicious.  If I happen to spot a recipe using Brie then it's pretty much guaranteed I'm going to feel compelled to make it.  Such is the case with this recipe for Donna Hay's Brie and Crispy Bread Salad with Cranberry Dressing

This recipe is for those of you, who like me, look for a way to make a sensible meal out of bread and cheese.  And by sensible I mean that I convinced myself this salad was healthy because it called for spinach and contained fruit.  Because really...all that brie cheese was just a little over a serving, right?  And that bread, well we have to have some carbs every once in awhile, right?  

However you rationalize it, this salad was delicious.  It hits a multitude of flavor and texture combinations and is very comforting and satisfying.  Plus, it is rather festive with the cranberry dressing.  Perfect for this time of year!

Brie & Crispy Bread Salad with Cranberry Dressing
Adapted from Donna Hay website
Serves 4

Salad
2 pieces flatbread*
olive oil, for brushing
250g brie, sliced
2 cups arugula or spinach leaves

Cranberry Dressing
¼ cup roughly chopped sweetened dried cranberries
2 tablespoons olive oil
2 tablespoons red wine vinegar
salt and pepper, to taste

*Note: I couldn't find flatbread so I used good quality country bread and grilled it in a pan


Every Sunday @ Kahakai Kitchen


Theme: In Season

Sunday, November 3, 2013

Lamb Sausage Rolls

My mind gets the best of me on a regular basis.  These Lamb Sausage Rolls are a perfect example.  In my mind I picture thawing and rolling out puff pastry.  Then I start thinking of what a pain pastry can be when it sticks and rips and tears.  I picture flour on the counter, a big mess, and lots of frustration.  Before you know it I have talked myself out of making anything with pastry of any sort, which is totally a shame.

The funny thing is that puff pastry couldn't be easier to work with.  You simply thaw it and it is a dream to work with.  It never ever ever gives you fits.  Even though I know this to be true my mind still gets the best of me.  It's as if I'm waiting for the day puff pastry totally lets me down.  Thankfully, it hasn't happened yet and I can't imagine it will.  These rolls couldn't have been easier to make.  Could I really be learning to trust puff pastry? 

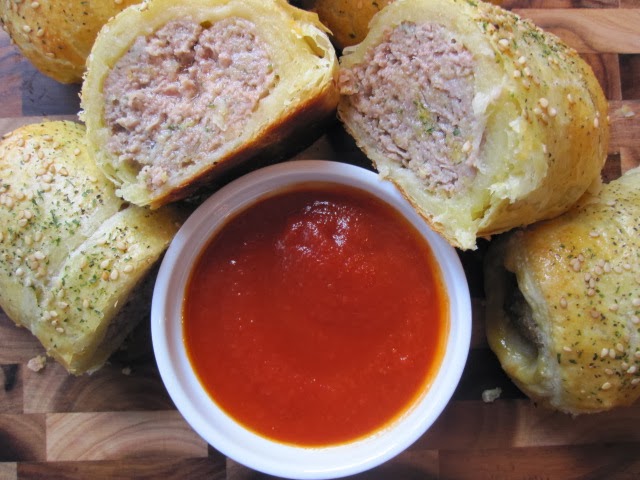
These Lamb Sausage Rolls were even better than I anticipated.  The puff pastry creates a very flaky and buttery exterior while the inside of the roll is soft and meaty.  At first I questioned the use of tomato sauce for dipping, but it all works together splendidly.  These rolls are very reminiscent of stromboli, but the use of lamb makes them quite unique and all their own.


Lamb Sausage Rolls
Serves 8

½ cup (35g) fresh breadcrumbs
1 pound/500g lamb mince
1 small brown onion, grated
½ cup finely chopped mint*
1 tablespoon finely grated lemon rind
1 egg
 salt and pepper to taste
2 sheets frozen puff pastry, thawed
1 egg, extra, lightly beaten (for brushing on the rolls)
Optional garnish: sesame seeds, salt, pepper, parsley, mint, garlic, etc..
For serving: tomato sauce
 
Note: I omitted the mint only because I didn't have any on hand

Sunday, October 27, 2013

Pine Nut Brown Butter Pasta

Pine nuts.  I never really cared for them until I had them toasted in a pan with butter and salt.  Then I fell in love with them.  A special deep kind of love.  I wanted to put those toasty buttery pine nuts on everything and I found myself craving them.  If a recipe called for pine nuts I was sold.

So to say I loved this pasta dish is an understatement. It was absolutely delicious and and as a bonus, extremely simple and straightforward.


Pine Nut Brown Butter Pasta
Adapted from Off The Shelf
by Donna Hay
Serves 4-6

Cook one pound of pappardelle or fettucine until al dente, then drain. Melt 5 -6 tablespoons of butter in a frying pan then add 1/2 cup pine nuts to the pan and simmer until the pine nuts are golden.  Add pepper and salt and toss through the hot pasta.  Finish with grated Parmesan and serve as a simple meal or side dish.


Theme: Potluck

Sunday, October 20, 2013

Raspberry Breakfast Parfaits


Weekday mornings are crazy and hectic, aren't they?  I spend about two hours getting the kids ready for school and dropping them off.  No matter how hard I try there is always some sort of crisis like last minute permission slips that need signed, money that is due (does anyone actually carry cash anymore ???), and my personal favorite...Surprise, I forgot today was picture day!  Either way, it never seems to run smooth when you have kiddos and I've learned there is really nothing you can do to brace yourself for it.  You just have to go with it, one step at a time.  

Once my kiddos head out the door I'm in a mad dash to get myself ready so I can make it to the gym for class at nine o'clock.  I usually end up grabbing a banana or some kind of granola bar because they are easy, but they're also kinda boring.  Other times I'll make a batch of hard boiled eggs on the weekend so I can enjoy a hard boiled egg with a piece of toast.  Lately I've been into yogurt parfaits because they feel like a decadent breakfast treat and goodness knows they are definitely more colorful and pretty than a monochromatic piece of toast.      

There are a million different variations on yogurt and/or breakfast parfaits.  Use what you like. I like this breakfast parfait because it blends the fruit into the yogurt which means I don't have to mix the fruit into the yogurt when I eat it.  I also like this recipe because it relies on a bag of frozen fruit, which is nice if your favorite fruit isn't in season.  Raspberries are at the top of my list, but you could literally go with anything here. There are also a lot of different muesli mixes and granola mixes out there.  I like the combination of raspberry with a little bit of chocolate so I went with a granola mix made from oats and bits of dark chocolate. These parfaits are definitely going to get my morning off to a great start!


Raspberry Breakfast Parfaits
Adapted from Donna Hay website
Serves 4

One bag frozen raspberries (about 250g - 350g), thawed
2 cups (500 grams) Greek yogurt
1 tablespoon confectioner's sugar
1 cup (130 g) toasted muesli or granola
1/3 cup honey


Theme: Up & At 'Em

Sunday, October 13, 2013

Roasted Sweet Potato Pasta

One glimpse in my pantry would quickly reveal that we are a family of pasta lovers.  I pretty much buy pasta like it's my job.  In fact, buy might not even be the best word to describe it.  It's more like collect.  If you have 23 boxes of pasta in your pantry that qualifies as a collection, right? 

My collection of pasta always comes in handy for quick weeknight meals like this Roasted Sweet Potato Pasta.  This recipe was kinda like love at first sight for me.  I simply fell in love with all the colors in this dish: pops of green from the spinach, red from the tomato, and orange from the sweet potato.  Just looking at all that color makes me happy.  Of course, adding two kinds of cheeses helps any situation.  Tangy feta cheese and salty Parmesan make everything better.  Stir it all into some lovely linguine and you have yourself a wonderful and quick fall meal that goes very well with a glass of white wine.


Roasted Sweet Potato Pasta
Adapted from Donna Hay
Serves 4-6

3 sweet potatoes, peeled and chopped
3 Roma tomatoes, halved
olive oil*
1 pound of spaghetti or linguini
5 - 6 ounces baby spinach leaves 
salt and pepper
5 - 6 ounces feta cheese
lemon juice and olive oil, to serve
Optional: Sage, dried or fresh for adding to the roasted veggies
*reserve some of the pasta water

*Note: I used quite a bit of olive oil when roasting the veggies. It was easily between 1/4 and 1/2 cup.  I also tossed the veggies in a combo of dried sage, salt and pepper.


Preheat oven to 400F.  Place the sweet potato and tomato, cut-side up, in a baking dish.  Drizzle with oil and bake for 35-45 minutes or until the sweet potato is soft and golden.

Cook the pasta in a large saucepan of salted boiling water until al dente.  Reserve a little of the pasta water so that you can mix it in later for a creamier texture.  Drain pasta and combine with the sweet potato, tomato, spinach, Parmesan, reserved pasta water, salt and pepper.  Place in serving bowls, top with the feta and drizzle with lemon juice and oil to serve. 

Theme: Pantry Magic!

Sunday, October 6, 2013

Cashew Chicken Salad with Honey Mustard Dressing

Whenever I see a recipe for any kind of nut-crusted chicken I'm completely sold.  Something about that pairing gets me every single time.  Combine that with my favorite dressing, honey mustard, and it's a total win.  I loved this salad.  It was simple and straightforward and it totally hit the spot!

If you feel inclined you could do a few simple things to jazz this salad up.  A few dried cranberries or cherries would be a great addition, as well as a sprinkle or two of blue cheese, and maybe a few sprinkles of crushed cashews just for added texture, but only if you're in the mood! The idea is to keep it nice and simple!


Cashew Chicken Salad with Honey Mustard Dressing
Adapted from Simple Essentials Chicken
by Donna Hay
Serves 4
1 cup cashew nuts
1/2 pound or so (7-8 ounces) chicken tenders
salt and pepper
2 tablespoons olive oil
1 - 2 heads romaine lettuce
Honey Mustard Dressing:
1 tablespoon dijon mustard
2 tablespoons honey
1 tablespoon white vinegar
 To make the honey mustard dressing:  Combine the mustard, honey, and vinegar.  Set aside.

To make the salad: Place the cashews in a food processor and process for 2 - 3 minutes.  Coat the chicken with the cashew and salt and pepper.  Heat a medium non-stick frying pan over medium-high heat.  Add the oil to the pan and cook the chicken for 2- 3 minutes each side or until cooked through.  To serve, toss the chicken with the lettuce and spoon over the dressing and serve.
We are introducing a new chef over at I Heart Cooking Clubs this week.  We will be cooking the recipes of the great Donna Hay for the next six months.  If you're interested in joining us then head on over and check out the details. 


Theme: G'day Donna Hay!

Every Sunday @ Kahakai Kitchen