Showing posts with label ice cream and frozen desserts. Show all posts

Sunday, July 29, 2012

Fresh Lime Ice with Berries

 
I don't like hot weather at all.  Anything above 90 degrees is pushing it for me.  This 100 degree heatwave we've been having has really been testing my limits.  However, in an effort to be positive and go with the flow, I've tried telling myself that I love the hot weather.  If you say it enough times it must be true, right?

When I'm wheeling my grocery cart across the blacktop in the middle of the day, with two kids hanging on me, I tell myself the heat feels wonderful.  After all, I love hot weather.
 
When I get in my car and the temperature gauge says 120F I tell myself it's good for my character.  You just gotta tough these things out sometimes, right?  When the kids start whining about the heat I tell them the same thing. I chuckle to myself because they love it when I tell them things like that.   
 
When I get home and it's time to carry in all the groceries (and the back of my shirt is already soaked with sweat) I tell myself I should just be thankful to have groceries to carry in the house. 


For the past two months I've tried convincing myself that I love the heat.  I was successful in my endeavor until this past Thursday.  On Thursday I was walking out of the grocery store and I literally reached my melting point.  It was crazy stupid hot and miserably humid.  I felt like laying down and having a temper tantrum just like my five year old.  Right then and there I decided I was going to quit lying to myself.  The fact is I just can't stand the heat.

So, for the rest of the summer I'm hiding inside.  The only reason I'm going outside is to check the mail or walk to my car.  On the off chance I'm forced to brave the great outdoors you will find me rewarding myself with something really cold like this super icy refreshing lime ice.  This lime ice stays really cold.  Almost too cold to eat.  It's the stuff of dreams on a hot summer day.

Fresh Lime Ice with Berries
Adapted from Mexican Everyday
by Rick Bayless
Serves 4-6 

5 to 6 large limes (or enough to make 3/4 cup lime juice)
1 cup sugar
1/3 cup corn syrup
2 to 3 cups fresh raspberries, blackberries or strawberries for garnish

Grate the zest (colored part only) of 2 of the limes and scrape into a large bowl.  (If the zest is in large pieces, finely chop it.)  Juice the limes, measure 3/4 cup and pour it in with the zest.  Add the sugar, corn syrup and 1-3/4 cups water.  Stir until the sugar dissolves.

Pour the mixture into the canister of your ice cream maker and freeze according to the manufacturer's directions.  The ice will have the best texture if you transfer it from the ice cream maker into a container and let it firm up for several hours in the freezer.  The ice is best eaten within 24 hours.  Scoop it into small dishes and sprinkle with the berries.

Alternatively, pour the mixture into a 13 x 9-inch baking dish, slide it into the freezer and "still-freeze" the mixture - stir it thoroughly after 45 minutes, then twice more at 15 minute intervals.  It's that easy,  (This is my preferred method for making any fruit ice.  I think the texture is so much better than using your ice cream maker).


Theme: Nieves (Icy Cold Treats)


Wednesday, May 30, 2012

Cookbook Review: The Cookie Dough Lover's Cookbook {and Chocolate Chip Cookie Dough Ice Cream}

Hardcover 
160 pages
*Spiral bound for easy flipping

Seven Chapters:  Introduction; Candy; Cookies and Brownies; Cakes, Custards, and Pies; Frozen Treats; Indulgent Breakfasts; and Fun Snacks and Party Fare

Lindsay Landis, of the popular Love and Olive Oil blog, has created one helluva cookbook in The Cookie Dough Lover's Cookbook. This book is a complete dream for any cookie dough lover, kids and adults alike. Not only that, but the book includes an extensive set of recipes, from Cookie Dough Wontons with Chocolate Dipping Sauce to Cookie Dough-Stuffed Cinnamon Rolls.  There are so many fun new ways to enjoy cookie dough in this book.  Wanna know the best part?  All the cookie dough is egg-free.  So there's no worries about eating raw egg.

I had a hard time deciding on what to make from the book, so I let my daughter decide.  It was no surprise when she chose the Chocolate Chip Cookie Dough Ice Cream.  It is her favorite after all.  We all loved this ice cream.  My husband, who is my toughest critic, declared this ice cream the best I've ever made.  I have to agree.  We loved the brown sugar flavored ice cream base, but what we loved even more was the fact that this was the creamiest ice cream ever.  The texture was perfect!  Sometimes homemade ice cream can be icy and best served on day one.  This ice cream isn't that way at all.  This ice cream is creamy and it stays creamy, even on day five in the freezer.  But, of course, the best part of this ice cream is all the plentiful little chunks of cookie dough...and let me tell you, this ice cream is not skimpy in the cookie dough department.  It's fully loaded!!


Chocolate Chip Cookie Dough Ice Cream
Makes 1-1/2 quarts

For Ice Cream:
2 cups heavy cream, divided
1 cup whole milk
1/4 cup granulated sugar
1/2 cup light brown sugar, packed
pinch salt
4 egg yolks
1 teaspoon vanilla extract

For Cookie Dough:
1/2 cup (1 stick) unsalted butter, room temperature
1/4 cup granulated sugar
1/2 cup light brown sugar, packed
1/4 teaspoon salt
1/2 teaspoon vanilla extract
2 tablespoons milk or cream
3/4 cup all-purpose flour
1/2 cup mini semisweet chocolate chips


Recipes Tagged To Make:  Crispy Peanut Butter Cookie Dough Cups; White Chocolate-Macadamia Nut Cookie Dough Blondies; Cookie Dough Mosaic Cheesecake; Mexican Chocolate Cookie Dough Tartlets; Invisible Cookie Dough Ice Pops; Cookie Dough Oatmeal Pancakes; Baked Cookie Dough Doughnuts; Cookie Dough-Stuffed Cinnamon Rolls; Oatmeal Raisin Cookie Dough Granola Bars; and Cookie Dough S'mores.

*Quirk Books sent me a copy of The Cookie Dough Lover's Cookbook for review, but all opinions shared are my own.

Wednesday, April 11, 2012

Creamy Mango Ice


I have a confession.  I buy packages of cubed mango in the freezer section of my grocery store.  When the craving strikes I take out a package and let it thaw just a bit.  When the mango is semi-frozen I start popping those cubes straight into my mouth.  Talk about tasty.  Those semi-frozen cubes are so creamy and sweet.  It's like a dreamy tropical treat that you don't have to feel guilty about.  

While paging through my copy of Mexican Everyday I saw this recipe for Creamy Mango Ice and I was smitten.  I had to make it...and soon.  I blended up a bag of frozen mangoes with some water, sugar, corn syrup, and lime juice.  I tasted it.  Then I tasted it again.  If you taste something several times is it still considered tasting?  Finally I had the willpower to pour it into a 9 x 13 dish and set it in the freezer.  I set the timer for 2 hours and tried to forget about it.  Unfortunately, I kept going back to the freezer and taking a bite.  After two and a half hours and lots of stirring there was a good amount missing. Then my son tasted it and I think he liked it as much as I did.  Let's just say there was barely enough left for the picture.  This mango ice is cold, icy, refreshing and incredibly delicious. Consider this a warning. 


Creamy Mango Ice
Adapted from Mexican Everyday
by Rick Bayless
Serves 6

1-1/2 cups pureed fresh mango pulp (peel and pit the mangoes, 
then puree in a food processor or blender)**
1 cup water
2/3 cup sugar
1/3 cup corn syrup
1/3 cup fresh lime juice

Note: I used a 12 oz. package of frozen cubed mangoes, but you really need about a 15 oz. package OR about 4-6 fresh mangoes, depending on their size and amount of puree they yield

Begin by pureeing a 12/15 oz. package of frozen mangoes and/or 5-6 fresh cubed mangoes.  You should have 1-1/2 cups pureed fresh mango pulp.  Add in 1 cup of water, 2/3 cup sugar, 1/3 cup corn syrup and 1/3 cup fresh lime juice.  Blend in blender or food processor until well blended.  

Pour the mixture into the canister of your ice cream maker and freeze according to the manufacturer's directions.  The ice will have the best texture if you transfer it from the ice cream maker into a container and let it firm up for several hours in the freezer.  Alternatively, pour the mixture into a 13 x 9 inch baking dish, slide it into the freezer and "still-freeze" the mixture - stir it thoroughly after 45 minutes, then twice more at 15-minute intervals.  

The ice is best eaten within 24 hours.  Scoop it into small dishes and garnish with lime zest and/or slices.

Theme:  Sweet Tooth


Monday, February 20, 2012

Pomegranate Sorbet

Over the weekend my husband and I went on a much needed adults only vacation to the Smoky Mountains of Tennessee.  We rented a beautiful cabin that was perched way, way, way high atop a large mountain (I had to cover my eyes on the drive up).  It was very remote. And by remote I mean no internet.  Three and a half days with no internet.  I consoled myself with beautiful breathtaking views like this.  This is a real picture taken just this morning.  The snow on the mountains was as beautiful as beautiful gets.
During the day I shopped.  The Lodge Cast Iron Factory Store was my personal favorite.  We're talking wall-to-wall cast iron of every shape and size.  Everything from super cute minis to a super-sized cast iron paella pan.  I wanted it all, but in the end I settled for a few pieces.  One of the pieces I bought was this oval serving griddle.  
The nights called for another type of consolation.  Something strong, something special, something mountain made and over a century old.  Believe me when I say nothing fits the bill like Ole Smoky Tennessee Moonshine.  The Ole Smoky Tennessee Moonshine Distillery is one of the only places you can buy moonshine legally.  They have every flavor imaginable.  I tried them all (the results were very entertaining).
 
All in all I do have to say that I really missed popping online here and there, BUT I did manage to fill my days with several worthwhile distractions.  We had a wonderful time, but it is nice to be back.  My body needs a break from all that moonshine.

Before leaving on vacation I made this very refreshing pomegranate sorbet.  It was both tart and sweet and had just the right balance of lemony flavor.  The kids loved it.  I loved it.  It disappeared in a flash.  We loved it so much I'd double the recipe next time around.  It really was that good.  Next time around I'd like to scoop a bit into a champagne flute and pour some champagne or prosecco over it. 

Pomegranate Sorbet
Adapted from Apples for Jam
by Tessa Kiros
Serves 4

4 ripe pomegranates or 1-3/4 cups Pom Wonderful 100% pomegranate juice
Juice of 1 lemon
1/4 cup sugar

Juice the pomegranates very thoroughly, using a levered juice extractor or a citrus juicer, and then strain.  Or, pour 1 - 3/4 cups of Pom Wonderful pomegranate juice into a bowl/cup.  Put the lemon juice in a small saucepan with the sugar and 3 to 4 tablespoons of the pomegranate juice.  Heat, stirring, over medium-low heat until the sugar has dissolved.  Remove from the heat, leave to cool a little, and then stir in the rest of the pomegranate juice.

If  using an ice cream machine:  Place the mixture in the refrigerator until it is completely chilled.  When the mixture is chilled, place it in your ice cream machine and follow the mfg. instructions.

If you do not have an ice cream machine:  Pour the mixture into a bowl or container that has a lid.  Put the lid on, and put it in the freezer.  After an hour give the mixture an energetic whisk with a hand whisk.  Put it back in the freezer and then whisk again after another couple of hours.  When the sorbet is nearly firm, give one last whisk, and put it back in the freezer to set.  

Theme: In the Pink

Thursday, October 27, 2011

Midnight Milky Way Bar Sauce

Happy Halloween weekend everyone!  We absolutely love this time of year in my house.  We have a full schedule this weekend, including carving pumpkins, going to the yearly Thriller event downtown, and lots of trick-or-treating.  Our small town has trick-or-treating for the kids downtown Friday afternoon, then we're going to Boo at the Zoo, followed by trick-or-treating in the neighborhood.  Wish me lots of luck keeping up with the kids! 

As a special treat before our big Halloween weekend, I made a chocolate sauce using Midnight Milky Way Bars. The rich dark chocolate of the Midnight Milky Way is fantastic when melted down into the cream and goes fantastic with vanilla ice cream.  However, the genius of this recipe (especially this time of year) is that you could use just about any candy bar with equally fantastic results.  I see a lot of candy bar sundaes in our future!

Midnight Milky Way Bar Sauce
Adapted from Apples for Jam by Tessa Kiros
Makes 2 cups

Tessa says, "This is a wonderfully rich and good-and really quick to make in an emergency.  We like it dribbled down the side of a milkshake or slightly warm over ice cream, so that the cold makes the caramel set just slightly.  When the pan is left covered on the stove or in the fridge, everyone goes with a teaspoon and takes out a healthy scoop, and the marks of the diggers clearly remain."

1 cup heavy whipping cream
5 (2-ounce) Milky Way Midnight Bars

Pour half the cream into a heavy-bottomed pan and heat gently.  Coarsely chop the Midnight Milky Way bars and add to the pan, stirring all the time with a wooden spoon, until they are completely melted.  Make sure that the cream is not too hot and that nothing gets stuck on the bottom of the pan, which would ruin your chocolate.  When everything is nearly all melted together, add the rest of the cream, and whisk to break up the soft lumps.  Remove fro the heat and carry on whisking until the sauce is completely smooth.  cover when it has cooled a bit.  Serve warm or even at room temperature, but store in the fridge if you don't finish it all.  Even a teaspoon of it cold or at room temperature is great for lifting the spirits.
Theme: Harvest Moon


HAPPY HALLOWEEN!

Thursday, August 18, 2011

Frozen Treats Week #6: Banana Pudding Ice Cream Cupcakes

Those of you who've been following me for any length of time have probably heard me say that banana pudding is one of my favorite desserts. Banana pudding can be made all kinds of ways, but my all-time favorite recipe for banana pudding is Paula Deen's cool and creamy Not Yo' Mama's Banana Pudding. Paula's recipe is the ultimate and oh so delicious.  It is not, however, figure friendly!

When I saw this recipe for Banana Pudding Ice Cream Cupcakes while browsing through my Weight Watcher's books I jumped on it.  Now, I'll warn you.  This recipe contains store bought cookie wafers, Cool Whip Lite, and low-fat ice cream.  Some of you will not be able to overlook that.  However, some of you may feel like I do, which is to say that I can forgive these ingredients from time to time if it means I can indulge in one of my favorite desserts.

If you are bothered by the list of ingredients, you could certainly use a homemade cookie (shortbread or gingersnaps would be nice), real whipped cream, and/or regular or homemade ice cream.  Whichever route you chose, this recipe is fun and the cupcake portion helps to keep you in check so that you don't blow it.  The end result is a very creamy frozen version of banana pudding that is luscious and fulfilling.  I may even consider hiding them for myself as a mid-afternoon snack for the next several days.  Shhh!!
Banana Pudding Ice Cream Cupcakes
Adapted from Weight Watchers Annual Recipes 2005
WW Points+ 3
Serves 12

24 reduced-fat vanilla wafers, divided
2 ripe bananas
 1 tablespoon lemon juice
1-3/4 cups low-fat vanilla ice cream
6 ounces of Cool Whip Lite, thawed

Place 1 vanilla wafer in the bottom of 12 foil-lined muffin cups.

Process bananas and lemon juice in a blender or food processor until smooth.  Add all of the ice cream; pulse 4-5 times or just until blended.  Add half of the Cool Whip (reserving half for garnish), as well as 6 vanilla wafers, and pulse 2-3 times or just until blended.

Divide ice cream mixture evenly among muffin cups; cover with plastic wrap and freeze.

Crush remaining 6 vanilla wafers to make coarse crumbs. Top each ice cream cup evenly with remaining Cool Whip; sprinkle with about a tablespoon of the coarse wafer crumbs.  Serve immediately, or freeze for later.

Note: Once the cupcakes set up in the freezer they will be frozen solid.  They do benefit from a quick thaw on the counter or a quick 5 second zap in the microwave. 

Sunday, August 14, 2011

Frozen Treats Week #5: One Minute Berry Ice Cream

My father-in-law walks around with little Hershey's miniatures in his t-shirt pocket, snacking on them leisurely throughout the day.  The man never puts on a pound.  Do you know people like that?

I'm not one of those people, never was.  My culinary adventures catch up with me from time to time.  It's a never ending cycle of putting on the weight and then taking it off.  Controlling my weight is my one true struggle in life.  Don't get me wrong.  I'm not complaining at all.  I do consider myself lucky.  A lot of people have bigger issues.  It's just a never ending cycle.

Back on the saddle again, I'm here with some One Minute Berry Ice Cream from Jamie Oliver.  Cool, fruity, creamy, and refreshing it's a tasty treat and also a bright spot in the dog days of summer.  The whole family enjoyed it and ate it up in no time, but we all agreed that it was certainly not ice cream.  I'm not slamming this dessert at all.  We all loved it.  It's just that I don't want to mislead anyone by thinking the texture is anything remotely close to ice cream.  I feel more comfortable calling it frozen yogurt.  That being said, I think it's a very tasty and sensible dessert that feels both decadent and satisfying.

One Minute Berry Ice Cream
Adapted from JamieOliver.com
Serves 4

• 1 x 500g pack of mixed frozen berries (I used frozen strawberries)
• 150g fresh blueberries (or strawberries in my case)
• 3–4 tablespoons runny honey
• 1 x 500g tub of natural yogurt
• a few sprigs of fresh mint
• optional: 4 small ice cream cornets


In advance: Put 4 small glasses in the freezer, or you can serve straight into ice cream cornets, if you prefer.When you're all set up and ready to go, get the glasses (if using) and the frozen berries out of the freezer. Divide the fresh blueberries between the glasses or cornets. Put the honey and yogurt and leaves from the sprigs of mint into the food processor and whiz, then add the frozen berries and whiz again until combined. Spoon the frozen yogurt over the fresh berries and serve. 


IHCC Theme: Time For Dessert!

Friday, July 15, 2011

Frozen Treats Week #4: Sorbetto di limone

Squeezing lemons 
is hard work
 for a four year old....
but I totally did it!
Sorbetto di Limone (aka Lemon Sherbet)
Adapted from Jamie's Italy
Serves 6
1 cup sugar
1 cup water
1 cup lemon juice (we used about 8 lemons)
zest of 1 lemon
1 heaping tablespoon mascarpone


Prefreeze a shallow 8-10 inch container.

Put the sugar and water into a pan and bring to a boil, then turn the heat down and continue to simmer for 5 minutes.  Once the liquid is clear and syrupy, remove it from the heat and allow it to cool for 15 minutes, then add the lemon juice and zest.  Next, add the mascarpone and stir until totally combined.  It's very important that you give it a taste at this point.  It all depends on the sourness of your lemons, and it's very hard to give an exact recipe that is going to hit it right on the head - all I can say is that the amount of sugar I have suggested should do the job.  If, on the other hand it's so sour that it makes your face totally curl up, you know you need to add a little more sugar until it softens the lemon juice.

Pour into your pre-frozen dish and return it to the freezer - leave it for at least an hour before you check it.  If it has started to freeze, fork it up a bit.  Do this maybe every hour or so for the next 3 hours, after which it will be ready to eat.  It can now be kept for a couple of days in the freezer, with plastic wrap over the top - any longer and it will start to get ice crystals in it.  Always a real treat served on its own in a bowl or glass, but also wicked served with whizzed up raspberries -like a fresh sauce - poured over the top.
Notes/Results:  Jamie's lemon sherbet is tart and refreshing, making a terrific light summertime treat and also a great palate cleanser.  This recipe makes 6 teensy weensy servings, but you really wouldn't want to eat much more than a small scoop because it's fairly tart.  In fact, we love lemon, but next time I would probably add a bit more sugar to help balance out the tartness of all the lemon.  This version ended up being a little too tart for the kids (which is a shame since Jackson worked so hard), but my husband and I really enjoyed it.

Theme: Potluck

Thursday, June 30, 2011

Frozen Treats Week#4: Zoku Quick Pops Cookbook Review, Homemade Fudge Pops, and Peanut Butter Quick Shell

A few weeks ago I bought some new tools for my Zoku Quick Pop Maker, along with the new Zoku Quick Pops Cookbook.  Last year when I first bought the Zoku Quick Pop Maker I had some trouble unmolding my pops and I was hopeful that the Zoku book would include great recipes and helpful hints to solve my problems.  The book itself is full of information about the quick pop maker, as well as the accessories.  It provides lists of ingredients that work well with the Zoku, as well as tips about creating layers, adding extras, adding fruit, and making quick shells.  
 Zoku Quick Pops
Softcover
95 pages

The chapters with recipes include:
Fresh & Fruity:  Includes all sorts of fruity favorites like watermelon, caramelized banana, black raspberry, and pink mojito.

I Scream for Quick Pops!:  This chapter includes lots of ice pops made out of ice cream. Some of the ones I'd like to try are the Tartufo, Butter Pecan, Pistachio, Cookie Dough, and Cookies & Cream

Bake Shop:  Fun recipes based on all your favorite baked goods like pumpkin pie, strawberry shortstops, key lime pie, and even a carrot cake quick pop.

Coco Loco:  Recipes to satisfy your chocolate cravings.  Everything ranging from the classic fudge pop, to nutty chocolate pretzel pops, s'more pops, peanut butter & jelly pops and malted milk ball pops

All in all, I'd say this is a very kid-friendly cookbook. My four year old son carries it around constantly, begging me to make him every quick pop in the book.  I finally got him to narrow down his choices and he settled on the fudge pops.

Oh, Fudge!
Adapted from Zoku Quick Pop Cookbook
Yields 6  
1 cup water
2-1/2 oz. bittersweet chocolate
1/3 cup sugar
1 pinch salt
1/3 cup 2% milk
1 tablespoon half & half
In a medium saucepan over low heat, whisk together the water, chocolate, sugar, and salt until the chocolate has completly melted (do not boil) and chocolate granules have dissolved, about 5 minutes (test by dipping a clean spoon into the mixture; if you don't see many chocolate specks, it's ready to come off the heat).  Let cool slightly (about 10 minutes).  Whisk in the milk and half & half.  Refrigerate until cool.
Insert sticks into the pop maker molds and pour the cooled chocolate base until you reach the fill line.  Let freeze completely, then remove pops with the Super Tool and enjoy.  Repeat with remaining pops.  Alternatively, you can fill standard pop molds and store in the freezer until frozen.
Peanut Butter Quick Shell
Adapted from Zoku Quick Pop Cookbook
Yields 2/3 cup

1/3 smooth peanut butter
1/3 cup refined coconut oil

In a double boiler over barely simmering water, whisk together the peanut butter and coconut oil until warmed through and mixed thoroughly.  Remove from the heat and let cool completely before using.

How to Store:  Pour quick shell into airtight, microwave-safe container; store in the fridge for up to three weeks.  Quick shell will harden when cold so you will need to reheat it in short increments at half power or sit the container in a bath of hot water for a few minutes.

Notes/Results:  I have to say that I have mixed feelings about the Zoku book.  The book itself is beautiful and done well, but the recipes weren't my favorite.  The fudge pop came together quickly and had a good flavor pre-freeze.  However, after freezing in the Zoku, the fudge pops had a very strange texture.  They looked great, and they unmolded wonderfully, but they didn't taste great.  To be completely honest, we pitched them.  Yes, they were that bad.

We were positive that we would be crazy about the peanut butter quick shell, but after mixing equal parts peanut butter and coconut oil, the peanut butter flavor wasn't as pronounced as we would have liked it to be.  It's not to say that we didn't like it at all, but I probably wouldn't make it again.  I do have to admit that it was really fun to make the peanut butter quick shell.  It was definitely fun to pour the quick shell over the ice cream and watch it harden. 

I'm going to give the book a second chance and try the chocolate quick shell, as well as some of the other quick pop recipes.


Saturday, June 25, 2011

Frozen Treats Week #3: Pecan Vanilla Ice Cream with Maple Syrup

Okay, I totally chose this recipe because the week is quickly coming to a close and I didn't want to drop the ball.  I didn't want to drop the ball on my pledge to make a new frozen treat every week.  Nor did I want to drop the ball on making a Jamie Oliver recipe once a week as part of the I Heart Cooking Clubs group.  Saying all that, I wasn't expecting for this recipe to blow my socks off, but it did.  The caramelized sugary and maple flavored pecans are so perfect sitting on top of vanilla ice cream.  Top it all off with a drizzle of good maple syrup and it's pure heaven.  I will definitely be making this again!

Now for a confession.  I have a new addiction.  It's called Pinterest.  Have you heard of it? If not, you need to get on over there right now.  Be prepared to spend a few hours, or even all day on this site.  It's insanely addictive.  I've pinned so many ideas and recipes that I've lost count.  
 Pecan Vanilla Ice Cream with Maple Syrup
Adapted from Jamie Oliver via Food Network
Serves 4

2 tablespoons confectioners sugar (or enough to make a paste)
2 handfuls pecan nuts
1 to 1-1/2 tablespoon(s) maple extract (my addition)
1 quart good quality vanilla ice cream
maple syrup

Heat the oven to 350F.  Mix the confectioners sugar, maple extract (or flavoring) on a baking tray with a little water to make a thick-ish paste.  Add the pecans.  Bake in the oven for a few minutes (I baked mine for about 8 minutes) or until toasted and caramelized.  Scoop out the ice cream into 4 glasses or bowls and sprinkle over the whole pecans then drizzle with a good glug of maple syrup.

 Notes/Results:  Oh my...the scent when those pecans are baking is amazing! The sugary caramelized pecans and maple syrup are an insanely addictive topping for vanilla ice cream.  I used one good handful of pecans, together with about a tablespoon of maple extract, and about 4-5 tablespoons of confectioners sugar.  Jamie indicates to add water to make a paste.  I would say I used about 1 good tablespoon of water. My suggestion would be to play with the recipe until you feel comfortable that your paste is thick enough.  Absolutely delicious!

Theme: Get Fresh with Jamie!

I'm off to disappear on the Pinterest site again!  If you don't hear from me for awhile send help!!

Monday, June 13, 2011

Frozen Treats Week #2: Ice Cream S'mores Cups

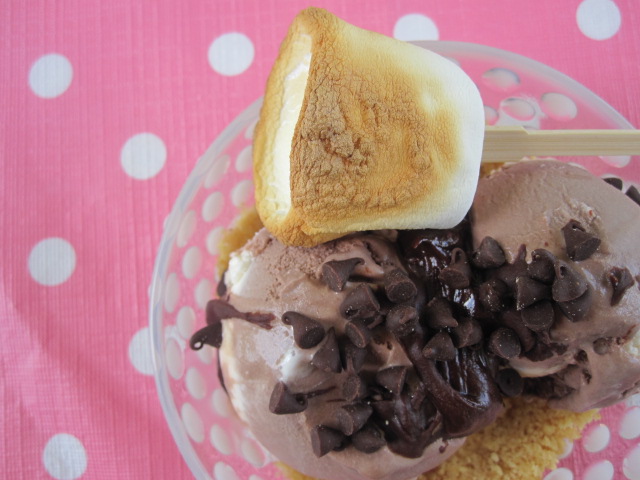
I stumbled across this quick, super kid-friendly, brilliant recipe while searching for s'mores related treats and printed it immediately.  It's such a simple idea, but one that was a huge hit at my house.  A perfectly puffy golden-brown marshmallow sits skewered atop your favorite flavor of ice cream with a sprinkling of chocolate and a quick graham cracker crust.  It begs the question....why haven't I thought of this before?


 Ice Cream S'mores Cups
Adapted from Rachel Ray via Food Network
Serves 4

1 cup graham cracker crumbs
2 tablespoons melted butter
4 scoops vanilla or chocolate ice cream
1 bittersweet chocolate bar, or equivalent in chocolate chips
4 large marshmallows, or more

Combine graham cracker crumbs and butter. Press 1/4 of the crumbs into the bottom of 4 dessert cups, lining the sides and bottom of each cup. Fill cups with vanilla or chocolate ice cream. Shave curls of bittersweet chocolate over cups using a vegetable peeler, or scatter chocolate chips on top. Thread marshmallows on to a metal skewer. Hold the skewer over a burner at high heat and toast the marshmallows. Top each cup with a toasted marshmallow and serve.
 
Notes/Results:  I think this is a fantastic treat that is extremely quick, kid-friendly, and delicious.  However, I do have a few suggestions.  First, and most importantly, I think you should make this with fresh homemade graham cracker crumbs.  Don't bother with the crumbs that are sold in canisters.  Secondly, in a traditional s'more, the chocolate gets all melty and therefore I think this recipe benefits from a little chocolate sauce or melted chocolate poured on top. Lastly, while both vanilla and chocolate ice cream are good options for this, I do think a good chocolate marshmallow ice cream would be best.  I  love how fun, quick ,and delicious this was and plan to make it again. 

I'm submitting this to Saturdays with Rachel Ray over at Taste and Tell.