Showing posts with label Type: Confirmation. Show all posts

Thursday, May 17, 2012

Sometimes I worry about myself...

I used to have a career - a real career.  I traveled, I worked with clients, I have made presentations to auditoriums of hostile people, I out-earned my husband.  But that was a decade ago...now I'm "mom"...and I am beginning to worry about my brain...

Just a couple of days ago, I showed you a card that I was going to be making in bulk for our church youth who were being confirmed. There was really nothing wrong with the card except I had a lot of circles to punch.

At the same time this was going on - I have another project.  Our church secretary has been quite ill so a number of us have volunteered to help out with parts of her job.  One of the things that I am doing is the visual presentation for the service.  It's quite simple - we simply project words for the hymns, the readings and then a series of graphics/photos for the sermon, the prayers, etc.  I try to match all of the graphics to the sermon theme.  For confirmation weekend, our youth each read their faith statement.  Most of them are incredibly nervous - so I have been pondering for weeks what I could do as a graphic that they would enjoy and would have meaning.

The light bulb came on for the visual presentation.  I have had this card technique pinned on Pinterest - it's a simple and very fun thank you card that includes instructions for making a word cloud on Tagxedo.com. I used her instructions and have been working on a word cloud including the first names of our confirmation kids - AND I have done it in the shape of a dove.  I have been practically giddy with excitement over it...that this dove would be projected over their heads as they read their faith statements.

Here's the worrisome part...I had that great card pinned on Pinterest, it gave me an idea for a visual presentation, but I never went full circle and realized that I could also use the word cloud as card.  I am so disappointed in myself - it's a perfect idea.  First of all, it's themed and I'm very, very big on themes.  Second, it's easy - print the word cloud and trim to fit a card.  Third, the kids will like it so much more than a generic card put together by a mom.

Where did my brain go????

So, after all of that, here's the card that I have created for each confirmand...


Confirmation word cloud


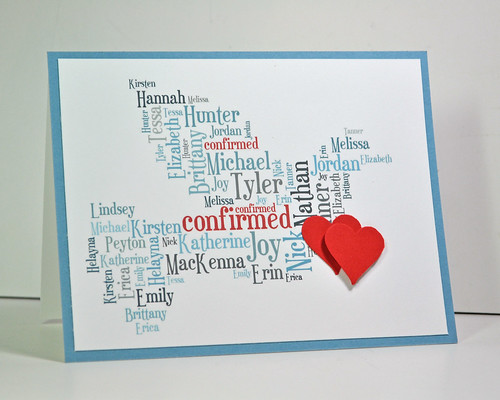
I used all of the instructions included with the card that I linked to above, except:

  • Color Theme: Ocean
  • Max Word Count: 100 (for the visual presentation, I used 250 - this squeezes a lot more smaller names and helps define the shape)
  • Emphasis: 40%, this decreases the large size of some of the names, which helped me make sure that each confirmand had their name large at least once.
Tagxedo.com is an incredible place to create word clouds.  It is totally flexible.  The downside to the flexibility is that is isn't particularly easy to use - lots and lots of options.  But it does allow you to play with the options and it does keep your history, so if you get somewhere you don't like...just click back.


(Now, I just have to figure out what to do with all of the circles that I punched for the first card.)

Tuesday, May 15, 2012

Confirmation Cards...In Bulk

I am on my last "bulk card" requirement for May.  If you read my blog, you have seen bulk cards for Evening of Honor invites, Servant Day (birthday cards for Family Services) and graduation cards.  In each of these case, my family was drafted (NOT optional) into helping me with cutting, gluing and assembling.  I think I have used up all my good will with them - so I had to make these bulk cards very, very, VERY simple so I could get them done this morning.  These are for our church to give to our youth who are being confirmed this weekend...


Confirmation

Just two stamps, a swipe of a red Copic, three circle punches (cutting them in half is the hardest part) and a few black nailhead stickers.

I used the colors from The Paper Players because they are so cheerful and they can work for boys or girls.

  • Stamps: Stampendous cross, Paper Inspirations sentiment
  • Paper: Poppy Parade (and I'll do some backed in Baja and Daffodil, because as much as I love my church - I am NOT happy about using up my retiring Poppy Parade!!), dsp in all colors (the Poppy is from Sunny Garden)
  • Ink: black and R08 Copic
  • Accessories: Mark Richards black nailheads


Saturday, April 28, 2012

Invites in bulk from My Digital Studio

My church has a three-year Confirmation program for middle-schoolers, meeting on Wednesday nights for dinner, worship, and then an education/social/service program.  In May, the 8th graders are confirmed - which is their affirmation of baptism.  It's a big event for them - so we hold an Evening of Honor to celebrate.

I get to do the formal invitations for this event but we had a particularly large number of confirmands this year, so I got it in my head that I would get better at Stampin' Up's My Digital Studio.  I have a friend who uses it beautifully - after she prints, she embosses, adds blings, etc and it looks "real"!

I was feeling fairly confident after I did a simple flyer using an MDS template.  (This concert has been another huge reason that you haven't seen much posting on my blog - I'm involved in three of the groups - and it's tonight - so lots and lots of rehearsal time!!)  FYI: I'm not too worried about posting her name as this poster can be found EVERYWHERE - it's going to be an amazing evening!


But I realized how much that I didn't know about My Digital Studio when it came time to make a card that looked "real".  I spent a lot of time watching videos - there are great starting videos on Stampin' Up's official My Digital Studio website.  Another amazing resource is Stamp with Heather - she has done two full video classes full of tips and techniques.  

So after a lot of videos and even more trial and error, I came up with this...


Confirmation Invitation

I'm feeling pretty good about it.  The only "real" things are the glitter strip, the punched button and twine, and the one little bling on the cross.  All the other layers are printed.  If you try this, another great technique to add a "real" look is to use an embossing folder, but this is such a large card that I didn't have anything that fit.  The insides are formal and are all personalized like a graduation announcement.

The decorations for the evening are blue and silver so the colors were chosen for me. For the layout, I used the technostamper sketch for this week:


Enough chatter from me...I have everything printed and ready to go - but I still have a few hours of putting them all together!!  
  • Stamps: Stampin' Up My Digital Studio Crosses of Hope
  • Paper and Ink: My Digital Studio Night of Navy (although I elected not to print at the highest possible quality to conserve a little ink, so it didn't print out as dark as a typical Night of Navy)
  • Accessories: Stampin' Up Silver Glitter Paper, Marvy Uchida button punch, misc gem
Technostamper is the fun challenge that lets me add the entries right here on my blog.  Here is what everyone else has done with this sketch...


Wednesday, May 18, 2011

Confirmation Weekend with Mojo

This upcoming weekend is the big weekend for our 8th graders being confirmed (an affirmation of their baptism).  They read their faith statements at two of our church services and are confirmed at the third.  There is an Evening of Honor Saturday night for which I had made this set of invitations.  I also made many other cards for the members of our congregation to choose from and give to the confirmands. 

Then I needed to mass produce some cards for the church to give to the confirmands, but I was fresh out of ideas.  Confirmation cards are the hardest cards for me to make.  They are for teenagers but they are for a formal occasion - those don't always go together!  Also, there are very few stamps specific to the occasion.

Luckily, the Mojo Monday sketch came up and I knew instantly that I was using it for these cards.  I think that the notched panel gave it a formal look as befitting this occasion.


My color choices were easy - these are the colors of our sanctuary.  (I do hope that the kids - or at least the parents of the kids - get the connection!)  I chose stamps that aren't specific to "confirmation" but at least make an appropriate statement.


I really took the sketch seriously - see the background on the sketch - here it is on my card!


There are a few more layers here than I would normally like to use for a mass-produced card, but cutting is an easy task.  There are no fancy techniques, just a little woodgrain texture on the background and I am done.

  • Stamps: Verve Artful Elegance background, Our Daily Bread sentiment, Clear Dollar Stamps small cross
  • Ink: Papertrey Ink Dark Chocolate
  • Paper: Stampin' Up Creamy Caramel, Bravo Burgundy, Papertrey Pinefeather
  • Accessories: Stampin' Up Burgundy grosgrain, Papertrey Woodgrain Impression Plate, misc gem colored with copics

Tuesday, May 3, 2011

Confirmation - Elegant

I have been making confirmation cards for the church card ministry.  I like to make a variety of styles because these kids are teens - but typically parents and grandparents are buying the cards.  I've done a number of others earlier in the week - this one is the elegant card!


I saw a card somewhere with the colored gems on this cross - it was the reason that I bought the stamp set.  I really don't remember anything else about that card, but I loved the cross reminiscent of stained glass.

  • Stamps: Sweet 'n Sassy Stamps Elegant Blessings
  • Ink: black
  • Paper: white
  • Accessories: Spellbinders Label Die, Stampin' Up Embossing folder, misc gems

Sunday, May 1, 2011

Confirmation - Teen-Style

I have known all week what I wanted to do with this week's ColourQ Color Challenge - this stamp with "thumped" greens for our teens who are being confirmed in a few weeks.  And here I am finishing it up with 14 minutes to go before the challenge is closed!

I think it just took the inspiration of the Sweet Sunday Sketch Challenge!


FYI - I didn't spend any time in Photoshop making sure the colors were correct - but they REALLY are from the color challenge!

I inked the Blessed stamp in Kiwi then I thumped it with Artichoke and Pear.  The Pear is a little hard to see but up close it's just a wonderful mash of greens!

Here's the colors that I used:

And here's the sketch:

  • Stamps: Clear Dollar Stamps Whatever, unknown cross
  • Ink: Stampin' Up Kiwi Kiss, Always Artichoke and Pear Pizzazz
  • Paper: Stampin' Up Always Artichoke, Pear Pizzazz, Baja Breeze dsp
  • Accessories: baker's twine, brushed gold brads

Friday, April 29, 2011

Confirmation Card - Sweet

I try to make a variety of Confirmation cards to give to the church's youth - sweet, fun, elegant, etc.  Here's my first card - the sweet one!


The sketch is from The Paper Players.


  • Stamps: Stampendous scripture
  • Ink: black
  • Paper: Stampin' Up Old Olive CS and dsp, So Saffron
  • Accessories: Stampin' Up Olive Grosgrain, Scallop Border Punch, Oval and Scallop Oval punches

Tuesday, April 19, 2011

Confirmation Announcements

I haven't posted much in the last 4 days and what I have posted has been very quick and simple.  I am finally done with a big project that I have been working on and thought I would share.

Next month, our church's 8th graders are being confirmed.  This occurs after three years of Wednesday night classes, social events, worship services and service events.  The confirmation service is a public affirmation of their baptism and, in our church, is a very big deal.

The evening before Confirmation Sunday we are holding an Evening of Honor for our confirmands - a sit-down dinner, followed by a shower of honors, gifts and blessings.  My job was to create the formal invitations for this event.

This is the main invitation. It's a large 5x7 card done in the event's colors of blue and silver.


The Bible verse is the theme verse for the evening - I did it on the computer.  The insides of all of the cards are personalized in a very formal graduation card type format.

Here is a close-up of the texture.  These cards were my perfect excuse for purchasing Our Daily Bread's Fish Embossing Plate.


Inserted into each main card are two smaller (standard-sized) cards and envelopes that the confirmand can send to their extended family and friends to invite them to this special evening.


These are obviously modeled on the main card - just down-sized.  Each of these is also personalized.

Finally, we have included RSVP cards and envelopes.  Obviously the actual cards have real names on them!


Have you done the crosses that are on each card?  They are very simple to do, but require Stampin' Up's Sizzix Lattice die.  It cuts a square lattice that makes great quilt-look cards, but with a few snips, it can become a cross.  Here's a picture of a cross on top of the full diecut.  The bigger crosses that I used on the bigger cards just go down on scallop further.


These cards became a real group effort in my family.  My 15-year old son spent 2 1/2 hours on Sunday cutting out the crosses and embossing the backgrounds.  (He owes me money!)  My husband and I spent yesterday evening and all of this morning glueing everything together.  I cannot believe I did not get a picture of him hunched over my craft table, with his reading glasses, very carefully lining up everything he glued...and he calls me anal!!

  • Stamps: "You're Invited" comes from Papertrey Ink Round & Round (an anniversary set)
  • Ink: Adirondack Denim (only for You're Invited - everything else is computer printed)
  • Paper: Blue and Silver Bazzill purchased in bulk at Michaels - I didn't check the color names
  • Accessories: Martha Stewart border punch (on the main card), Stampin' Up Scallop Border Punch, Our Daily Bread Fish Embossing Plate, Stampin' Up Lattice Die, 1 1/2" circle punch, gems from Michaels