Saturday, April 27, 2013

Dioptics Solar Shield Sunglasses...

Kind of a strange subject for a blog, you think? Well, not so much...It is spring and the sun is shining...well, some of the time...lol...and if you are like me you need sunglasses even if the sun is not shining...sigh...Anyway, those aren't just any pair of sunglasses over there:) those are fit-overs  And just as the name suggests they are made to fit over your prescription glasses! So, when Vibrant nation's Vibrant Influencer Network offered to send me a free pair of Dioptics Solar Shield Sunglasses to use and review...well of course, I agreed... I have to admit, I was not convinced that they were going to work for me. I am very light sensitive and I have to have serious sunglasses!  I was a bit worried about that...I mean, here was this nice company sending me these nice glasses and I needed to do an honest review! What if I didn't like them!?! I needn't have worried:) First of all look at them...These are not your Grandparents Fit-Overs:) And they had a Pink pair! The are polarized! A must for me in the shades category...Now first, the color...I might have been a bit disappointed there...not really the fushia of the picture, but that's OK...
Next: coverage...they did a good job of fitting over my glasses and they are comfortable, not too heavy...They look great...Note: If you have large frames, these might not work, but just pay attention to the measurements when ordering yours...Speaking of ordering...mine were free but the list price for these is: 24.99 (very reasonable, I think, especially as they are polarized)
So to recap so far: They look great, feel great, and the cost is reasonable...
So, on to function...I believe that they function well. I was skeptical...they are not dark, but they still filter out the glare very well. I have been able to forgo my regular prescription sun lenses on a number of occasions without getting a migraine (this is stellar praise, indeed) I rarely had to squint behind them...another plus...squinting usually leads to migraines for me...On a midday at a ballgame or at the beach I would probably have to use my regular prescription lenses with the mirrored surface but under all other circumstances these work well! The convenience is wonderful, not switching glasses as you go in and out of doors:)
So overall, my conclusion is positive and I give these Dioptics Solar Shields Sunglasses a


That would be out of 5!
So that's it...I want to thank Vibrant Nation and Solar Shield for giving me this opportunity to review this product:) 


Thursday, April 25, 2013

my favourite..

This week over on the Pebbles blog we are creating layouts about our favourite thing...I choose to create a about the sweetest little girl I know! Simple and sweet...


Photobucket

CAS(E) this Sketch! with Dahlias

It's a very unique sketch this week at CAS(E) this Sketch and I LOVE it!!


How different are those staggered tags?!  I chose to use flowers and leaves, but as usual, the rest of the design team came up with amazingly fun ideas - coffee cups, cute little cars, a camera - be sure to check it out on the CAS(E) this Sketch blog.


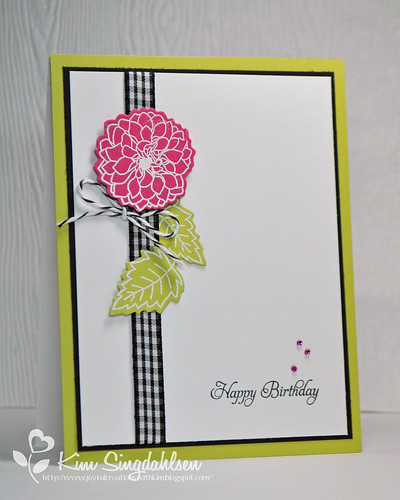
Happy Birthday Dahlia
If you follow my blog, you are now thinking...hey, I've seen that flower in those colors!  Yes, you have. I had originally started this card with the bigger dahlia and leaves that are in the stamp set - but they were just too big for the layout.  After going to the work of die-cutting and embossing them, I most certainly was not going to waste them - so the big dahlia showed up on a card just two days ago!!
  • Stamps: Papertrey Ink Delightful Dahlias
  • Paper: Papertrey Ink Raspberry Fizz, Lucky Limeade
  • Ink: Versamark, Memento black
  • Accessories: white embossing powder, Papertrey Ink Delightful Dahlias dies, CTMH Bitty Sparkles (colored with Copics), Divine Twine Black Licorice, misc black and white gingham

Wednesday, April 24, 2013

simple celebrations: hello kitty party + printables


We kinda have a crush on Hello Kitty around here.

Ella turned seven this month, and at the last minute decided she wanted a "friends" party with a Hello Kitty theme. She must have caught me on a good day, because I gave the okay. Not one to usually do something like this so late in the game, I figured I could throw something together quickly if I kept things super simple.

Am I sharing the printables? Well, of course.

Hello Kitty fill-able invitation (add your own details using Photoshop or Photoshop Elements).

So here's the rundown of the festivities, starting at the top left.  

1. My version of an ice cream cake went together in about 15 minutes (with Tayler's help).
2. I put together a simple game on the trampoline. The girls jumped around while Lynn threw balls over the net. If a ball touched anyone, they went out. Last girl standing was the winner. The game lasted forever because they kept wanting to play.  
3. I used my balloon flowers again, this time creating them in colors to match Kitty's flower. Actually, my daughter-in-law Tayler, made them all! She'll be making them again for Piper's first birthday soon. 

4. For a craft project, I planned to have each of the girls design their own pin/button. It was a huge hit and they each made multiples. My friend Jen, just bought a button making machine to use at Girls' Camp and for other occasions and loaned it to me. Thanks, Jen!  
5. I gave Ella a budget for the goodie bags and she chose the items she wanted (all from Target.) I also designed and made an HK button for each of the girls and my daughter Kate, found pink and orange mini buckets to package everything in. Thanks, Kate!
6. The silly birthday girl in her Hello Kitty dress. Kate and I found matching ones for Ella and my granddaughter Madi, at Old Navy for about $7 each. 
7. Our granddaughter Piper, decided that hangin' with her Poppa was much more fun than those noisy, cray-cray girls. :) Check out that one little tooth--so darling!
8. The aftermath.


I created this 16 x 20 Hello Kitty welcome poster for the front door. It's only $6 to print at Costco or Walmart and Ella now has it on her bedroom door.


 Hello Kitty printable for 1 1/4" buttons
2" Hello Kitty toppers or tags

I did learn a few things raising my bigs, one being that the the simple parties and celebrations really are the most memorable--for everyone. I also figured out that my expectations were always far greater than my little ones. This little party is proof. I was able to put it together in just a few days and for about $60 total. Ella loved it and the girls had a delightful time. How do I know? They didn't want to leave.:)

Happy Birthday, Ella Bella! Big loves.

P.S. Send me photos if you use these printables for your own Hello Kitty themed party. I want to see!

Also shared at:
Chic on a Shoestring

A very HAPPY FINISH!

This special quilt is for my son's teacher that was recently diagnosed with cancer and is undergoing chemo. The children participated in the making of the quilt for their teacher and I cannot wait for the children to see their quilt that will give Ms.V so much comfort. I will be taking it  into the class to show them and I know they will love it!


I used a Lori Holt Riley Blake Polka Dot Stitches jelly roll and Moda Bella White.  The piecing and quilting were all done with Aurifil 50wt. The batting used was Pellon Nature's Touch.


See the sweet handprints?   I could NOT have done this without the help of the a very lovely and talented lady, who I happen to adore!  Laurie Tigner!  She volunteered to quilt this quilt before it was even a real design, that is pretty incredible in my book and I ADORE and LOVE her to BITS!!!!  She brought this quilt ( all quilts in fact) to life!  THANK YOU LAURIE!


I asked Laurie if it was possible to include the children's names in the blocks with the prints and she DID IT!  I sent a listing of the names and a diagram of where each print was and she wrote each of the names with the print that goes with it.


The MOST IMPORTANT one!


I am sure this will be loved for many many years!

Fixing the missing bloglovin' folks!!

This is my second post today.


If you chose bloglovin' as your blog reader and then transferred your blog lists from Google Reader, there were two (that we know of) great blogs that bloglovin' could not find.  You may have "lost" these blogs and don't even know it.
Always Playing with Paper - the talented Lesley Croghan and the home of Merry Monday
GIBMISS - the wonderful Sylvie who takes all of her pictures using her Gibraltar ocean view in the background!
Bloglovin' readers need to add these blogs manually.  Pop over to each of these blogs and see what you have missed.  Then copy their blog address, bring up your bloglovin' account, paste them into the blog search box and click FOLLOW.  They will be back in your list so you can read all of their future posts!!


------------------------------


I am hoping you can pass the above info along in your posts too.  These ladies can't notify their bloglovin' readers that they are no longer lost - - - because bloglovin' readers don't currently get their posts - - oops!  So I would like to help them out and spread the word to get them back into people's bloglovin' lists.


Feedly Tags and Follow Buttons


I've written a number of educational posts on these issues.
Click here to see each of them.


First - a quick sidetrack - if you are still trying to decide between bloglovin' and feedly - I found this article called "Bloglovin' vs Feedly: Which RSS Reader Reigns Supreme?'  It's a great article that does a good job pointing out the pros and cons of each!


I have two quick updates regarding feedly for you - both are kind of more for the advanced user!


TAGGING IN FEEDLY
Feedly is getting ready to disconnect from Google Reader.  Right now, they are just a front-end to Google Reader so they are using Google Reader info.  When they disconnect, they are not only going to keep all of the blogs that you read, they are also going to bring over everything you have tagged in the past!!!!  Yeah!!!

But...they do need a little help.

Tagging is a great function that allows you to mark and then keep past posts.  For example, I might tag "Christmas" or "CASE-worthy".  Those posts are automatically saved and categorized until the point that you choose to un-tag them.

What feedly needs you to do is to tell your feedly account what tags you used when you were reading in Google Reader.  If you don't remember, pop back into Google Reader (although Google has already taken away the link - just go to www.google.com/reader) and find them.  They are listed on the left column, toward the bottom with little tag symbols.

Then go into feedly,

  1. Click on "prefs" right under your name and scroll down until you see "tagging"
  2. Type your list of tags into the box using commas to separate each tag.
Done!!


The exact wording with a helpful picture from the feedly blog is...


But we need your help regarding upgrading your tagged articles. We need you to go to your feedly preferences and enter the list of tags you have been using to archive old articles. We will migrate up to 250 articles per tag.
This is what my tag list looks like for example:Tag list


A FEEDLY FOLLOW BUTTON
Sadly, one thing that is lacking right now is a feedly follow button so that the people who read in feedly and want to add you can easily just click.

(Not that it's all that hard to simply copy your blog address and paste it into feedly - but buttons are nice!)

It is fairly high on feedly's update list - but if you want to add one now, I read about a way to do it.  It's not totally clean - so you might want to wait until feedly has an official button.  If you do create your own - I promise to tell you when feedly has an official button!

  • Find a feedly graphic - I just did a Google Image search and came up with this one.  If you like it just save this one to your computer.


  • Find your blog feed address.  (I only know how to do this for blogger).  It's your blog address plus the following "/feeds/posts/default"  For example, my blog feed address is:
                         http://joyfulcreationswithkim.blogspot.com/feeds/posts/default

  • Go to your blogger/design/layout area and "Add a gadget" to your sidebar, using an "Image" gadget.
  • Add a title.  I just said "For my feedly followers"
  • Add a caption.  The one flaw in this is that it actually just brings up your blog in feedly - it doesn't add it until the click the Add button in feedly.  So I just captioned it "Then click +ADD in feedly!!"
  • Add a link.  You need to type http://www.feedly.com/home#subscriptions/feed/your feed address.  For example, I typed:
                  http://www.feedly.com/home#subscription/feed/http://joyfulcreationswithkim.blogspot.com/feeds/posts/default
  
  • Add the image.  Browse your computer for the feedly graphic that you found or copied from above.
  • Save


I have re-organized my sidebar so that all of these major readers are listed.  My sidebar says:

     If you follow/read in blogger/blogspot
          This is the old "follow" button that we all already have.
     If you read in bloglovin'
           They already have a nice button.
           Just sign up for bloglovin' and find the follow buttons.
           (I don't use bloglovin', but I did sign up to get the button.)
     If you read in feedly
           I created it as above
     If you read via email
           Most of us already have it there.

I think I've covered the big ones this way!!


Hasn't this all been just a big adventure??  Not really one that I welcomed - but I have learned a lot!!