Showing posts with label _Church Needs. Show all posts

Thursday, May 17, 2012

Sometimes I worry about myself...

I used to have a career - a real career.  I traveled, I worked with clients, I have made presentations to auditoriums of hostile people, I out-earned my husband.  But that was a decade ago...now I'm "mom"...and I am beginning to worry about my brain...

Just a couple of days ago, I showed you a card that I was going to be making in bulk for our church youth who were being confirmed. There was really nothing wrong with the card except I had a lot of circles to punch.

At the same time this was going on - I have another project.  Our church secretary has been quite ill so a number of us have volunteered to help out with parts of her job.  One of the things that I am doing is the visual presentation for the service.  It's quite simple - we simply project words for the hymns, the readings and then a series of graphics/photos for the sermon, the prayers, etc.  I try to match all of the graphics to the sermon theme.  For confirmation weekend, our youth each read their faith statement.  Most of them are incredibly nervous - so I have been pondering for weeks what I could do as a graphic that they would enjoy and would have meaning.

The light bulb came on for the visual presentation.  I have had this card technique pinned on Pinterest - it's a simple and very fun thank you card that includes instructions for making a word cloud on Tagxedo.com. I used her instructions and have been working on a word cloud including the first names of our confirmation kids - AND I have done it in the shape of a dove.  I have been practically giddy with excitement over it...that this dove would be projected over their heads as they read their faith statements.

Here's the worrisome part...I had that great card pinned on Pinterest, it gave me an idea for a visual presentation, but I never went full circle and realized that I could also use the word cloud as card.  I am so disappointed in myself - it's a perfect idea.  First of all, it's themed and I'm very, very big on themes.  Second, it's easy - print the word cloud and trim to fit a card.  Third, the kids will like it so much more than a generic card put together by a mom.

Where did my brain go????

So, after all of that, here's the card that I have created for each confirmand...


Confirmation word cloud


I used all of the instructions included with the card that I linked to above, except:

  • Color Theme: Ocean
  • Max Word Count: 100 (for the visual presentation, I used 250 - this squeezes a lot more smaller names and helps define the shape)
  • Emphasis: 40%, this decreases the large size of some of the names, which helped me make sure that each confirmand had their name large at least once.
Tagxedo.com is an incredible place to create word clouds.  It is totally flexible.  The downside to the flexibility is that is isn't particularly easy to use - lots and lots of options.  But it does allow you to play with the options and it does keep your history, so if you get somewhere you don't like...just click back.


(Now, I just have to figure out what to do with all of the circles that I punched for the first card.)

Tuesday, May 15, 2012

Confirmation Cards...In Bulk

I am on my last "bulk card" requirement for May.  If you read my blog, you have seen bulk cards for Evening of Honor invites, Servant Day (birthday cards for Family Services) and graduation cards.  In each of these case, my family was drafted (NOT optional) into helping me with cutting, gluing and assembling.  I think I have used up all my good will with them - so I had to make these bulk cards very, very, VERY simple so I could get them done this morning.  These are for our church to give to our youth who are being confirmed this weekend...


Confirmation

Just two stamps, a swipe of a red Copic, three circle punches (cutting them in half is the hardest part) and a few black nailhead stickers.

I used the colors from The Paper Players because they are so cheerful and they can work for boys or girls.

  • Stamps: Stampendous cross, Paper Inspirations sentiment
  • Paper: Poppy Parade (and I'll do some backed in Baja and Daffodil, because as much as I love my church - I am NOT happy about using up my retiring Poppy Parade!!), dsp in all colors (the Poppy is from Sunny Garden)
  • Ink: black and R08 Copic
  • Accessories: Mark Richards black nailheads


Sunday, May 6, 2012

Cards for Lutheran Family Services

Here's a clean and simple birthday card for a kid.  What's special about it?  Nothing...except....


Birthday Cards for LFS

We made 200 of them yesterday!!!

My church as an annual servant day with projects in-house and around the community.  As the card-making group, we have done such things as cards for soldiers to send back home, and this year, we did birthday cards for Lutheran Family Services to send to their clients.  

Other projects include 
  • stuffing animals for Ronald McDonald House 
  • decorating priority mailing boxes that a group called Colorado Supporting Our Troops fills and sends overseas.  We have pictures from past years of groups of soldiers holding their glittered, painted, stamped, and stickered boxes!!
  • decorating brown paper bags that a group called Project Angel Heart uses to deliver meals to people with life-threatening illnesses
  • sewing prayer quilts
  • yard work at Girls Hope and Boys Hope
  • general handyman work at Praying Hands Ranch and at Sky Ranch Lutheran Camp
  • building handicap ramps for families in need
  • and many more this year and in past years!!
The key to making a lot of cards is keeping it very simple and being prepared in advance - because many of the people that come have never made a card and we also get lots of kids that want to serve.    Plus, if there's a crowd, I'm not always able to help each person individually.  

So, once again, I thank my family.  For the third time this week, my boys spent an evening cutting (see the confirmation and graduation posts in the last week).  They don't ask for much either.  My husband left yesterday for two days alone in our mountain place - with a stack of library books.  My boys are even easier - we are going to Garbanzo's for lunch today and then to see The Avengers

200 sheets of 5 1/2 x 4 1/4 paper AND
200 sheets of 5 1/4 x 4

I included a variety of embossing folders with instructions

My oldest son used the Stampin' Up BIGZ peekaboo die to
cut 200 little windows.  My husband cut appropriately sized
white squares and circles for under the window.  (I actually
stamped each one - I'm not a complete lump!!)

Here's some of the ladies and their cards!!  Hi, Carol!!!
Isn't card-making a wonderful hobby!!??

I played two challenges for my sample card - CAS-ual Fridays and Pals Paper Arts...


  • Stamps: none shown (I used a variety of stamps for insides the windows).  I also had the perfect stamp for inside each card...it says "Just thanking God for the day He made you." It's by MorningStar Stamps - a wonderful company with stamps to "encourage, cheer, thank, bless and celebrate.  But now that I have you all excited - I don't see this stamp there anymore...sorry...but there are lots of others!
  • Paper: Stampin' Up Calypso, Baja, Saffron
  • Ink: just black
  • Accessories: the sample includes a candle from Jolee's Boutique, but I had a wide variety of dimensional and glittered stickers for the cards - I watched sales for a month to get interesting stickers!, Stampin' Up Peekaboo die, the sample includes an embossing folder from Lifestyle Crafts


Tuesday, May 1, 2012

iSpy Graduation Cards

Now that I am through confirmation cards for the church, I am moving on to graduation cards for our graduating youth.  As usual, I didn't plan ahead - so I have a large number of cards to make in a very short period of time (translation: (1) nothing fancy or complex on the card and (2) components that can be parceled out to my 12-yr old, my 16-yr old and my 53-yr old...although I have a lot of bribing to do as they are still tired of cutting and gluing and addressing confirmation cards last week!)

I used this week's sketch from iSpy Sketches as I thought the various panels could be used with papers to add interest.


Graduation for Church Youth


We had a phenomenal fund-raising concert at our church this weekend.  (I had a flyer a few days ago on this blog).  It was for an amazing family whose very young daughter is going through her fourth round of chemotherapy.  The bell choir was one of eight groups that performed.  We decided that, even though we are mainly a group of middle-aged Lutheran ladies (and a few Methodist men pinch-hitting on the giant bells) we were doing....LADY GAGA...to appeal to the sweet, but very sick, young lady.

{My husband just wandered over, read over my shoulder, and said "Ha!  Middle-age??!!  Only if you live to be a hundred!"}

I'm in the brightly-colored boa under "Christ is Risen"??!!  Check out the director...she's got moves!!  Then check out the gentlemen whose head you see right in front of her that never, ever moves...that's her husband!  

I posted this on Facebook and a wonderful (but potentially former) friend commented "So that's where the missing communion wine went!"


I hope we made you smile!

THE CARD DEETS:
  • Stamps: Our Daily Bread As You Graduate
  • Paper: dsp is from Flair Designs (I've had it forEVer) and CS to match is Stampin' Up Creamy Caramel and Peach Parfair, Papertrey Winter Wisteria
  • Ink: Stampin' Up Creamy Caramel and Versamark
  • Accessories: Seafoam White embossing powder, Cuttlebug border embossing folder, EK Success postage border punch

Saturday, April 28, 2012

Invites in bulk from My Digital Studio

My church has a three-year Confirmation program for middle-schoolers, meeting on Wednesday nights for dinner, worship, and then an education/social/service program.  In May, the 8th graders are confirmed - which is their affirmation of baptism.  It's a big event for them - so we hold an Evening of Honor to celebrate.

I get to do the formal invitations for this event but we had a particularly large number of confirmands this year, so I got it in my head that I would get better at Stampin' Up's My Digital Studio.  I have a friend who uses it beautifully - after she prints, she embosses, adds blings, etc and it looks "real"!

I was feeling fairly confident after I did a simple flyer using an MDS template.  (This concert has been another huge reason that you haven't seen much posting on my blog - I'm involved in three of the groups - and it's tonight - so lots and lots of rehearsal time!!)  FYI: I'm not too worried about posting her name as this poster can be found EVERYWHERE - it's going to be an amazing evening!


But I realized how much that I didn't know about My Digital Studio when it came time to make a card that looked "real".  I spent a lot of time watching videos - there are great starting videos on Stampin' Up's official My Digital Studio website.  Another amazing resource is Stamp with Heather - she has done two full video classes full of tips and techniques.  

So after a lot of videos and even more trial and error, I came up with this...


Confirmation Invitation

I'm feeling pretty good about it.  The only "real" things are the glitter strip, the punched button and twine, and the one little bling on the cross.  All the other layers are printed.  If you try this, another great technique to add a "real" look is to use an embossing folder, but this is such a large card that I didn't have anything that fit.  The insides are formal and are all personalized like a graduation announcement.

The decorations for the evening are blue and silver so the colors were chosen for me. For the layout, I used the technostamper sketch for this week:


Enough chatter from me...I have everything printed and ready to go - but I still have a few hours of putting them all together!!  
  • Stamps: Stampin' Up My Digital Studio Crosses of Hope
  • Paper and Ink: My Digital Studio Night of Navy (although I elected not to print at the highest possible quality to conserve a little ink, so it didn't print out as dark as a typical Night of Navy)
  • Accessories: Stampin' Up Silver Glitter Paper, Marvy Uchida button punch, misc gem
Technostamper is the fun challenge that lets me add the entries right here on my blog.  Here is what everyone else has done with this sketch...


Wednesday, May 18, 2011

Confirmation Weekend with Mojo

This upcoming weekend is the big weekend for our 8th graders being confirmed (an affirmation of their baptism).  They read their faith statements at two of our church services and are confirmed at the third.  There is an Evening of Honor Saturday night for which I had made this set of invitations.  I also made many other cards for the members of our congregation to choose from and give to the confirmands. 

Then I needed to mass produce some cards for the church to give to the confirmands, but I was fresh out of ideas.  Confirmation cards are the hardest cards for me to make.  They are for teenagers but they are for a formal occasion - those don't always go together!  Also, there are very few stamps specific to the occasion.

Luckily, the Mojo Monday sketch came up and I knew instantly that I was using it for these cards.  I think that the notched panel gave it a formal look as befitting this occasion.


My color choices were easy - these are the colors of our sanctuary.  (I do hope that the kids - or at least the parents of the kids - get the connection!)  I chose stamps that aren't specific to "confirmation" but at least make an appropriate statement.


I really took the sketch seriously - see the background on the sketch - here it is on my card!


There are a few more layers here than I would normally like to use for a mass-produced card, but cutting is an easy task.  There are no fancy techniques, just a little woodgrain texture on the background and I am done.

  • Stamps: Verve Artful Elegance background, Our Daily Bread sentiment, Clear Dollar Stamps small cross
  • Ink: Papertrey Ink Dark Chocolate
  • Paper: Stampin' Up Creamy Caramel, Bravo Burgundy, Papertrey Pinefeather
  • Accessories: Stampin' Up Burgundy grosgrain, Papertrey Woodgrain Impression Plate, misc gem colored with copics

Monday, May 9, 2011

Splitcoast CAS118: Banners

This just isn't something you see very often...


More on this later!

First, I have my card(s) for today's Splitcoast Clean and Simple challenge: Banners.  I thought I was done with graduation cards for our church card ministry, but the idea of a CAS card with banners got me thinking that I could do a group of cards based on each local high school's school colors.  So I finished those three and realized there were two private schools.  I probably should have done some of the schools from the suburbs north and west of us, but I never obsess over things like that! (That thud you heard was the sound of all of my cardmaking buddies falling out of their chairs laughing hysterically over the fact that I stated I don't obsess!)


  • Stamps: Studio G sentiment (the cheap stamps at Michaels), Taylored Expression banner
  • Ink and Paper: a variety to match school colors
  • Accessories: Taylored Expressions banner die, Cuttlebug folder, misc brads.

So what's up with the penguins??

This weekend our church held our second annual day of service.  We had 15 different projects- some in the church, many out in the community.  I was in the church working with a group making Magic Cards - they are great cards for kids as they image is black and white until you pull up a tab and it magically becomes colored (tutorial here).  We are giving them to Lutheran Family Services who will use them as birthday cards for their clients.  Since I was in the church, my pictures are some of the inhouse projects - but the people outside did such things as feed our local firefighters, build a handicap ramp, clean up the yard of a WWII vet, garden at Girls/Boys Hope homes, work at our local food bank and others.

This is a small portion of the group stuffing the penguins
to give to Ronald McDonald house.  They carefully
placed a heart in each penguin and then
decorate "birth certificates".

Here's part of the group making birthday cards.

This group is decorating brown paper bags for
Project Angel Heart.  That group delivers meals
to people dealing with life-threatening illness.
The meals are necessary, but the bags are treasured!

Here's my boys!  After they went to one of our
shut-ins home to install their air-conditioning units,
they worked to fill bags with toiletries to donate
to The Gathering Place - a safe daytime refuge for
women and children experiencing homelessness
and poverty.

I have to credit my husband for the success of the birthday card project.  I was so totally overwhelmed last week with our regular church cardmaking gathering, the service day (I also did all of the organizing/communicating) and a big bell choir finale with a full orchestra - that it fell to my husband to get all the parts and pieces of the birthday cards together.  He cut and scored for three days - and he will proudly show you his paper cuts!

Tuesday, April 19, 2011

Confirmation Announcements

I haven't posted much in the last 4 days and what I have posted has been very quick and simple.  I am finally done with a big project that I have been working on and thought I would share.

Next month, our church's 8th graders are being confirmed.  This occurs after three years of Wednesday night classes, social events, worship services and service events.  The confirmation service is a public affirmation of their baptism and, in our church, is a very big deal.

The evening before Confirmation Sunday we are holding an Evening of Honor for our confirmands - a sit-down dinner, followed by a shower of honors, gifts and blessings.  My job was to create the formal invitations for this event.

This is the main invitation. It's a large 5x7 card done in the event's colors of blue and silver.


The Bible verse is the theme verse for the evening - I did it on the computer.  The insides of all of the cards are personalized in a very formal graduation card type format.

Here is a close-up of the texture.  These cards were my perfect excuse for purchasing Our Daily Bread's Fish Embossing Plate.


Inserted into each main card are two smaller (standard-sized) cards and envelopes that the confirmand can send to their extended family and friends to invite them to this special evening.


These are obviously modeled on the main card - just down-sized.  Each of these is also personalized.

Finally, we have included RSVP cards and envelopes.  Obviously the actual cards have real names on them!


Have you done the crosses that are on each card?  They are very simple to do, but require Stampin' Up's Sizzix Lattice die.  It cuts a square lattice that makes great quilt-look cards, but with a few snips, it can become a cross.  Here's a picture of a cross on top of the full diecut.  The bigger crosses that I used on the bigger cards just go down on scallop further.


These cards became a real group effort in my family.  My 15-year old son spent 2 1/2 hours on Sunday cutting out the crosses and embossing the backgrounds.  (He owes me money!)  My husband and I spent yesterday evening and all of this morning glueing everything together.  I cannot believe I did not get a picture of him hunched over my craft table, with his reading glasses, very carefully lining up everything he glued...and he calls me anal!!

  • Stamps: "You're Invited" comes from Papertrey Ink Round & Round (an anniversary set)
  • Ink: Adirondack Denim (only for You're Invited - everything else is computer printed)
  • Paper: Blue and Silver Bazzill purchased in bulk at Michaels - I didn't check the color names
  • Accessories: Martha Stewart border punch (on the main card), Stampin' Up Scallop Border Punch, Our Daily Bread Fish Embossing Plate, Stampin' Up Lattice Die, 1 1/2" circle punch, gems from Michaels

Thursday, January 13, 2011

Crafting with Tweens

SIXTY 6th, 7th and 8th graders making cards.  I don't know whether to be thrilled at how involved they were or to sit back this morning and nurse my headache from the noise levels!!

Once a month in our confirmation program, we have a service and/or social project.  Last night we had two service projects going on - cookie making (to go to local police and firemen) and Valentines for soldiers.  Since I don't even do well with those rolls of refrigerator cookies - I definitely was not in charge of cookie making!!

I tried to put together a very simple card that still included a touch that might be fun for the kids.  In this case, the "fun" was simply a punch and a 3-D flower. (Given that twice the number of hearts that were needed were punched and put together, I think they had fun!!)  Here's the card:


The card uses all Stampin' Up products - a stamping wheel, a stamp from Service and Sacrifice, the heart punch, Crumb Cake, Cherry Cobbler and Vanilla.

I had four stations set up with instructions (as if tweens read instructions??!!!)  1) the wheel stamp, 2) the 3D heart, 3) writing a note for the inside and 4) putting it all together.  Here's a couple of the stations.


The kids dove right in!


Even though it was utter chaos - here's the final product!!


They made 100 cards that I will now get over to Colorado Supporting Our Troops to tuck into the next box of goodies (and essentials) that they are shipping overseas.


Saturday, December 4, 2010

Cards for Church: Fellowship

If you are here only for the OLW card, scroll to the bottom.

Part 5 of a series on Church Card Ministries:

So...you have decided to start a church card ministry, you have planned and prepared and your card designers have put together card kits.  Now it is time to have fun! 

Our cardmakers range from a 6th graders all the way up to ???  Some attend our church, some are mothers or friends or friends of daughters of members!  We even have some that come that have no apparent connection except for a love of cardmaking.

The fellowship is phenomenal.  We share our recent crafting purchases and discuss our favorite brands/stores/websites.  We bring cards that we have made in other classes and discuss techniques.  We catch up on each others' lives.  We might even participate in a little gossip!

The following photos are from our December gathering, which is not our best attended session - people are so very busy.  But there are enough of us that want one last "escape" before Christmas that we meet anyway.


The table of card kits.
The first arrival selecting the card kits that
she wants to make.

Here are a few photos of the participants that didn't mind their photos appearing on my blog!!


And the final result is a table full of cards!
This is just a small portion of the cards we made this month.

As your ministry gets going, you can find so many other opportunities to gather.  The following is a picture from an amazing event that we held last May.  We gathered to make cards for soldiers' use - blank cards that they could use to send back home (it's not like they have a Hallmark on the corner!).  We made 1,000 cards!!

Church card ministries are the ultimate ministry!  We had so much fun as we created our cards.  And now they are in our card "sales" racks.  I can't wait to see people gathered around the cards tomorrow morning between services.  I will remember the excitement of creating those cards and now others will be excited to buy them - and they will definitely bring a smile to the recipient!  All of this, and the church raised a little money!

Please feel free to contact me or comment if you have any questions.  We are so thrilled with what we do, we would love to get others started. (In fact, one of the ladies in the first pictures was visiting from a church 90 miles away as they are thinking about starting a card ministry!)

--------------------

This series of Church Card Ministry posts is dedicated to my mom, the founder of our card ministry.  I was so blessed to be able to share this amazing experience with my mother.  We all miss you and remember you every time we gather.

Shirley Heier
1939 - 2006


--------------------

Set 269 - Embrace Life

This week's One Layer Wednesday challenge was simply "Back to the Beginning".  What technique or product got me hooked on cardmaking?  I thought and thought - but I suddenly realized that I was trying to come up with a technique or product to make a card for this challenge - not the one that got me hooked.  Because the simple truth was that it was the stamps that hooked me.  I don't have an artistic bone in my fingertips. I can't draw a stick figure.  Even trying my hardest, I don't have handwriting that can create a beautiful sentiment - it's not even legible.  I had no way to create art.  Rubber stamps did that for me.  Even I can create miniature works of art!!


The leaves are actually inked in a darker green, then coated with Shimmer Paint.
  • Stamps: Stampin' Up Embrace Life, Verses Rubber Stamp sentiment
  • Inks: PaperTrey Ripe Avocado and Dark Chocolate
  • Paper: Neenah Classic Crest Natural White
  • Accessories: PaperTrey Dark Chocolate satin ribbon, Tsukineko Champagne Mist Shimmer Paint, Mark Richards small pearls


Thursday, December 2, 2010

Cards for Church: How?

Part 4 of a series on Church Card Ministries

Now it is time to get ready for a cardmaking session.  Gather all of your crafters!

Our cardmaking group is open to everybody!  We have people who only ever ink a stamp at our monthly gathering, Stampin' Up demonstrators, people who have been published and one wonderful lady who has won a national contest!  Our challenge is satisfying all levels of crafters and allowing them to successfully create cards.

We make sure that we have a variety cards to fit all levels and to interest all cardmakers.

We have cards that work for experienced crafters. This card looks fairly simple but it involves heat embossing (the bird is embossed in copper) and watercoloring.  Plus there is a bow and a lot of people panic when they see a bow. 


Here's another card that is a little tough - rock-n-rolled image, border punch, and a line of plants behind the image.


We have cards with new techniques.  I have used this looped ribbon technique before (see this post for instructions) but I have not taken it to our cardmaking group yet.


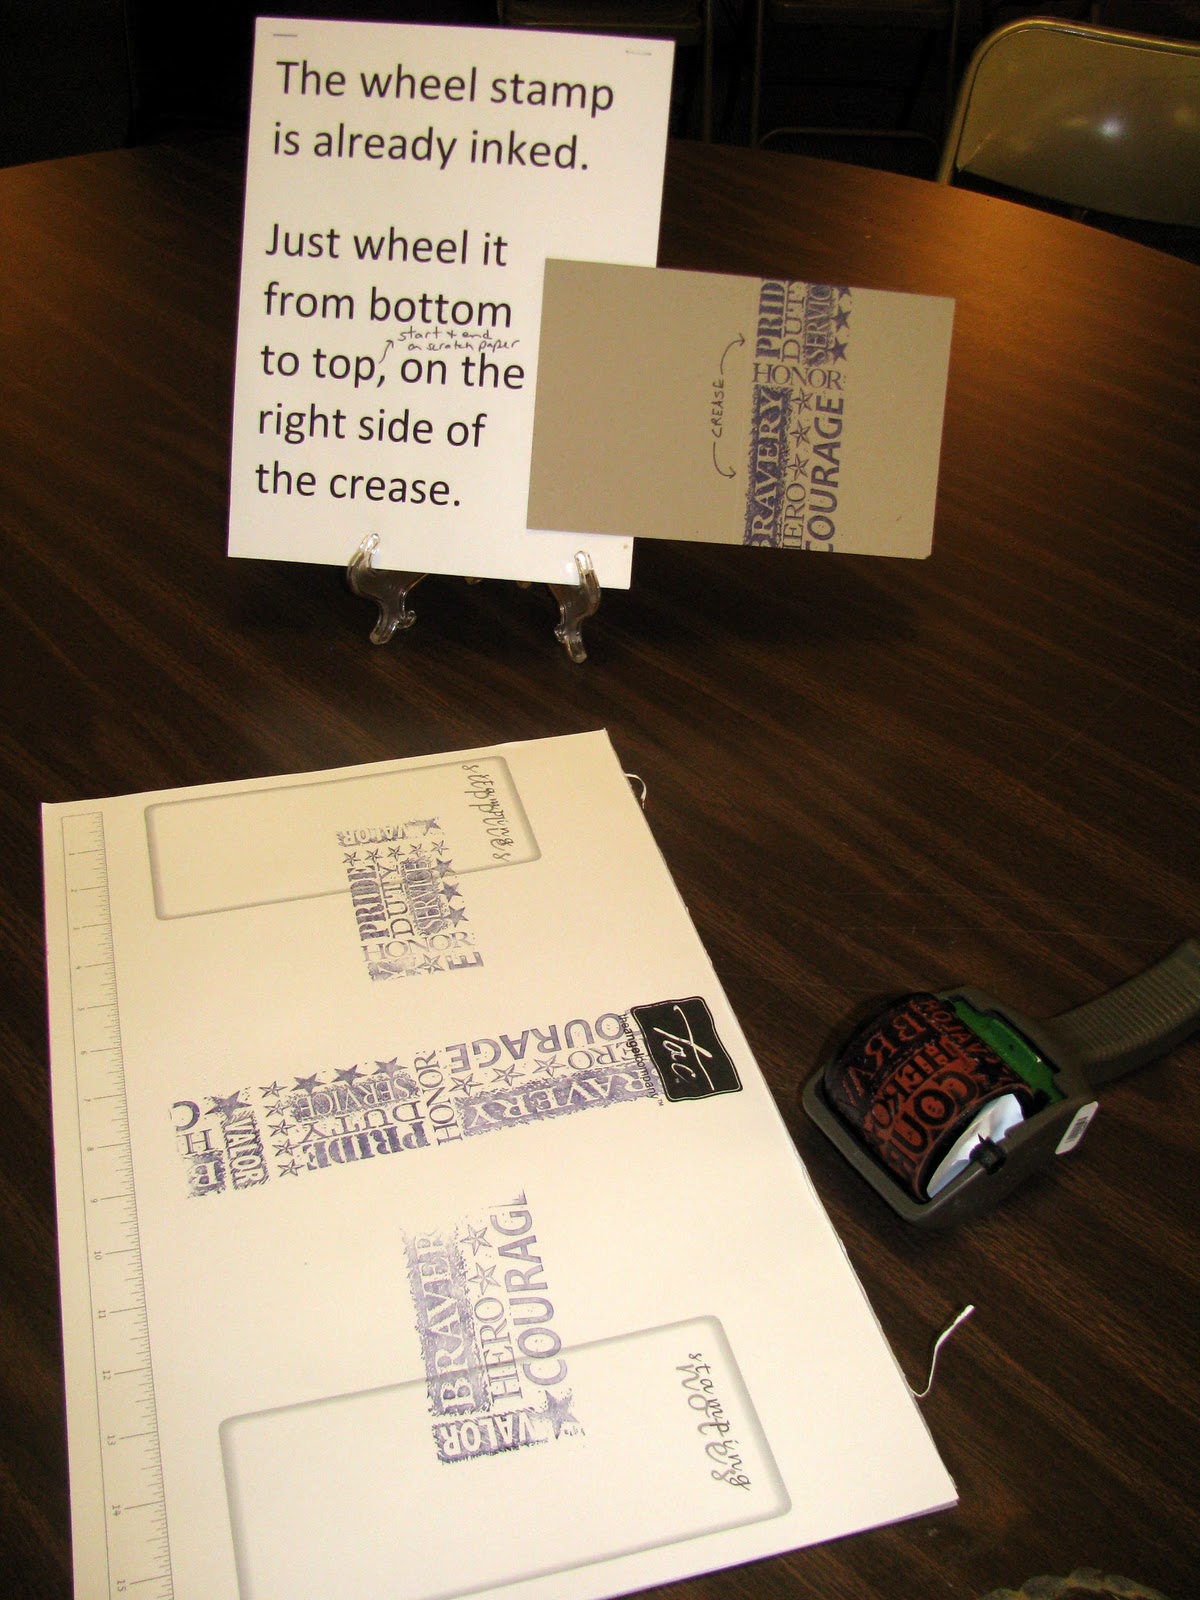
We try to have cards that use fun new toys.  I recently purchased this die set from Clear Dollar Stamps.  Check out their display of all of the fun uses.  The card also uses a coordinating stamp set from Clear Dollar.


Be sure to remember absolute beginners.  This card does have a Cuttlebugged background but I find that new stampers get very excited when they run something through the Cuttlebug and see the texture!  This card just involves a basic stamp, an embossing folder, two punches and a simple knot in the ribbon.


We ask that each designer create card kits with all the supplies pre-cut and ready to go.  Usually a card's worth of supplies fit into a pencil box or an oversized pencil box.  (FYI - I always take my Cuttlebug machine along with me because I use so many embossing folders or die cuts.)  Don't forget punches, special adhesives, etc.

Pre-cut and ready to go!

Boxed into an oversize pencil box.


Here's another fairly simple card.  This card has some coloring with Copics.  Our group LOVES to color.  I think it takes them back to their childhood!  Cards with coloring are always the first ones that are made.  This card also uses a "cheater's bow" because nobody that I work with likes to make real bows!  ("Cheater's bow" instructions follow the pictures.)


I'm looking at this picture and
realized that I didn't add the
stamps.  I guess I better do that
before I box everything up!!

Boxed into a regular size pencil box.

Here are the pictures describing how to do a "cheater's bow".  This would definitely be better in video format but I don't have the ability to make a good video!!

Cut a strip of ribbon that fits across
your card front plus another few inches.
Tie the first part of a knot...just
as if you were tying your shoes.

Before you tighten the knot, slip a
piece of ribbon through the knot.
(The turquoise is just for contrast!)

Tighten the knot.  You can then trim the
edges of the "bow" piece.  Wrap the
ends of the long piece around the
back of your paper and adhere with
a piece of tape.


Blue and Brown Watercolored Bird:
(Set 265 for my 2010 goal of making sure that all of my SU sets see ink.)

The colors for this card come from the color throwdown.

  • Stamps: Stampin' Up Every Moment
  • Inks: Stampin' Up Chocolate, Marina Mist, Bashful Blue, Versacolor Pigment Black
  • Paper: Stampin' Up Chocolate Chip, Marina Mist, Bashful Blue, watercolor paper
  • Accessories: Stampin' Up embossing folder, Marina Mist taffeta, copper cord (retired), scalloped border punch; Mark Enterprises Ultra Detail Copper Embossing Powder, misc copper brads

Reverse Prints Thank You:
(Set 266 for my 2010 goal of making sure that all of my SU sets see ink.)

The colors for this card come from Curtain Call Color Challenge.


  • Stamps: Stampin' Up Reverse Prints, There She Goes Here For You (background plants), Verve Celebration of Thanks
  • Inks: Stampin' Up Concord Crush, Crumb Cake
  • Papers: Stampin' Up black, white, Crumb Cake, Concord Crush, Basic Gray
  • Accessories: Stampin' Up Basic Gray Taffeta, Martha Stewart crown border punch and butterfly punch, Tim Holtz tiny attacher, gems from Michaels

Illuminated Thank You:
(Set 268 for my 2010 goal of making sure that all of my SU sets see ink.)
This is for SplitCoast Stampers Ways to Use It challenge which was to use "letters". 
  • Stamps: Stampin' Up Illuminations
  • Inks: Stampin' Up Crumb Cake, Not Quite Navy
  • Paper: Stampin' Up Not Quite Navy, Crumb Cake, Bella Bleu dsp
  • Accessories: Stampin' Up Kraft Taffeta, Antique Brads

Raspberry and Black Thank You:
This is for SplitCoast Stampers Ways to Use It challenge which was to use "letters".  I chose the use them as an accent with the text background.
  • Stamps: Clear Dollar Stamps Designer Label Additions, PaperTrey Round & Round (an anniversary gift set), PaperTrey Text
  • Inks: black and PaperTrey Raspberry Fizz
  • Papers: black and white
  • Accessories: Clear Dollar Stamps Designer Label Dies, Stampin' Up rhinestones

Thanks so Much with Greenery:
(Set 267 for my 2010 goal of making sure that all of my SU sets see ink.)
  • Stamps: Stampin' Up Eight Great Greetings
  • Ink: Stampin' Up Garden Green
  • Paper: Stampin' Up Certainly Celery, Garden Green, Pumpkin Pie
  • Accessories:  Stampin' Up oval and label punch, Cuttlebug embossing folder, gems and ribbon from Michaels

Up, Up and Away Birthday:
I was having a little mojo problem last night, then Colleen's card got me all revved up and I CASed it!
  • Stamps: PaperTrey Ink Up, Up and Away
  • Ink: Memento Black and copics, Stampin' Up Bermuda Bay
  • Paper: DCWV Citrus Stack
  • Accessories: PaperTrey Ink balloon, cloud and scalloped border dies, Nestabilities label die, Offray ribbon