Saturday, December 3, 2011

a little Christmas inspiration

I was flat on my back with the stomach flu yesterday. Between all the nastiness, I looked through my Pinterest holiday board for a little inspiration. I thought I'd share some of my favorites.


I started collecting toddler size socks a few years ago when I saw this advent calendar from Martha Stewart. I'm going to use it as a garland.


The title for this post at White on Rice Couple reads: Chocolate Marshmallow Peppermint Pops--Holiday Happiness on a Stick. I know that would be true for my oldest son, Patrick. Might have to make him a few (or a dozen) for his hot cocoa obsession. The photos for this tutorial are beautiful--go check them out.


Wool felt balls + garland = delightful. It may take me awhile to collect all the balls (they're a bit pricey), but I'm going to make one--or ten--of these. I was at Pebbles in my Pocket the other day. They carry them in individual colors (yes!). There's a special tool you need to string them. Or you can make them with this great tutorial from Whipperberry.


I love this ruffle garland from A Field Journal. I have something similar in the works for my red and white tree.


This holiday punch--apple juice, cranberry juice, ginger ale and ice (sans the vodka, please)--sounds wonderful. It was made for a July 4th celebration, but I may try it for our family Christmas dinner.


Gingerbread heads from Bakerella. These make me happy just looking at them. I'd buy a dozen for my girlies in a second.


So simple for my holiday table. (Click on photo for link.)


A simple holiday place setting from BH&G--my favorite mag.


An all white dessert table at Chickabug--so beautiful. Go check out the rest of the table.


These knitted ornaments on Etsy are too sweet. I want a few of the cupcakes for Ella's tree, the snowman for mine and a whole collection of those acorns for my fall decor. I don't knit, but Ella's Grandma Connie does. Next Christmas, maybe? The pattern is here .

Friday, December 2, 2011

A Techno Play Date!!

Sadly, I need sympathy cards for our church card ministry.  I was browsing challenges and saw soft colors at Play Date Cafe.  I paired it with the sketch at Technostamper.


These are so not colors that I would have put together, but I love how soft and gentle they are.


As I was looking through embossing folders for the first card, I found a butterfly folder that I had not yet used and thought it would look great with these colors.  It seemed a little "cheerful" for sympathy so I made it Get Well.


I also had to share some pictures of a fun moment from yesterday.  We have some very cold, snowy weather.  My oldest is in charge of taking the garbage out to the corner (which when you have 5 acres is quite a haul). He had forgotten to take it out last week so we had piles.  With his new learner's permit for driving, he decided he would load up the back of the car with trash bags and drive them out.  Made sense to us.  Somehow this is what happened...

Front end in the ditch!!  The truly inexplicable part of this is that our driveway is about 20 yards to the left of where he is, so it's not like he shot out of the driveway too fast and ended up in the ditch??!!


Then he had to come get Dad to help him.  Can you imagine how mortified he was to come tell Dad?  Of course, I grabbed my camera.  Andrew is actually walking from our driveway in this picture, so you can see how odd it was that the car is in the ditch almost by the neighbors house??!!


It turns out that after he unloaded the trash, he tried to U-turn so he didn't have to back down the driveway.  You can tell that the road is very icy - so he just slid right off!


Scott just pulled forward a little bit for traction and it came right out!  But it sure is going to be fun teasing Andrew about this over the years.  (And clearly we have to teach some snow driving!)

We are going to head up to our mountain place a little later today so I won't be back until Monday.  We are thrilled because the forecasted high in the mountains is 12F and the low is -9F.  We are a strange family that that excites us, aren't we??
  • Stamps: Stampin' Up Kindness Matters (butterfly), Perfectly Penned (Get Well), All That Scraps Sympathy Sentiments
  • Paper: Stampin' Wisteria Wonder, Groovy Guava, Crumb Cake, Soft Suede
  • Ink: Stampin' Up Wisteria Wonder, Groovy Guava, Soft Suede
  • Accessories: Cuttlebug embossing (leaves), Darice embossing (butterflies), Stampin' Up embossing, (stripes on fence), Stampin' Up Scallop border punch, Nestabilities oval and scalloped oval, My Favorite Things die (leaf), misc pearls and gems colored with Copics
Technostamper is the fun challenge that lets me show you all the other entrants.  Remember, you have to go the blog if you want to enter yourself.

Thursday, December 1, 2011

Last but not least a sweet Christmas treat! ( peppermint candy tutorial)

First I have to say thank you to Sara! Thank you Sara for hosting another fun and awesome sew along/blog hop for Christmas and a huge thanks to all the bloggers that put in their time and effort for some really fabulous blocks!!!!


Mine is the last block for the 12 Days of Christmas Quilt a Long.  I hope you enjoy making it :o)


I decided to do the peppermint candy. My great grandmother Bubba, her given name was Elvie, would always have hard candy at her bedside. The kids would go and sit with her, play Hi Ho Cherry-O, eat hard candy and ask her to take her false teeth out. This was before cable and when she did it was a great thrill!

Christmas I was allowed to spend a bit of extra time with my Bubba at her bedside with her loving smile, kind words,and hard candy so here is my Christmas candy peppermint block...


If you have Go! Baby, these are the inner quarter circles of the drunkard path, if not 


Here is an easy way to make them

4in square piece of paper


Mark 3 inches up and 3 inches over


find something in your house that has a circular side big enough to connect the two marks, I used a cute little planter I bought at Lowe's on clearance!


It will be close to perfect ;o)

I used a rotary cutter ( for paper only of course) to cut it out, and there is your quarter circle!!!!


Match up one print and one solid and sew together


When you have four completed, they should look like this

Line them up

and sew

After they are together ( I changed colors to keep you awake ;o), Cut down the center both ways

You will end up with these cute guys!


At this point make sure you have the right combo of print/solid


Sew the sides of two quarters together to make half circles

Line them up as best you can and sew to make a whole

Then iron that sucker flat!

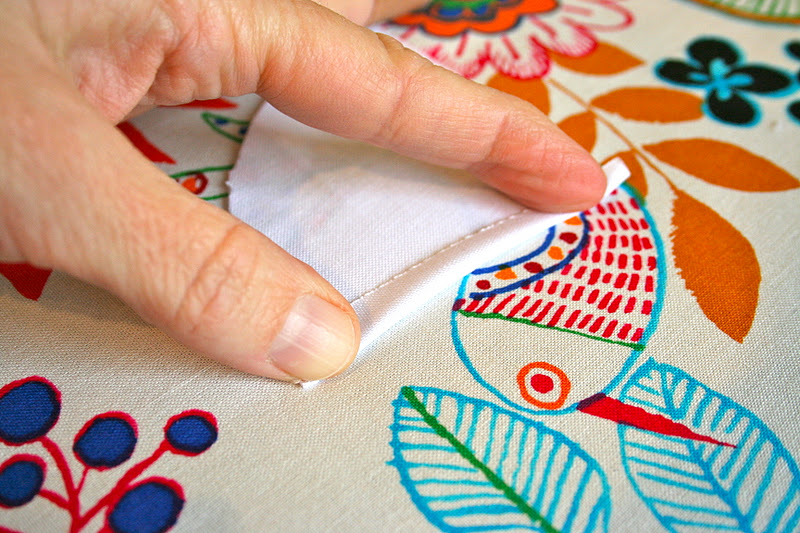
For the wrapper ends, you will need two more of the quarter circles in white

On your ironing board fold one side in


Press and repeat on the other side

Fold each side in again and press

The before and after

Stitch down the sides that you just pressed to secure them


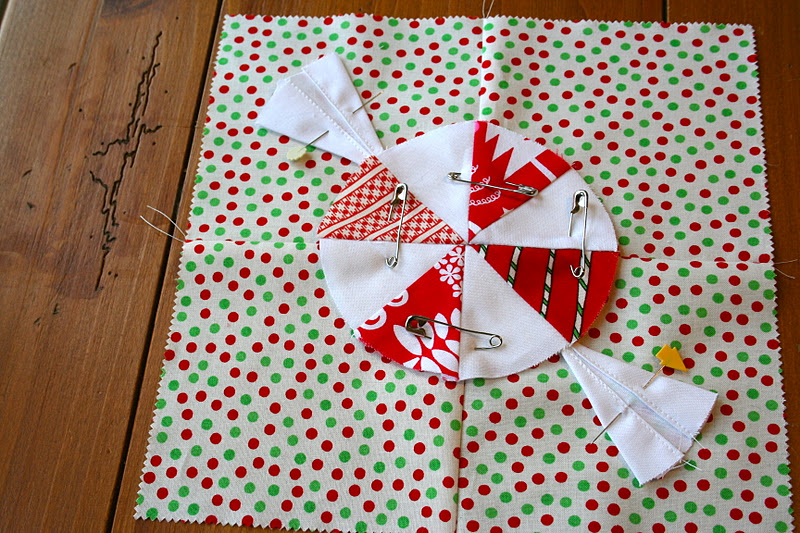
I used 5in charms for my backing only because I did not have enough of this fabric and this is what I wanted to use, you can just use a 10 inch square if you have something you like :o)


Time to put this together! You can either lay it on an angle or

straight, I prefer the angle


To give it a little more 3-d pow, I used a bit of batting behind the candy ( thank you Jeff for the idea! )

I used a little batting spray and then pinned it down


Using a blanket stitch I appliqued the candy

Then the wrapper

I finished off by stitching the wedges

The final step was adding 2.5 in white sashing around the block. It is a 13 in block so you can trim it down to what you need.


YUM! Peppermint candy!!!!


Thank you so very much for stopping by :o)


Linked to Sew and Tell Friday


and Fabric Tuesday


Kim