Monday, January 31, 2011

Fleece Navidad by Maggie Sefton

I'm trying something a little different tonight, this post is part of one of my reading challenges for this year...


The book title is listed above...this book is actually one of a sub genre of a type called cozy mysteries...I have pretty much just discovered them recently, and I a have covered a lot of ground recently! I love them.

This one is the sixth in a series, that I actually read first, so now I will have to go back and read the rest...The series features a CPA, caffeine addict, and beginning knitter named Kelly Flynne. This one is set during the Christmas season and apparently  Kelly has promised her friends to stay away from sleuthing for a while after narrowly escaping injury in the past...The setting is a lovely town and Kelly and her friends take on the local teenager and the Christmas play while trying to solve the mystery of who might be the hit and run driver that killed the local librarian. Could it really be Claudia? The woman is well liked, but her former stepdaughter is determined to prove that Claudia was responsible for her last husband's death and so the pot thickens...

This was a very enjoyable read as Kelly and her friends celebrate the season and Maggie Sefton manages to keep us guessing as she infuses the story with good humor and friendship, romance and good odl fashioned hometown Christmas.

Enjoy and Stay Pink!

Dessert Wars: Nutella & Hazelnut Caramel Corn

Sweet, crunchy, nutty, and chocolatey, this is one addictive snack that will satisfy all your cravings.  Buttery caramel corn is mixed with chopped hazelnuts and coated with a chocolatey Nutella drizzle.  A big bowl of this caramel corn would be great to serve at your Super Bowl party and/or packed up as gifts for Valentine's Day!

Nutella & Hazelnut Caramel Corn
A Stirring the Pot Original

For the Caramel Corn:
12 cups plain popped popcorn 
1 cup hazelnuts (optional)
1 cup brown sugar
1/4 cup light corn syrup
1/2 teaspoon salt
1/2 cup butter (1 stick)
1/4 teaspoon baking soda
1 teaspoon vanilla extract

For the Nutella Glaze/Coating:
1/3 cup Nutella, room temperature
1-2 tablespoons milk or cream (enough to make thin or pourable)
Place the popped popcorn into two shallow greased baking pans.  You may use roasting pans, jelly roll pans, or disposable roasting pans.  Add the hazelnuts (if using) to the popped corn.  Set aside.

Preheat the oven to 250 degrees F.  Combine the brown sugar, corn syrup, butter and salt in a saucepan.  Bring to a boil over medium heat, stirring enough to blend.  Once the mixture begins to boil, boil for 5 minutes while stirring constantly.

Remove from the heat, and stir in the baking soda and vanilla.  The mixture will be light and foamy.  Immediately pour over the popcorn in the pans, and stir to coat.  Don't worry too much at this point about getting all of the corn coated. (The caramel will become liquid-like in the oven and will be easy to mix in intervals).

Bake for 1 hour, removing the pans, and giving them each a good stir every 15 minutes (this will evenly distribute the caramel).  Line the counter top with waxed paper.  Dump the corn out onto the waxed paper and separate the pieces.  Allow to cool completely.

While the caramel corn is cooling, mix together the nutella and milk and/or cream in a small bowl until evenly mixed and smooth. When the caramel corn has completely cooled, place nutella mixture into a squeeze bottle or simply use a fork to drizzle over the caramel corn.  Place in the refrigerator for at least one hour so that the coating is allowed to firm up.
This is my entry for the new Dessert Wars, hosted by Reeni of Cinnamon Spice & Everything Nice and Christine of The Cupcake Bandits.  This month's challenge was to create a dessert using Nutella and the winner will win the fabulous gift pack you see below:


-Endless Vanilla and Cinnamon Extract

-Unlimited Layers: A Recipe for Turning Your Passion into Profits

-$50 Gift Certificate to Theme Kitchen

-$50 Coupon Redeemable for Organic Valley Products

-$50 Coupon Redeemable for Organic Prairie Products

handmade hearts....

Being the first of the month there is a new challenge up over at Show Us Your Stuff. Being February and valentines day not being very far away the first challenge is to create a layout or project using a handmade heart.
I came up with this, totally different for me but I am in desperate need of a style shake up!
I hope you will play along as there are fab prizes up for grabs and even INTERNATIONALS are welcome this month with a fab prize up for grabs for you guys too!
This is hanging on the door of my Scraproom. Lots of Hambly and Scrapware goodness here.
Do you spy that cute little newsprint banner I got that here, and if you head on over there you will see that Gail is having a little give away, tell her I sent you.
What do you think of my new look blog, I felt it was time for a makeover and when I got my disc of delicious family photos from here we had a wonderful shoot a couple of weeks ago (more on that later) I just had to go ahead and change.
BTW if you are looking for Hambly goodies in Australia go here or here.
Till next time...

meet karson eli carter

Our first look at our first grandson. Sean sent this to my phone. He's so excited!


Karson was born yesterday at 4:40 am Mexico time. He wasn't due for about three weeks, but is doing fine. He weighs 3 kil/.625. We converted it on the computer and it's 6 lbs. 9.8 oz or somewhere in there. Sean said Karson is 35 cm long which can't be right, because that converts to 13.78 inches. We're excited he's here safe and sound and that Daniela is doing well.

Welcome, Karson. We love you!

A Rock and Roll CAS

Today's SplitCoast CAS Challenge was the phrase "rock and roll".  I have a set from H&M Stamps (no longer in business) that I got when my youngest son and his best friend were in their "rock-on" stage.  They would go down to our barn (no animals in it - just a giant playhouse!) and do insane things like swing on a rope off of our hayloft to make their grand entrance for their rock "concerts".  I love this particular stamp because it is exactly how my son and friends ended every concert!


Now I need to rant a little on an entirely different subject.  I love winter - I really do.  But here is the scene outside my house right this minute -


That pickup truck slid right into the back of the school bus.  It is a total sheet of ice.  When I took my oldest son in to school at 7:30 this morning, I was coming UP the hill to my house and I started to fishtail and ended up briefly sideways.  It is UGLY out there.

But...school is in session today.

A few weeks ago, they cancelled school for the day.  Check out this picture of THAT day.  A picture-perfect sunny Colorado day!  And, it is important to note that I took that picture in the morning as I was watching the school cancellation notice scroll across the TV screen - NOT later in the day when the sun came out.


(FYI - that's the barn that is the site of the epic rock concerts!)

It will be interesting to see if I am still ranting tomorrow.  One of our news stations is projecting a HIGH tomorrow of -4F (after a nighttime low of -18F).  That would set an all-time record low for a record high??!?  So, all that ice out there isn't going to melt - it's just going to get bitterly cold.

OK, I'm done.  I'm happily at my computer with the fireplace going and a new pot of coffee brewing.  Life really isn't so bad.

And, here's the info that you really care about...
  • Stamps: H&M Stamps
  • Ink: Stampin' Up Summer Sun, Lovely Lilac, black
  • Paper: Stampin' Up YoYo Yellow, Eggplant Envy (retired), Black
  • Accessories: Brayer, Stampin' Up punch

Sunday, January 30, 2011

A Delightful Discovery

Each weekly Card Patterns Sketch Challenge has a sponsor - this week's is Designed2Delight digital stamps.  I had never seen them or heard of them before - but they are fantastic!!

First of all, they have wonderful images.  Check out these darling birds  - they so make me smile!


They have quite a variety of images, from an angel for "Sisters in Christ" to two darling puppies with their noses together forming a heart.  It was a "delight" to browse their stamps!

Then, they have this exciting program - each week they highlight an image.  If you make a card with that image and link it to their blog, you get the image for the next week - for free!!  How exciting!! An endless supply of fun digis and all I have to do is make cards.  Here is their link so you can browse: Designed2Delight digital stamps

And here is my card with this week's image.  (You do have to buy the image for the first week. When I went shopping for it, I ended up buying this image and 11 others!)


Just for fun, I went with a totally different color scheme.  I also added lots of glitter - the bottom snowflake border is all glittered, the white snowflake is glittered and his cuffs and muff are glittered!


Birday Party:
  • Stamps: Designed2Delight digital stamps, Stampin' Up Tiny Tags
  • Ink: Stampin' Up Markers: Kiwi Kiss, Marina Mist, Daffodil Delight and a very lt blue Tombow marker
  • Paper: Stampin' Up Marina Mist, Old Olive, Early Espresso, Basic Grey Marjolaine
  • Accessories: Stampin' Up Daffodil grosgrain, Kiwi Kiss Button, Crystal Effects on balloon, Tiny Tag punch, Cuttlebug dot folder, Nestabilities ovals and scalloped ovals
  • Challenges: Card Patterns Sketch and the Color Throwdown


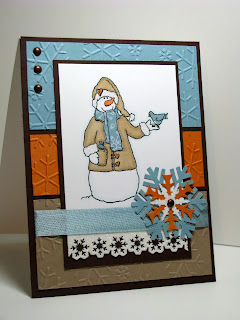
For the Birds Snowman:
  • Stamps: Designed2Delight digital stamps
  • Ink: copics
  • Paper: Stampin' Up Early Espresso, Baja Breeze, Peach Parfait, Crumb Cake
  • Accessories: Stampin' Up Baja seam binding and snowflake punch, other misc snowflake punches, Cuttlebug European embossing folder (at cropstop.com), Creative Impressions brads, Martha Stewart Crystal Fine Glitter
  • Challenges: Sweet Sunday Sketch Challenge and Stamping 411 Color Inspiration


Cheesy Baked Farro


Farro.  Have you had it before?  I hadn't, until today.  On my travels up in Cleveland, I ran across a bag of farro and bought it with this recipe in mind.  In case you haven't heard of farro before, it is an ancient grain with a nutty flavor and firm texture.  It also happens to be one of the first cultivated grains of ancient Italy.  It is used in salads, pilafs, soups, and also in place of pasta.
 I'm always a little skeptical to introduce new foods to my picky family, so I thought this recipe was perfect. A big douse of cheese is always a good way to introduce anything, right?

Cheesy Baked Farro
Adapted from Giada at Home
4-6 servings

Vegetable oil cooking spray
Sauce
4 tablespoons unsalted butter
1/4 cup all-purpose flour
2 cups warm milk
Salt and freshly ground black pepper

Farro
6 cups low-soldium chicken broth
2 cups farro, rinsed and drained
2 tablespoons olive oil, plus more for drizzling
2 cups assorted mushroooms, cleaned and sliced
Salt and Freshly ground black pepper
3/4 cup halved cherry or grape tomatoes
2 -1/2 cups freshly grated Parmesan cheese
1 cup grated Gruyere cheese
1/2 cup grated Fontina cheese
1 teaspoon chopped fresh thyme leaves
1/2 cup plain dried bread crumbs

Preheat the oven to 400F.  Spray a 9x13 inch baking dish with cooking spray.

For the sauce: In a 2-quart saucepan, melt the butter over medium heat.  Add the flour and whisk until smooth.  Gradually add the warm milk, whisking constantly to prevent lumps.  Simmer over medium heat, whisking constantly until the sauce is smooth and thick, about 8 minutes (do not allow the mixture to boil).  Remove from heat and season with salt and pepper.

For the farro:  In an 8-quart stockpot, bring the chicken broth to a boil over medium-high heat.  Add the farro, lower the heat, and simmer, stirring occasionally, until tender, about 25 minutes.  Drain if necessary.

In a large skillet, heat the oil over medium-high heat.  Add the mushrooms and season with salt and pepper.  Cook the mushrooms, stirring occasionally, for 8 minutes or until tender.  Add the tomatoes to the pan and cook for 2 to 3 minutes, until tender.

In a large bowl, combine the Parmesan cheese, Gruyere cheese, Fontina cheese, and thyme.  Remove 1 /2 cup of the  mixture and set aside.  Add the cooked farro, sauce, and mushroom mixture to the cheeses.  Stir until combined.  Season with salt and pepper.  Pour the mixture into the prepared baking dish and sprinkle with the 1/2 cup reserved cheese mixture.  Sprinkle the top with bread crumbs and drizzle with olive oil.  

Bake until the top is golden brown and forms a crust, 25-30 minutes.  Remove from the oven and let stand for 5 minutes before servings.
Notes/Results:  It looks very brown and unappetizing, but I promise that it is delicious.  I really loved the nutty taste of the farro combined with the nuttiness of the cheese.  In fact, the whole family enjoyed it.  This is something that I would definitely make again!

I made quite a few changes to the original recipe.  I halved the recipe, leaving out the mushrooms and using diced canned tomatoes in place of fresh cherry tomatoes.  I also subbed out extra Parmesan in place of the Gruyere (which I didn't have on hand).  Other than that, the only other change I made was to add more chicken stock to the farro so that the chicken stock didn't cook out and in addtion, I cooked the farro a little longer, until tender, about a total of 30-35 minutes.
Now cooking the recipes of Giada De Laurentiis

whatcha' doin'?

That's become a common phrase in our home. Of course you have to say it just like Isabelle on Phineas and Ferb. Have you seen the rodeo segment with the song, "Izzy's got the frizzies" at the end? HILARIOUS!

So, we've been working on another cuddle quilt. This time it's for a B-0-Y. Not just any boy, our new grandson. Yep, Sean and his wife, Daniela, are expecting. Any minute now actually.

Daniela, STOP reading here or you'll spoil the surprise!


I'm using another Riley Blake line of fabric called "wheels".


Not only is it so darn cute--love the colors--but it's sounding like little baby boy Carter's name is going to be Carson. CARSon--fun, huh?


When I said "we" have been working on the quilt, I meant it. My little side kick, Elles, loves to play with the scraps and have her turn sewing some together. I love it.


I'm using the same brick pattern as the girl's quilts. It's so simple and I love how it shows each of the fabric patterns. I did make the blocks a tad bit larger for this one.

A couple tips I've learned from my seasoned quilting friends that have been very helpful:

Tip no. 1: {Marina} If you're working on a larger project (like a quilt), pre-wind a few bobbins so you don't have to stop in the middle of sewing to do it.

Tip no. 2: {Maggie} After you've laid out your quilt in the pattern you want, take a photo. If you lose your place or things get mixed up by accident, you can refer back to it. I've used this tip a lot more than I thought I would. I also pin my pieces for each row together and attach a post-it with the row number written on it.

Happy sewing! I'll share the finished quilt when it's done.

Saturday, January 29, 2011

Happy Pink Saturday!!


Pink is a very special color, it represents hope, joy, and love!

Here is my Pink Saturday offering for this week!
Aren't they lovely?

Stay pink!!

PS...If you'd like to join in on this very pink endeavor then just click on the Pretty  Pink Saturday button above and visit Beverly...it is all right there!!

Friday, January 28, 2011

Bailey Helping me with Grants...


                   Still helping...


                         Uh oh, he hears something...


Wait...Bailey likes this one!

Bailey decides to stand guard from in front...


Whew! this review/guarding stuff is exhausting...


Stay Pink!!

French Fridays with Dorie Rewind: I'm a Month Behind!

So I'm literally drowning in recipes, but that really isn't a bad thing, right?  I'm a month behind on French Fridays with Dorie, so this is actually December's monthly roundup (minus the speculoos, which I didn't make).  Surprisingly enough, my very favorite recipe of the bunch was Dorie's Spiced Butter-Glazed Carrots.  The carrots are cooked until tender and glazed in a wonderful combination of onion, ginger, garlic and cardamom seeds.  As a lover of cooked carrots, these were some of the best I've ever had.
No one else in my family likes cooked carrots (I told you I lived with a bunch of crazy folk), so I just made a half batch.  I had them as a side dish for dinner one night and then ate the rest of them for lunch one day.  Just me and a plate of carrots.  I felt virtuous, for once.
I've done an obscene amount of braising this month, but Dorie's Go-To Beef Daube really does stand out among the others. A very robust and hearty beef stew loaded with veggies and braised in red wine.  A real winner for the whole family.  Even my picky daughter asked for more!
I usually don't have a least favorite when it comes to Dorie's recipes.  However, I really didn't care for the Leek and Potato Soup.  I think the recipe was written well enough.  It was really more of a personal thing.  I'm thinking that maybe I'm not the biggest fan of leeks.  Not sure.  Either way, I jazzed mine up with some extra buttery croutons, which made the soup MUCH tastier.

And, finally, Dorie's Sweet and Spicy Cocktail Nuts.  I made the recipe two times and both times they disappeared quickly.  The first time I made them according to the recipe, with chili powder, cinnamon and a dash of cayenne.  We loved them!  The second time I made them with only cinnamon, sugar and a sprinkling of cardamom.  We loved those too!  I think it's safe to say that Dorie's Sweet and Spicy Cocktail Nuts are a winner.  I can see myself making them many times in the future (almonds and pecans are my favorite)! 

Now onto next month!  Hopefully I'll have a chance to catch up.

I hope you all have a great weekend!

Thursday, January 27, 2011

Follow Friday 40 and Over!!

Welcome to the 35th edition of the   
Follow Friday 40 and Over!! 

Are you a blogger over 40? Yeah, welcome to the club!
Please join in the fun and get to know your fellow bloggers!!


The RULES to join in are very simple!

1. Grab the button
2. Add your link to the list
3. Visit as many other blogs as you can
4. Follow the ones you like (and comment on their blog to say that you are following)

NOTE:  PLEASE leave your blog address when you leave a comment!!  I have had several people wanting to follow back but the blogger can't always be found through the google info page!!

This list is new each week. The links do not carry over. Please link up  each week for new participants to find your blogs. It will be visible all week to visit  the blogs listed. 


While you are here, make sure you check out the
Over 40 Blogger List!!

Be sure to join if you haven't already!


HAVE FUN! Stay Pink!

Thursday Friends Cafe Blog Hop

Welcome to the "Thursday's Friends Cafe!"  

(hosted by Deb of Menopausal New Mom and Tammy's Two Cents)


  • Just a few reminders on how the "Cafe" works.
  • Follow the two hosts Deb and Tammy
  • (pre-requisite for qualifying for guest host)
  • Add your name/blog to the list
  • Follow as many participants you want
  • (be sure to comment so they can follow you back.)
  • Most importantly:  HAVE FUN!
Please leave me a comment so I know you are following...
ALWAYS follow those who make comments!


Our Guest Host this week is
of


Please stop over and say "Hi" to Michelle
 and
 don't forget to hit that follow
button while you're there!!

This is the BLOG HOP!!

pinked felt wreath

I saw this felt wreath on The Idea Room blog and loved it! I ran out and purchased the supplies and sat down to cut out a lot of 3" circles from felt.

I couldn't wait until February to hang it, so it's on the mirror over the fireplace already. This project is super simple and doable and looks beautiful. I've gotten a lot of compliments on it. After my crafty girlfriends saw mine, we made them for craft group.


Here's a quick tutorial of my version. I changed things up just a bit. I love anything with scalloped or pinked edges, so I cut my circles with pinking shears instead of regular scissors. I love, love, love the texture it adds.


SUPPLIES:
Styrofoam wreath
I used a 10" circle wreath so it would fit nicely on my mirror. Use an "extruded" form. It's more dense than the more hole-y styrofoam and the pins will stay in better.

One yard of 72" wide heavy-weight felt 
Definitely use a heavier-weight felt. It's more expensive, but well worth it. I found mine at Joanne's for $6.99 a yard. The lightweight felt will require you to use more, which means you'll need to cut and cut and cut more circles. The heavyweight felt also gives the wreath a more quality look.

One yard of felt was enough for two 10" wreaths--one for you and another for a special someone. Or keep them both. I'm thinking ahead and making two of many projects I make this year so I have gifts for Christmas. If you plan to make only one, purchase about 2/3 yard because the last row of circles hits the center of a yard of fabric.

3" circle template
I cut a template from chipboard and used a black fine tip marker to trace my circles onto the felt. (The top of a 15 oz. can is also the right size. Use the type of can opener that doesn't leave a sharp edge.) Cut right inside the line of each circle so no ink shows. A 10" wreath takes about 120 circles. I added another 25 on the back so the reflection on the mirror doesn't show the wreath form. My second wreath is 8" and I love it just as much.

My friend Jen made the heart shape wreath and a ball to fit on top of a candle holder. She said it took almost the entire yard of felt.

dressmaker pins
I used general purpose sewing pins--Dritz Dressmaker Pins Size 17 or 1 1/18" size.

pinking shears (or regular fabric scissors for a more ruffle-y look.)

2" ribbon
I used white grosgrain for Valentine's and will swap it out at Christmas for some gorgeous green vintage satin ribbon my friend Maggie gave me. Thanks again, Maggie!

DIRECTIONS:
Step 1: Trace and cut three-inch circles from felt with pinking shears.


Step 2: Fold  felt circle in half, then in half again.


Step 3: Pin through the bottom of the folded circle and push into the styrofoam wreath.


Tip: I've seen other wreaths and projects made with this technique. One thing I really like is when the circles go in all directions instead of just one way. So push a circle into the wreath and then place the one next to in facing the opposite direction. You'll end up with a more paisley-ish design instead of a stacked one. It also makes the wreath look fuller.


Step 4:  Add a ribbon hanger by pinning a length of ribbon onto the back of the wreath and then pinning the ribbon again back on itself to give a nice finished edge

Step 5: Hang, enjoy and take compliments graciously.

UPDATE:
My uber-creative friend, Jen Ostler, made a Halloween version of the felt wreath for our Super Saturday RS meeting. Love it!


We couldn't find a heavier-weight orange felt and it took almost an entire yard for this 12" wreath. She found the spider at JoAnn's. It was actually part of a pick, she just clipped the wire and inserted it into the styrofoam.